Cisco AnyConnect MFA Setup with Mideye on ASA
This guide describes how to configure Cisco AnyConnect SSL VPN on a Cisco ASA (Adaptive Security Appliance) to use Mideye Server for multi-factor authentication via RADIUS.
| Component | Versions |
|---|---|
| Cisco ASA software | 8.3+ (recommended 9.x) |
| ASDM | 6.x / 7.x |
| AnyConnect Secure Mobility Client | 3.x / 4.x / 5.x |
| Mideye Server | 4.3.0+ (5.x+ for full feature support) |
Feature version requirements
Section titled “Feature version requirements”| Feature | Minimum ASA version | Notes |
|---|---|---|
| Basic RADIUS AAA | 7.x+ | Stable in 8.x+ |
| AnyConnect SSL VPN | 8.0+ | |
| Dynamic RADIUS reject messages | 8.3+ (stable in 9.1.2+) | Requires PAP |
| Dynamic Access Policy (DAP) with RADIUS attributes | 8.0+ | ASDM only |
| MS-CHAPv2 password change | 8.x+ | |
| AnyConnect authentication timeout control | 8.4+ | ASDM only |
Prerequisites
Section titled “Prerequisites”- A running Mideye Server with RADIUS enabled (default UDP port 1812)
- Cisco ASA configured as a remote-access VPN using AnyConnect — refer to Cisco documentation for initial SSL VPN setup
- CLI access to the ASA via SSH, console, or ASDM
- Network connectivity between the ASA and Mideye Server on UDP port 1812
1. Add Cisco ASA as a RADIUS client in Mideye Server
Section titled “1. Add Cisco ASA as a RADIUS client in Mideye Server”Add the Cisco ASA IP address as a RADIUS client in Mideye Server, using a shared secret that you will also configure on the ASA in the next step.
See RADIUS Clients in the reference guide.
2. Create a new AAA server group using RADIUS
Section titled “2. Create a new AAA server group using RADIUS”-
From the ASA CLI, enter global configuration mode:
Terminal window Cisco-ASA> enableCisco-ASA# config terminalCisco-ASA (config)# -
Create a new AAA-server using RADIUS:
Cisco-ASA (config)# aaa-server mideye-server protocol RADIUS -
Assign the Mideye Server IP address, shared secret, and timeout:
Terminal window Cisco-ASA(config)# aaa-server mideye-server (inside) host 172.16.10.100Cisco-ASA(config-aaa-server-host)# key <shared-secret>Cisco-ASA(config-aaa-server-host)# authentication-port 1812Cisco-ASA(config-aaa-server-host)# accounting-port 1813Cisco-ASA(config-aaa-server-host)# timeout 35Cisco-ASA(config-aaa-server-host)# exitReplace
172.16.10.100with your Mideye Server IP andinsidewith the ASA interface facing the Mideye Server. The timeout of 35 seconds is required for MFA flows. -
Apply the AAA server group to your existing SSL VPN tunnel group:
Terminal window Cisco-ASA(config)# tunnel-group <your-tunnel-group> general-attributesCisco-ASA(config-tunnel-general)# authentication-server-group mideye-serverReplace
<your-tunnel-group>with the name of your existing AnyConnect connection profile. -
Write the new configuration to memory:
Terminal window Cisco-ASA(config)# write memory
3. Verify RADIUS authentication
Section titled “3. Verify RADIUS authentication”To verify that RADIUS is configured correctly, log in to ASDM.
- Navigate to Configuration → RemoteAccessVPN → AAA/LocalUsers.
- Select the Server Group and the correct server name and click Test.
- Select Authentication and type a valid username and password.
- An OTP should be delivered. ASDM will show an error message because it cannot handle RADIUS Challenge-Response:
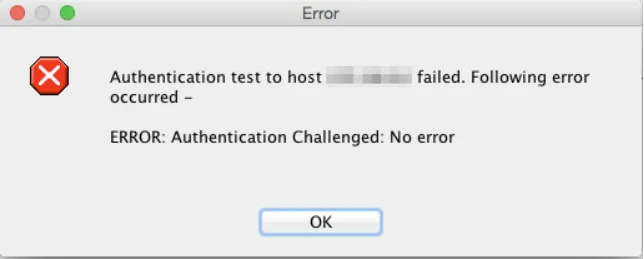
This is expected — ASDM’s test dialog does not support the Access-Challenge flow. The actual AnyConnect client handles it correctly.
4. Increase AnyConnect client timeout
Section titled “4. Increase AnyConnect client timeout”The default authentication timeout for the AnyConnect client is 12 seconds — too short for MFA. Change it to 35 seconds via ASDM.
- In ASDM, navigate to Configuration → Remote Access VPN → Network (Client) Access → AnyConnect Client Profile.
- Select the client profile and click Edit. If no profile exists, create one and assign it to the AnyConnect group policy, then click Edit.
- Navigate to Preferences (Part 2) and set Authentication timeout (seconds) to 35.
- The updated timeout is downloaded automatically when users connect.
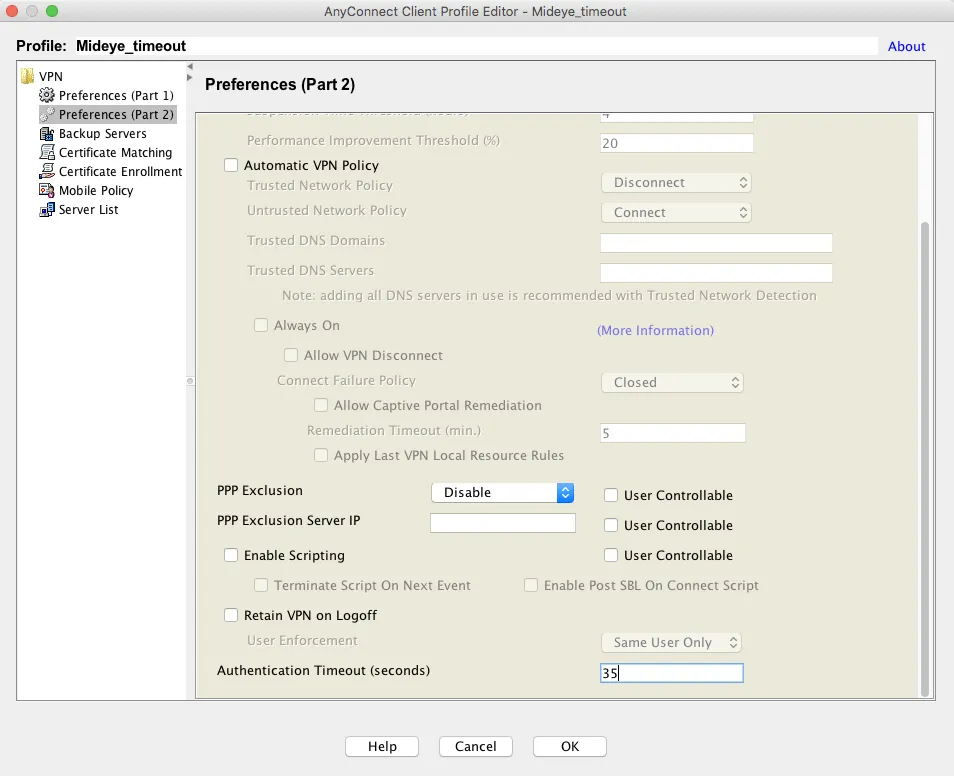
- Optionally, add a Server Listing under Server List → Add with a display name and the FQDN of your SSL VPN URL.
5. Enable dynamic RADIUS reject messages
Section titled “5. Enable dynamic RADIUS reject messages”Dynamic RADIUS reject messages display Mideye Server error messages (e.g. “Phone not reachable”) instead of the generic “Login Failed” text. This requires:
- ASA software 9.1(2) or later
- AnyConnect Secure Mobility Client 3.1.04066 or later
- PAP as the authentication protocol (default)
To enable in ASDM:
- Navigate to Configuration → Remote Access VPN.
- Click AnyConnect Connection Profiles and select the profile used for RADIUS login, then click Edit.
- Expand Advanced and click Group Alias / Group URL.
- Check Enable the display of RADIUS Reject-Messages on the login screen when authentication is rejected.
These messages can be customized in Mideye Server — see User Messages Configuration.
6. Password change using MS-CHAPv2 (optional)
Section titled “6. Password change using MS-CHAPv2 (optional)”Cisco ASA supports MS-CHAPv2, which allows users with expiring passwords to change them during AnyConnect SSL VPN login. This requires Mideye Server 4.3.0 or later and additional configuration on both the Mideye Server (see Network Policy Servers) and the ASA.
To switch the tunnel group from PAP to MS-CHAPv2:
Cisco-ASA(config)# tunnel-group <your-tunnel-group> ppp-attributesCisco-ASA(config-ppp)# no authentication papCisco-ASA(config-ppp)# authentication ms-chap-v2Cisco-ASA(config-ppp)# exitCisco-ASA(config)# write memory7. Fix special character display (å, ä, ö)
Section titled “7. Fix special character display (å, ä, ö)”By default, Mideye RADIUS clients use UTF-8 encoding. If special characters (å, ä, ö) do not display correctly in AnyConnect, change the encoding to ISO-8859-1:
- Open Mideye Configuration Tool and navigate to RADIUS Clients.
- Select the RADIUS client created for the ASA and click Modify.
- Under Client Configuration, change Encoding to ISO-8859-1.
- Click OK, Save, and restart the Mideye Server.
8. Dynamic Access Policy using RADIUS translation (optional)
Section titled “8. Dynamic Access Policy using RADIUS translation (optional)”Dynamic Access Policy (DAP) can assign per-user or per-group network permissions based on LDAP attributes translated to RADIUS attributes (Attribute ID 25 / Class). All AnyConnect users share the same IP subnet but are granted access to specific resources based on their LDAP group membership.
Mideye Server configuration
Section titled “Mideye Server configuration”Cisco ASA configuration (ASDM)
Section titled “Cisco ASA configuration (ASDM)”- In ASDM, navigate to Configuration → Remote Access VPN → Network (Client) Access → Dynamic Access Policies. Click Add.
- Enter a policy name and set Selection Criteria to User has ALL of the following AAA attributes.
- Click Add and set:
- AAA Attribute Type: RADIUS
- Attribute ID: 25
- Value: the group string configured in the Mideye RADIUS translation rule
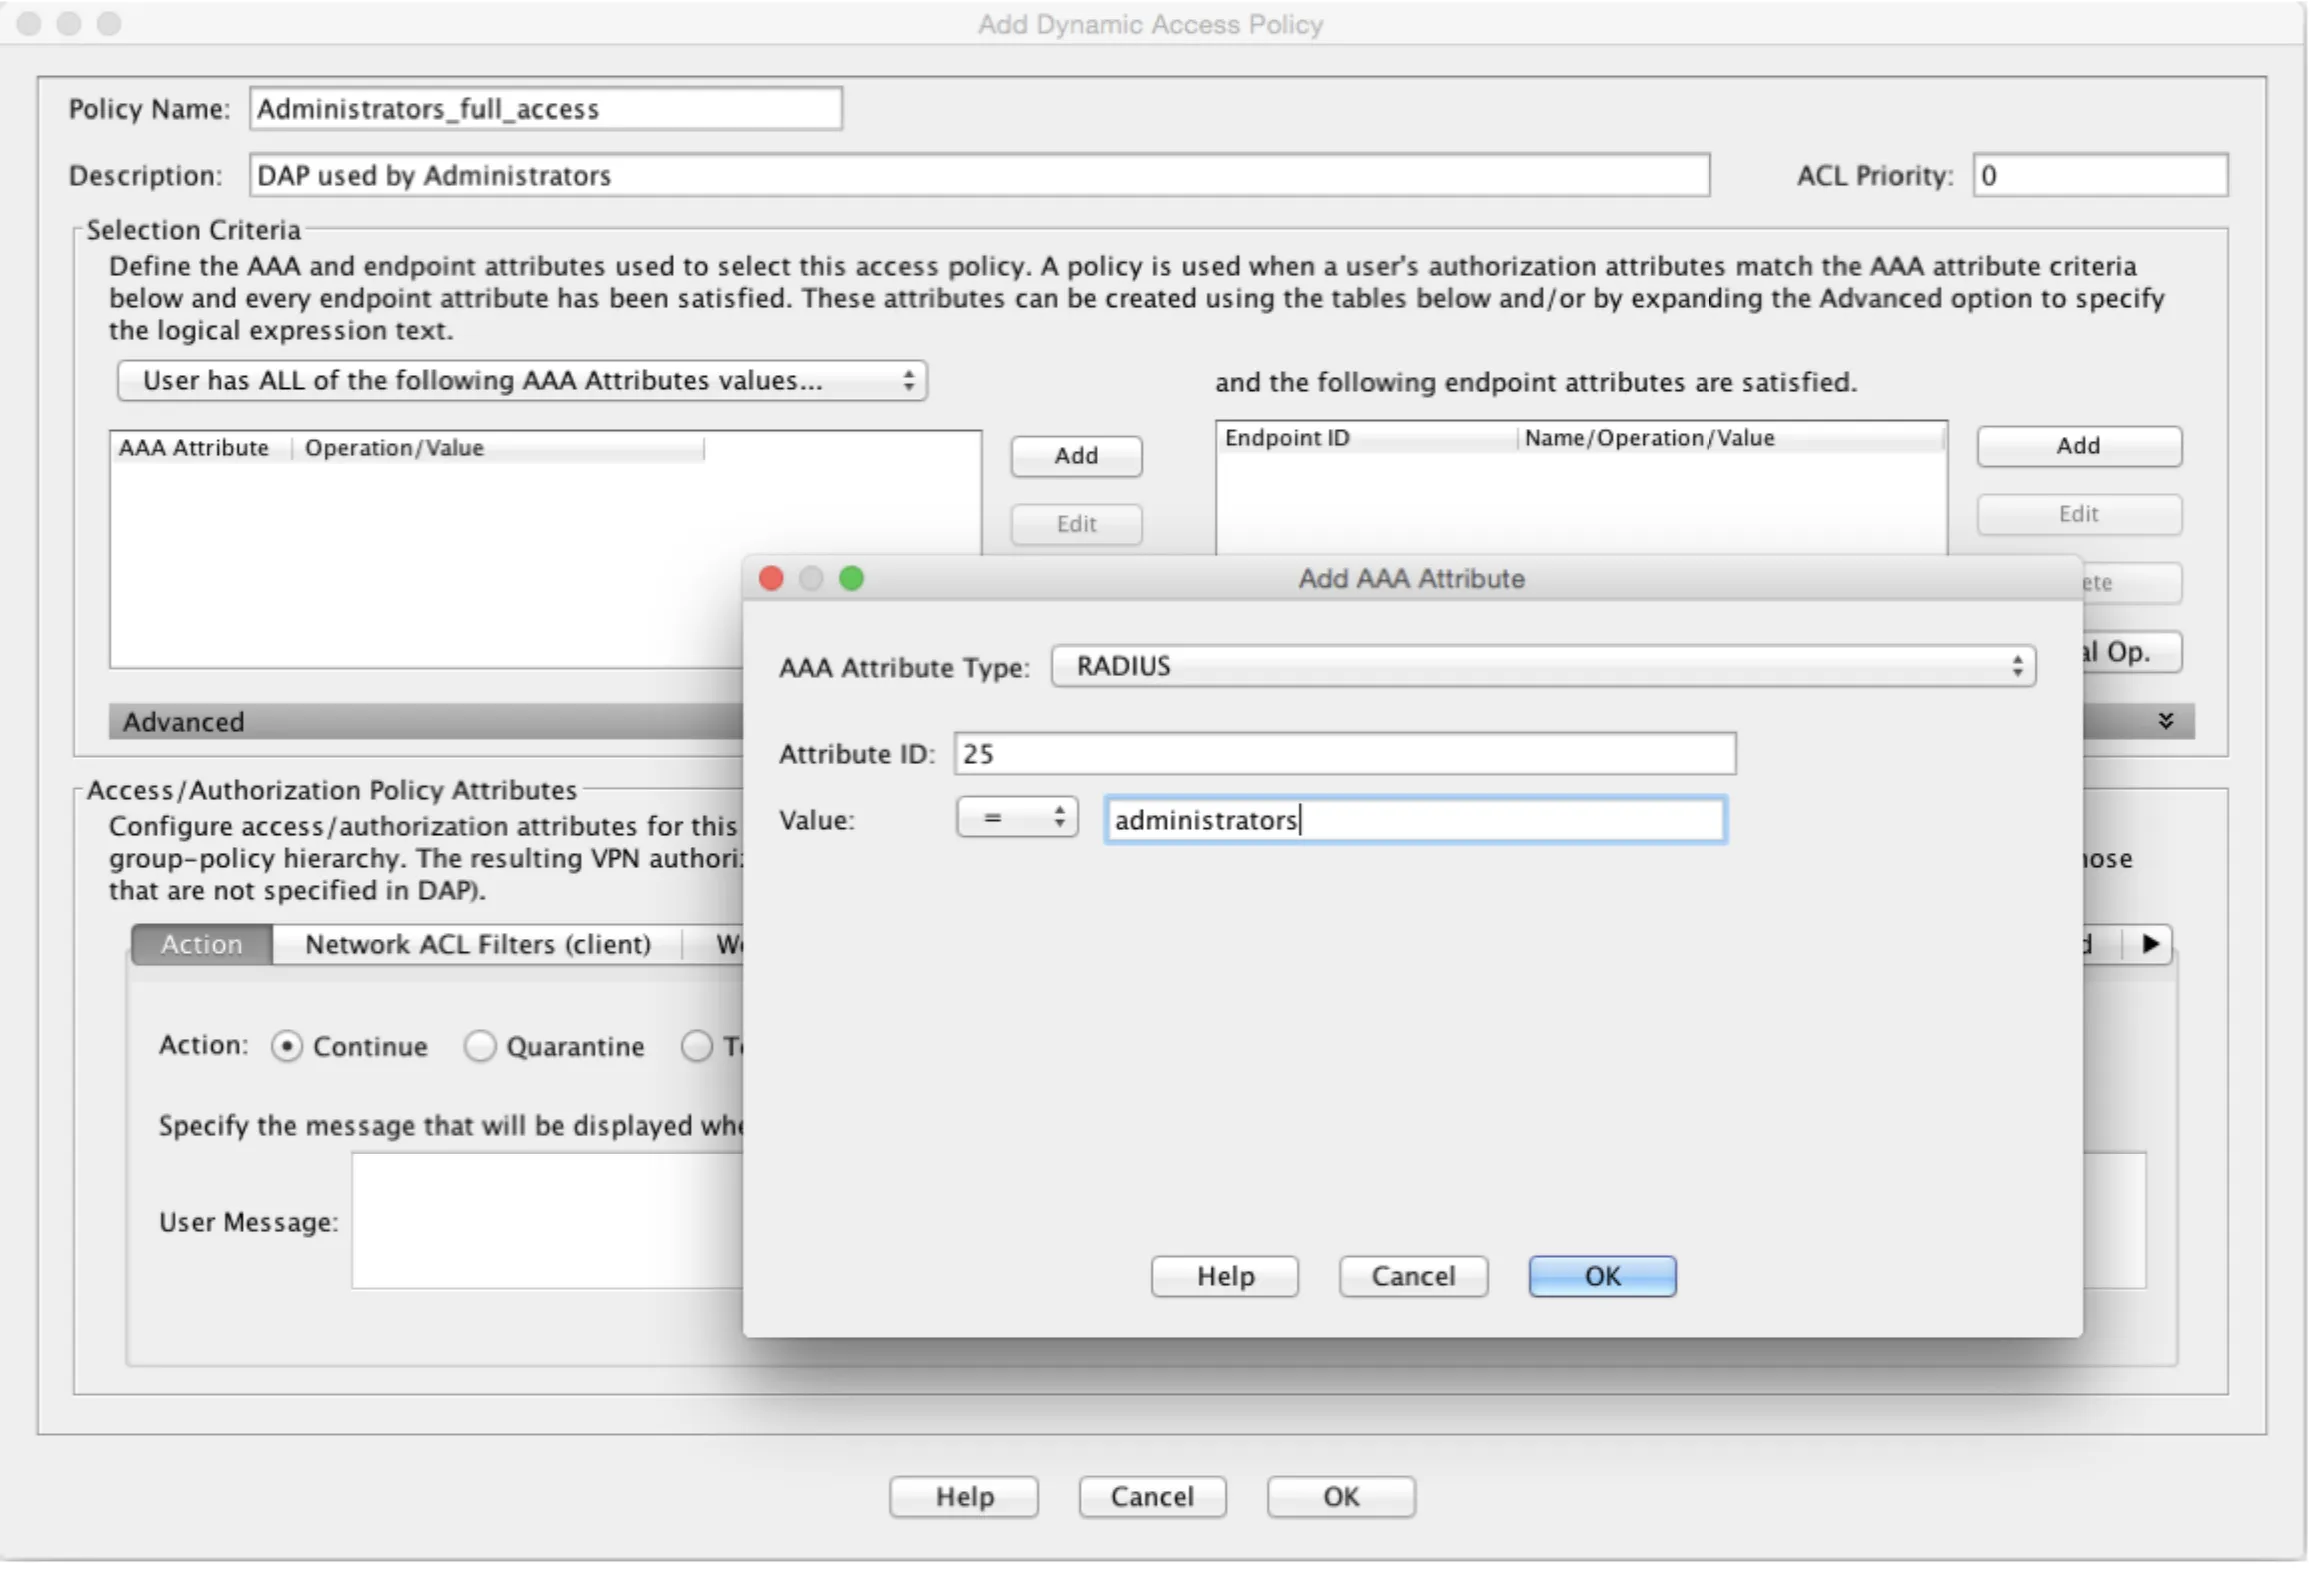
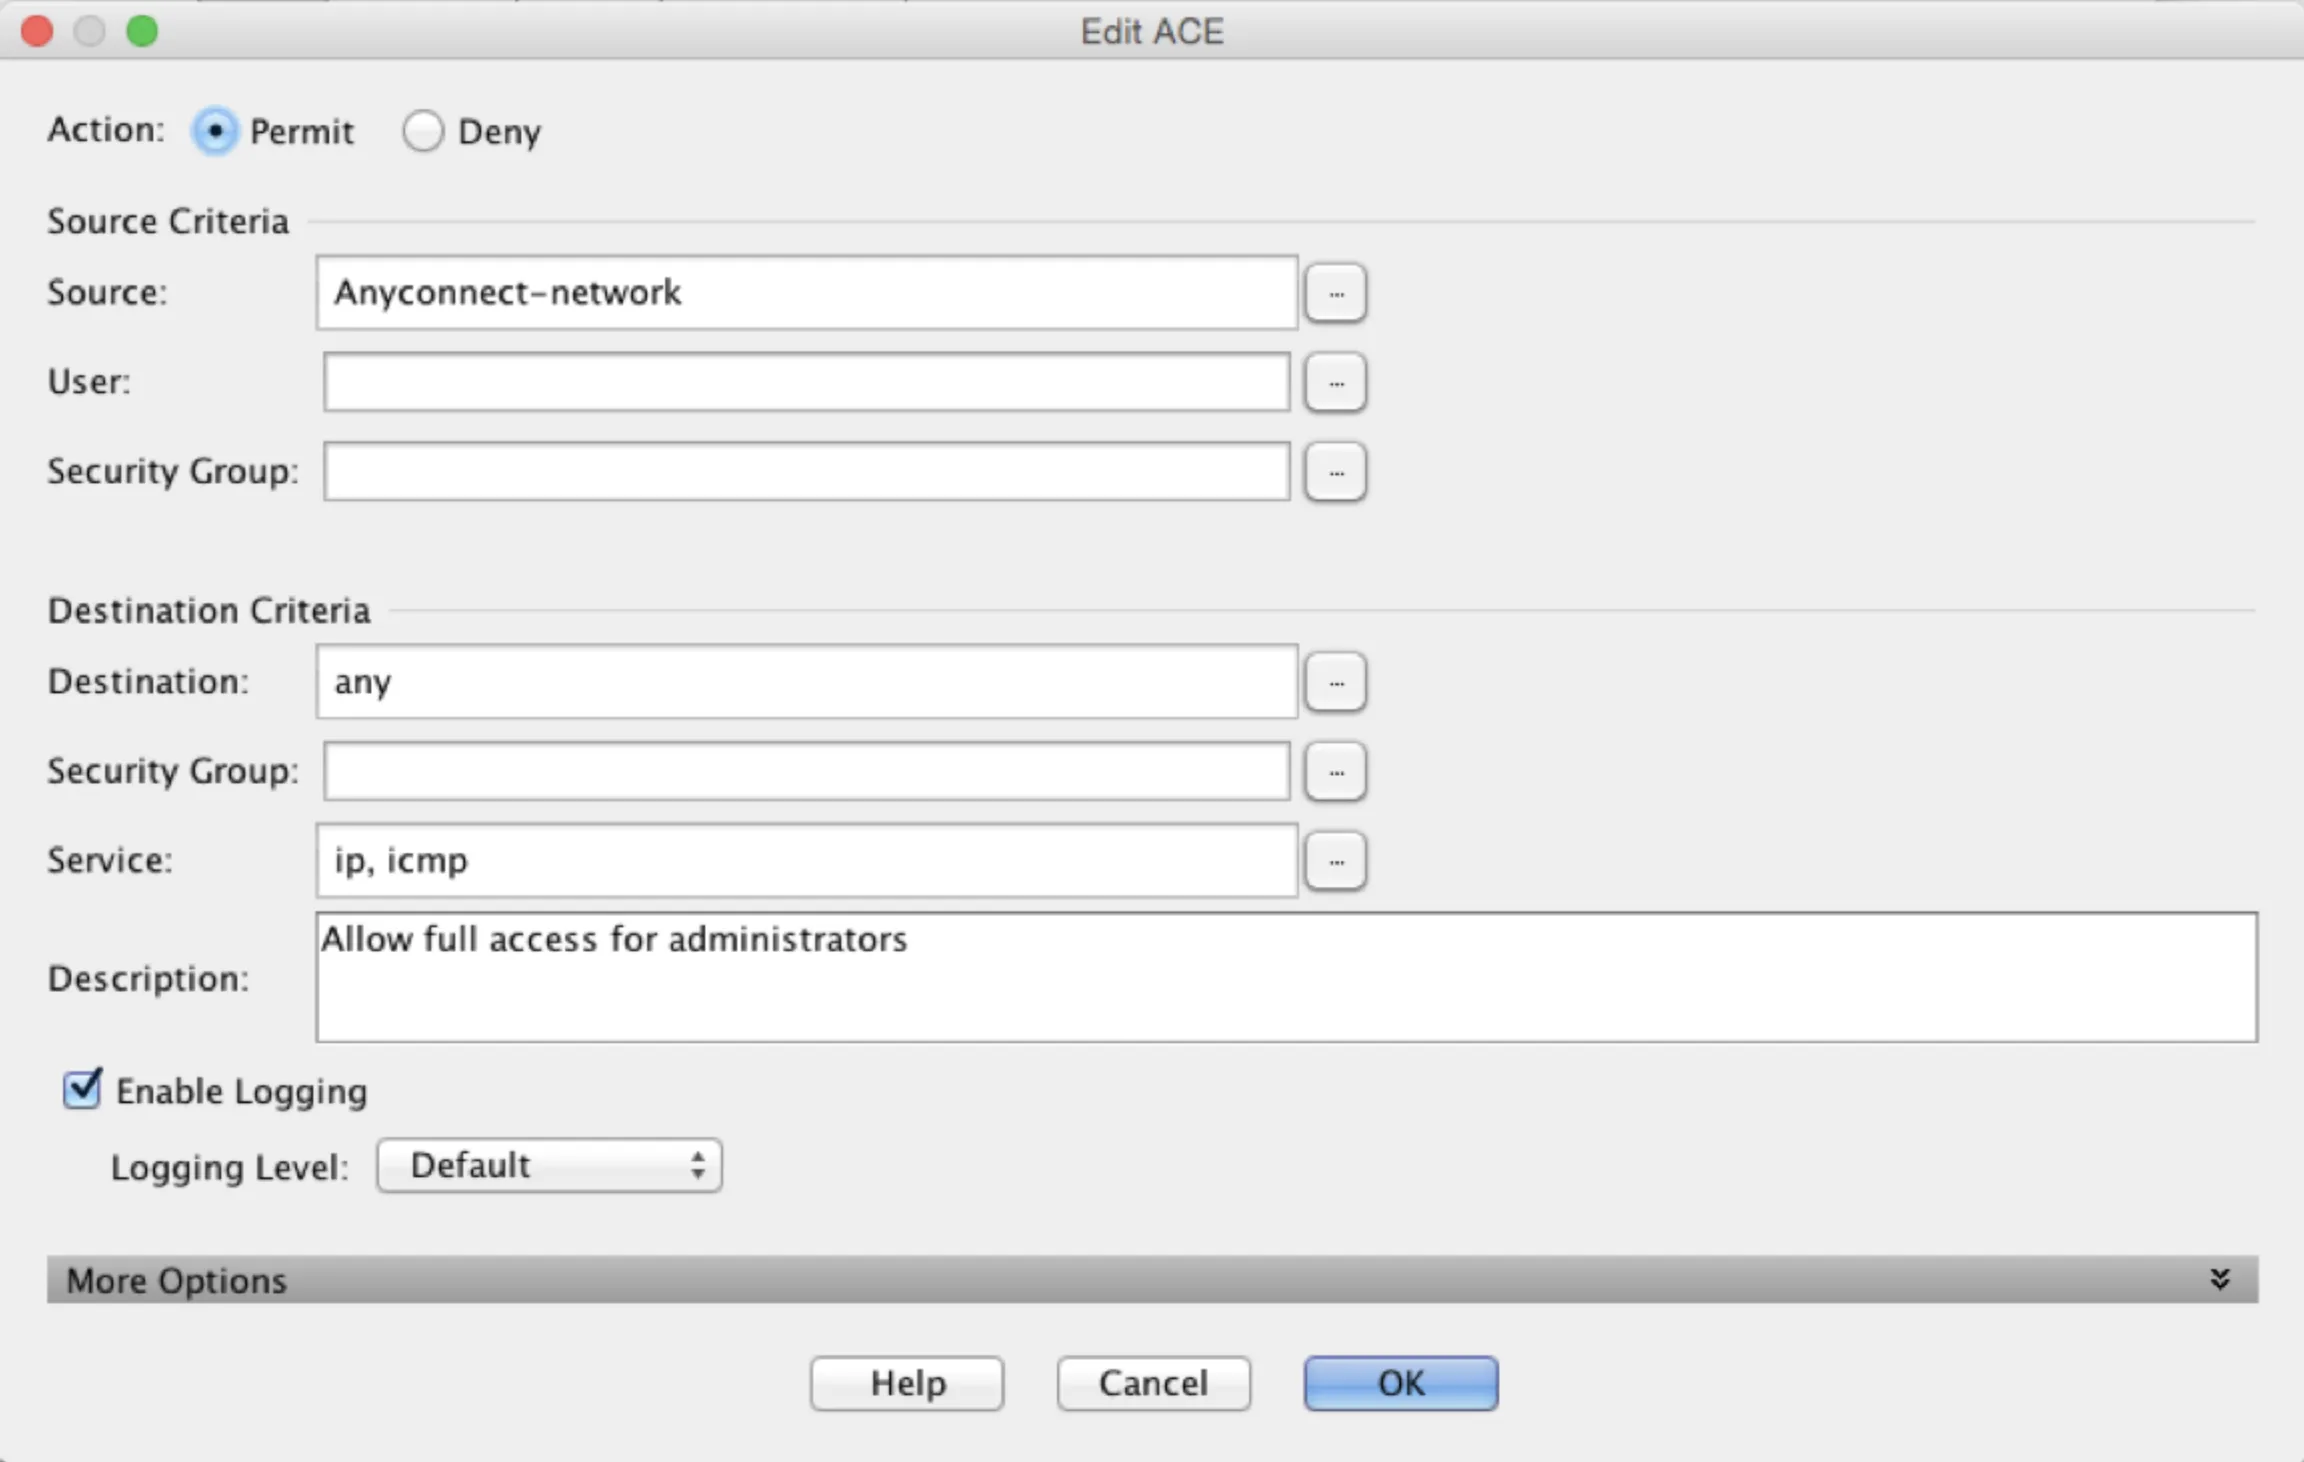
- Click the Network ACL Filters (client) tab, then Manage → Add. Create an ACL with the appropriate access rules for this group.
- Repeat for additional groups as needed.
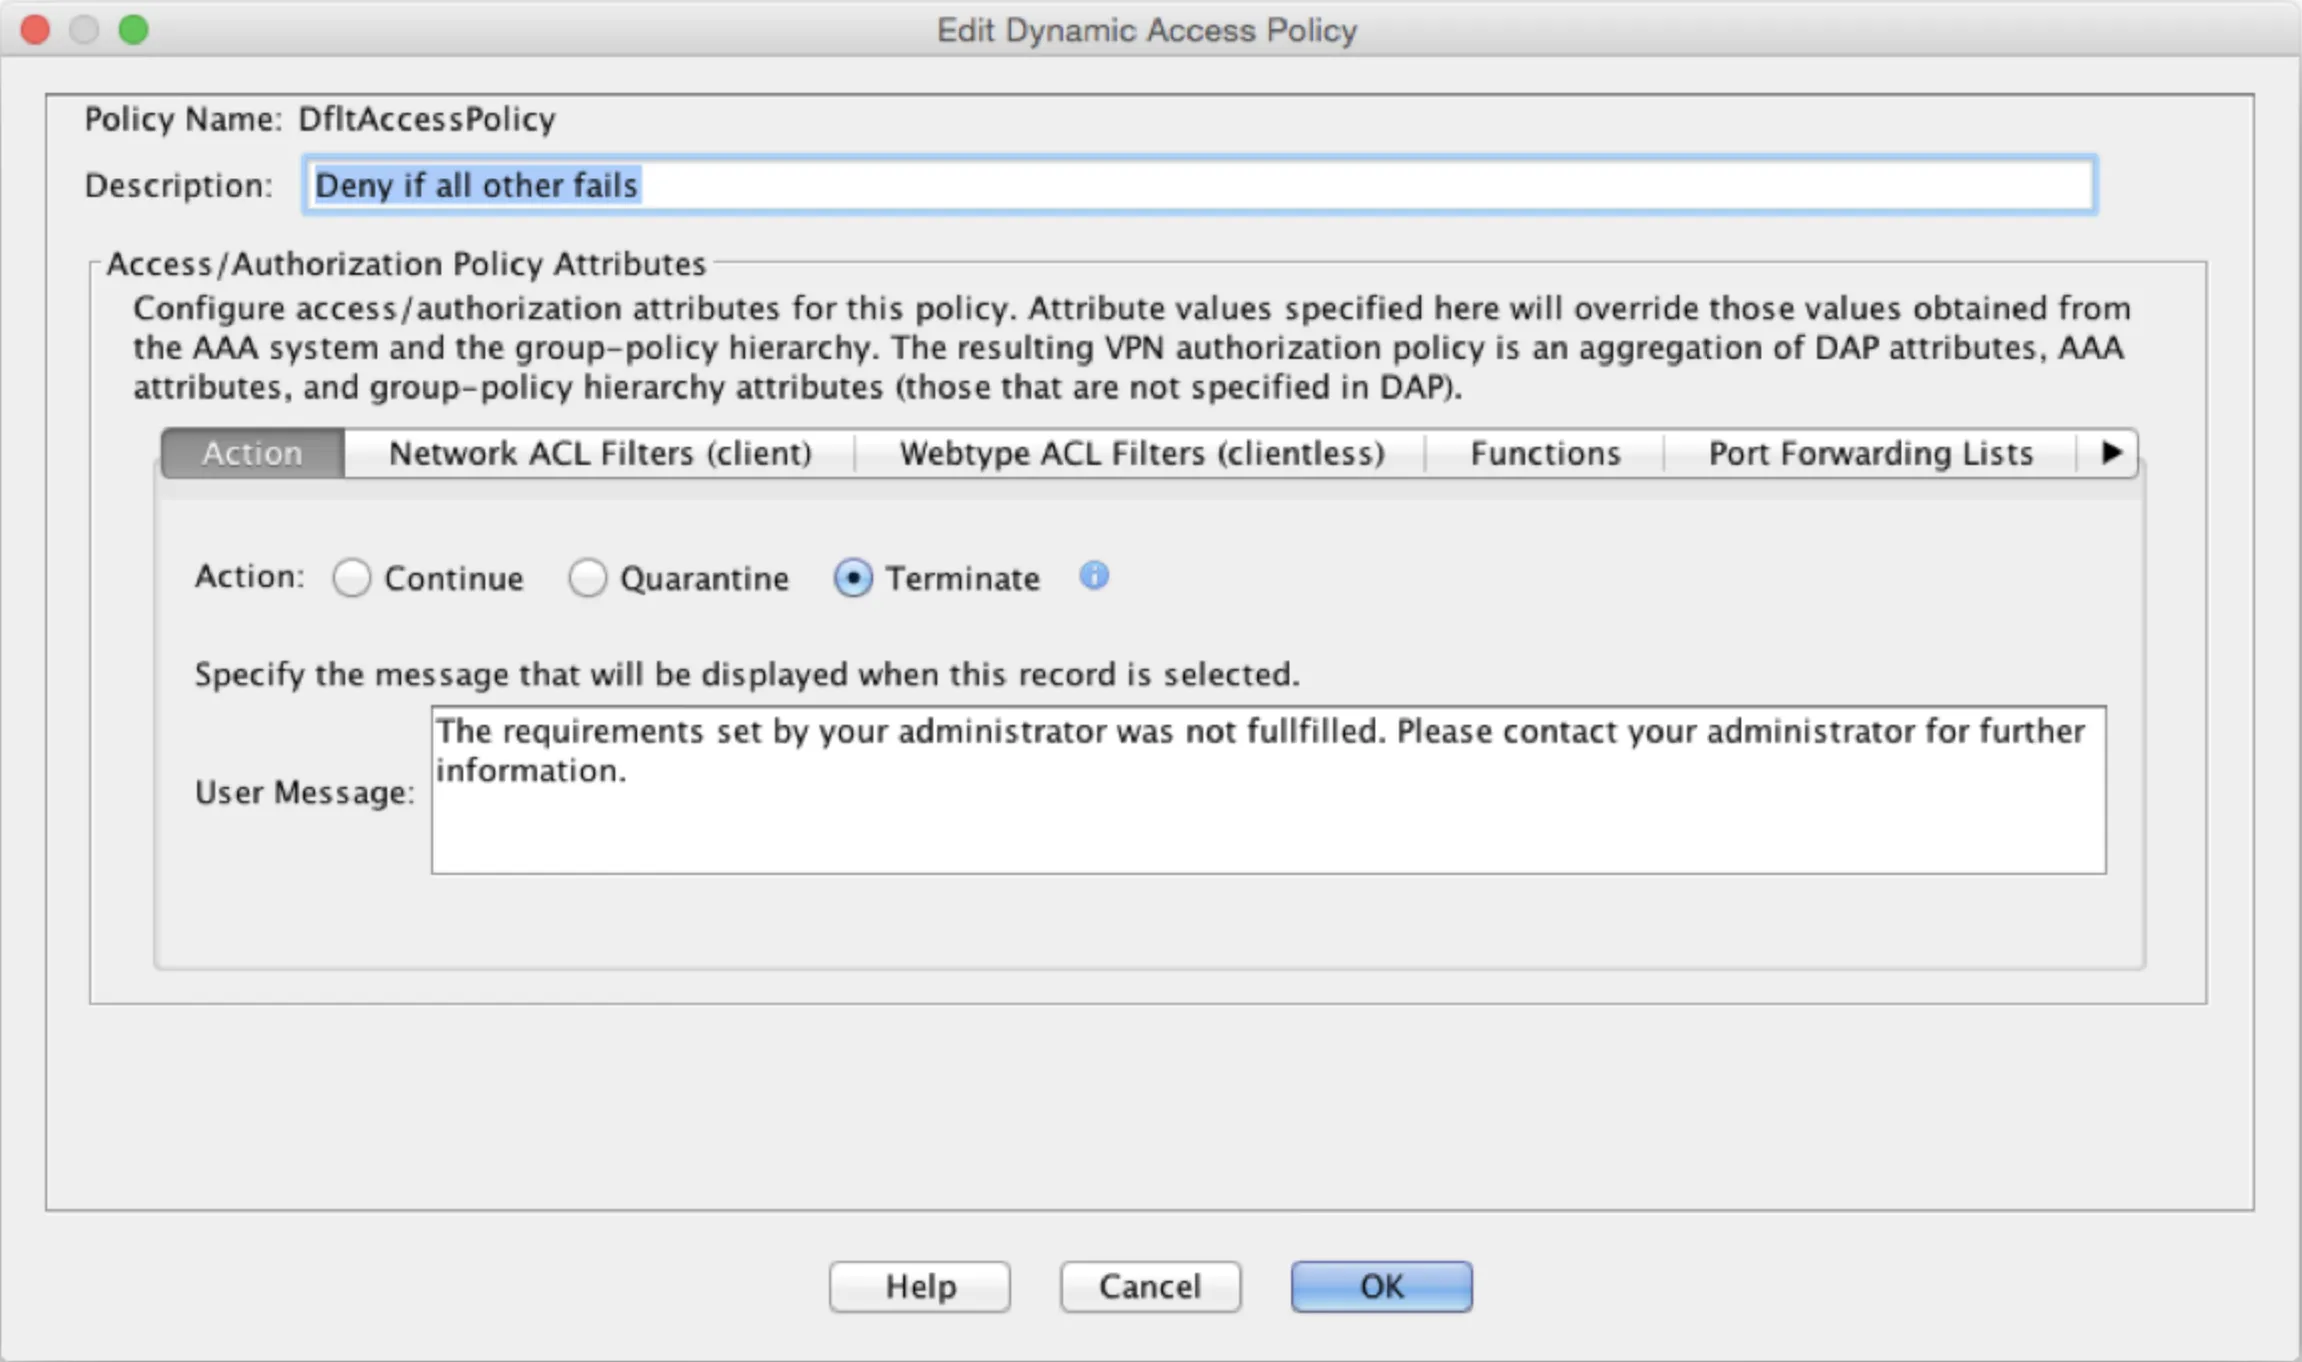
- Once verified, change the default DfltAccessPolicy action to Terminate to deny users that don’t match any DAP rule.
Troubleshooting
Section titled “Troubleshooting”| Symptom | Check |
|---|---|
| Authentication times out before OTP entry | Verify both the ASA RADIUS timeout (35s) and AnyConnect client profile timeout (35s) |
| “Login Failed” with no details | Enable dynamic RADIUS reject messages (step 5) — requires ASA 9.1.2+ and PAP |
| ASDM RADIUS test shows error | Expected — ASDM test dialog does not support Access-Challenge. Test with the actual AnyConnect client |
| OTP never arrives | Verify UDP port 1812 is open between the ASA and Mideye Server |
| Shared secret mismatch | Ensure the key in the ASA config matches the RADIUS client in Mideye Server |
| Special characters (å, ä, ö) garbled | Change encoding to ISO-8859-1 in Mideye RADIUS client configuration (step 7) |
| MS-CHAPv2 reject messages not shown | Expected — ASA uses internal error messages with MS-CHAPv2 |
Limitations
Section titled “Limitations”- Dynamic RADIUS reject messages require PAP (default). When using MS-CHAPv2, the ASA displays its own internal error messages instead of Mideye’s custom messages. RADIUS Challenge-Response messages (OTP prompts) still work with both protocols.
- ASDM test dialog does not support Access-Challenge — test results will show an error even when RADIUS is configured correctly. Use the actual AnyConnect client to verify the full MFA flow.
Related links
Section titled “Related links”Mideye documentation
Section titled “Mideye documentation”- Cisco AnyConnect with FMC — if using Firepower Threat Defense managed by FMC
- RADIUS Clients — configure Mideye Server to accept requests from Cisco ASA
- RADIUS Integrations — authentication flows and supported auth types
- Authentication Types — all supported Mideye authentication methods
- User Messages Configuration — customize RADIUS reject and challenge messages
- Support Center — contact Mideye support for integration assistance
Official Cisco documentation
Section titled “Official Cisco documentation”- Cisco ASA Configuration Guides — main listing of all ASA software and ASDM configuration guides
- Configuring RADIUS Servers for AAA (ASA 9.1) — RADIUS authentication methods, attributes, and server configuration
- RADIUS Server Settings in ASDM (ASDM 7.1) — step-by-step ASDM UI guide for RADIUS server setup and testing
- AnyConnect with RADIUS Authentication on ASA — complete AnyConnect + RADIUS configuration walkthrough