Configure Mideye MFA for Remote Desktop Services with ADFS
Requirements and prerequisites
Section titled “Requirements and prerequisites”- Mideye Server 5
- Functional Microsoft RDS-environment installed with a Remote Desktop Gateway.
- Functional Microsoft ADFS with WAP.
- WAP must be a member of the domain.
- Windows 10 client with Internet Explorer (or Edge in IE mode — other browsers are not supported)
1. Configure ADFS relying party
Section titled “1. Configure ADFS relying party”Open ADFS management console Relying Party Trusts → Add Relying Party Trust.
Create a relying party that is configured manually (without any metadata), and without any enabled support for WS-federation Passive Protocol or SAML 2.0 WebSSO protocol. Only add a trust identifier that should be the public DNS of your RD-gateway (i.e https://remoteapps.mideye.dev)
You can either create a Relying Party in the Windows Gui or in powershell.
Configure ADFS relying party in Windows gui
Section titled “Configure ADFS relying party in Windows gui”Step 1 - Windows GUI
Section titled “Step 1 - Windows GUI”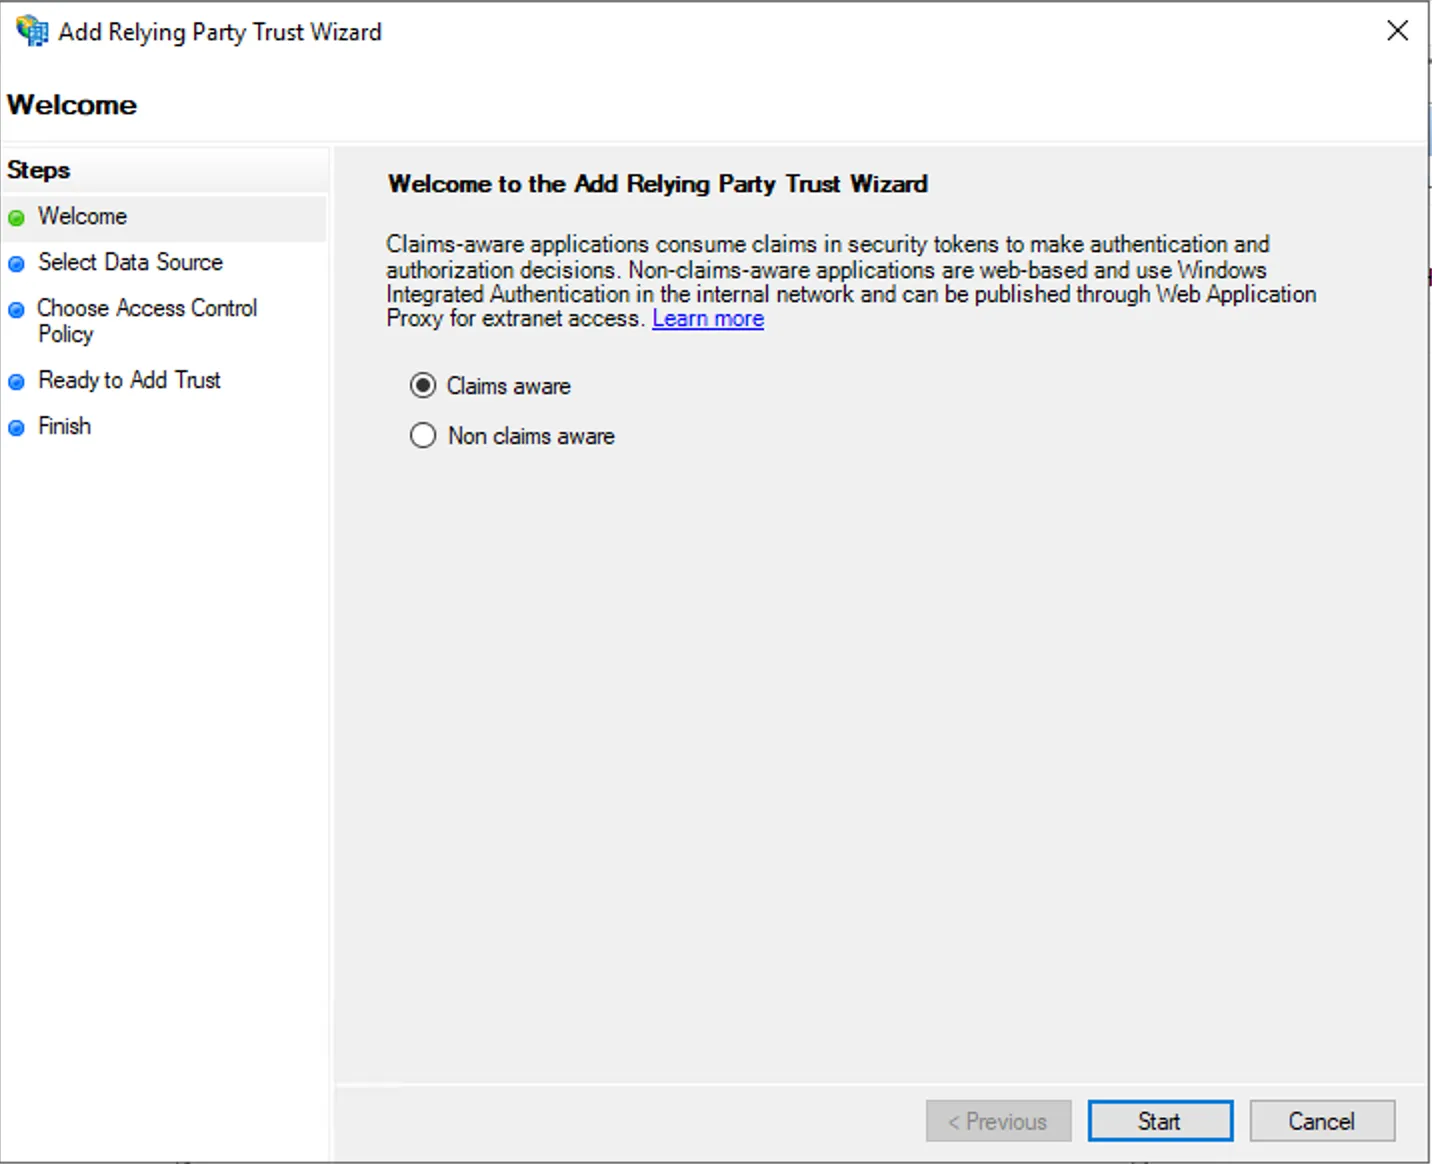
Step 2 - Windows GUI
Section titled “Step 2 - Windows GUI”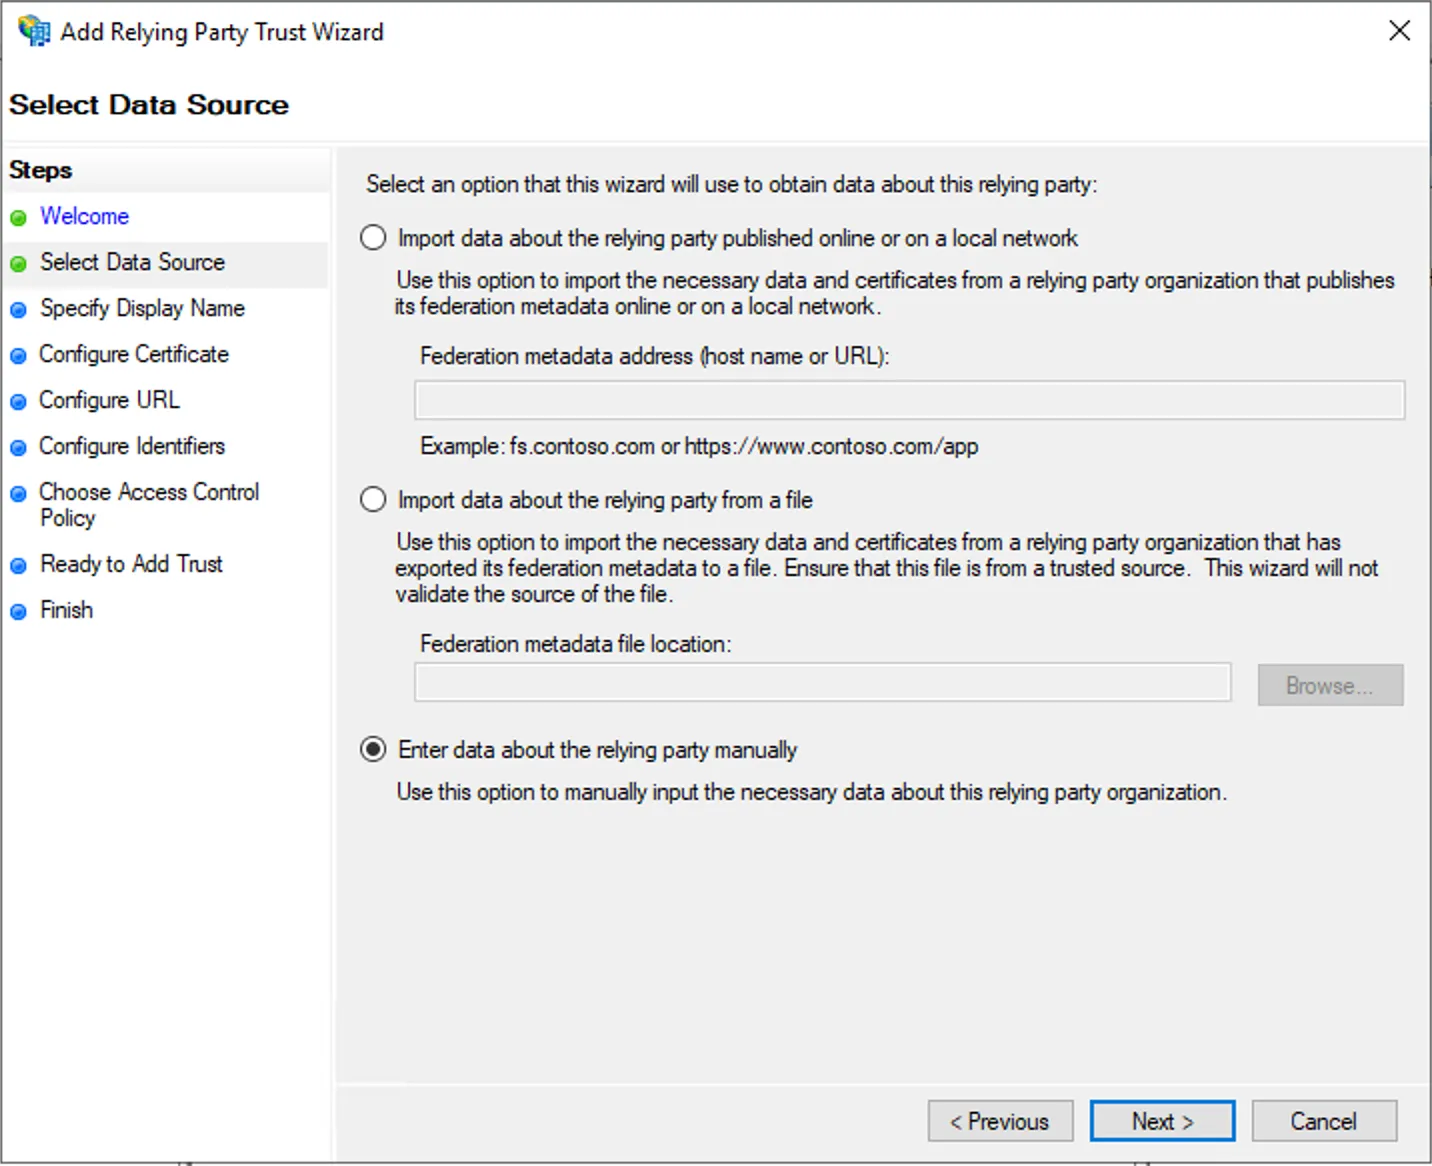
Step 3 - Windows GUI
Section titled “Step 3 - Windows GUI”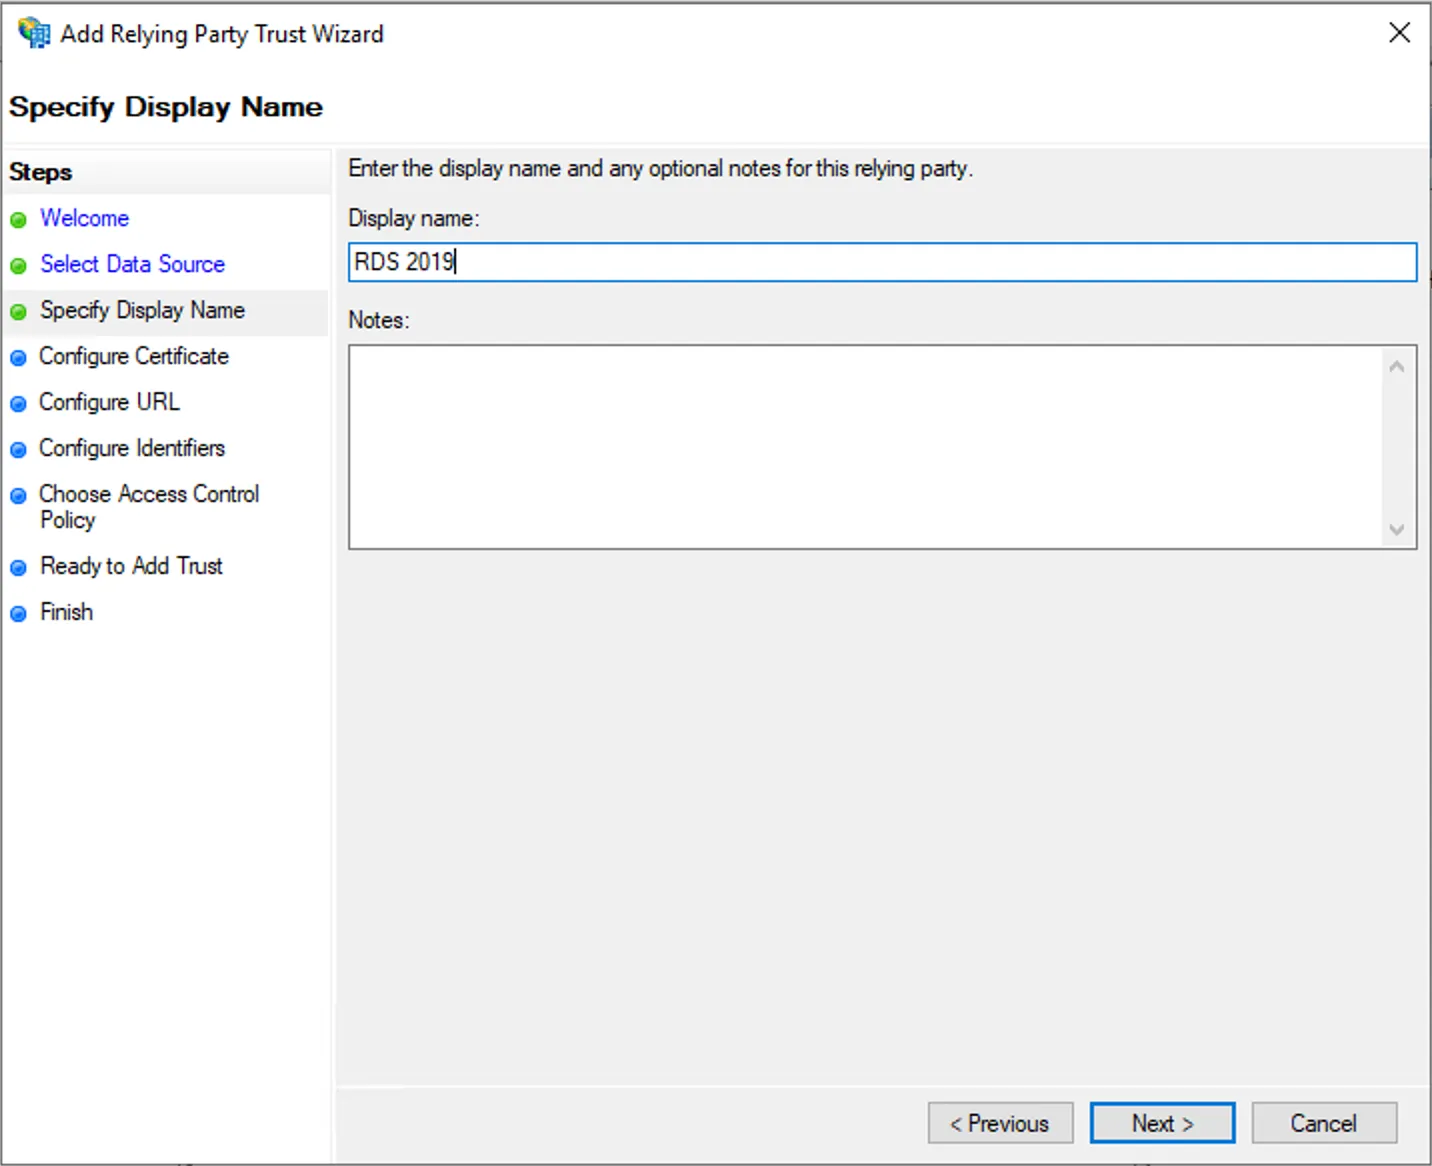
Step 4 - Windows GUI
Section titled “Step 4 - Windows GUI”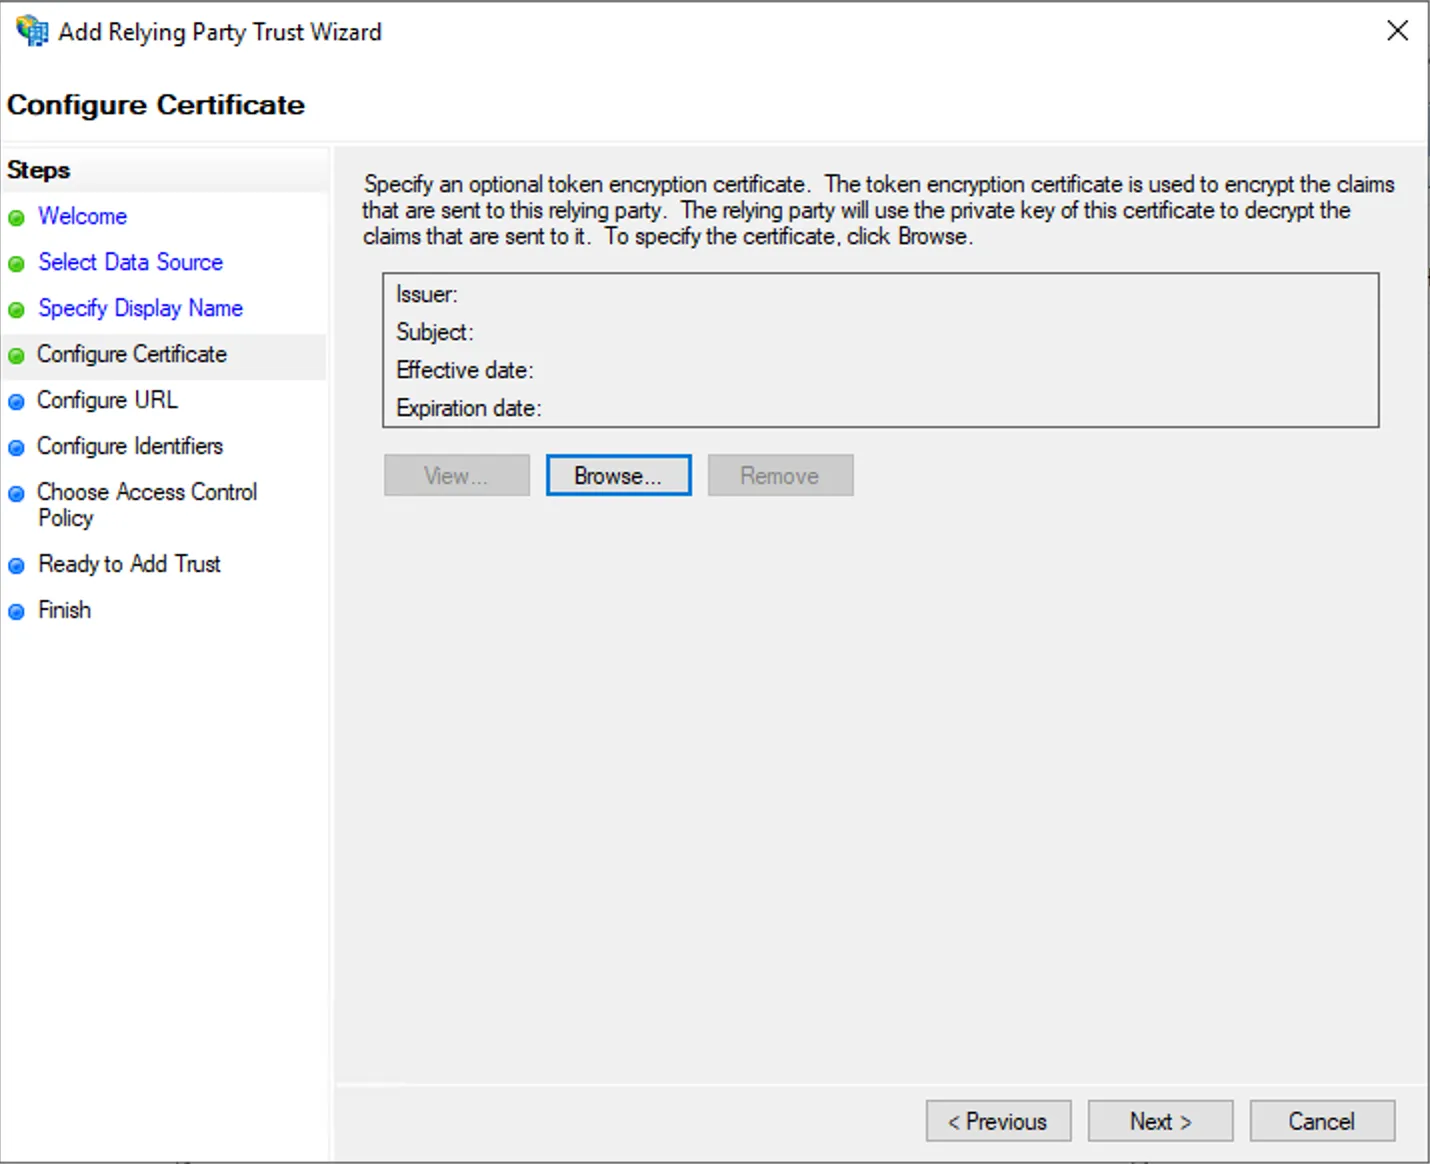
Step 5 - Windows GUI
Section titled “Step 5 - Windows GUI”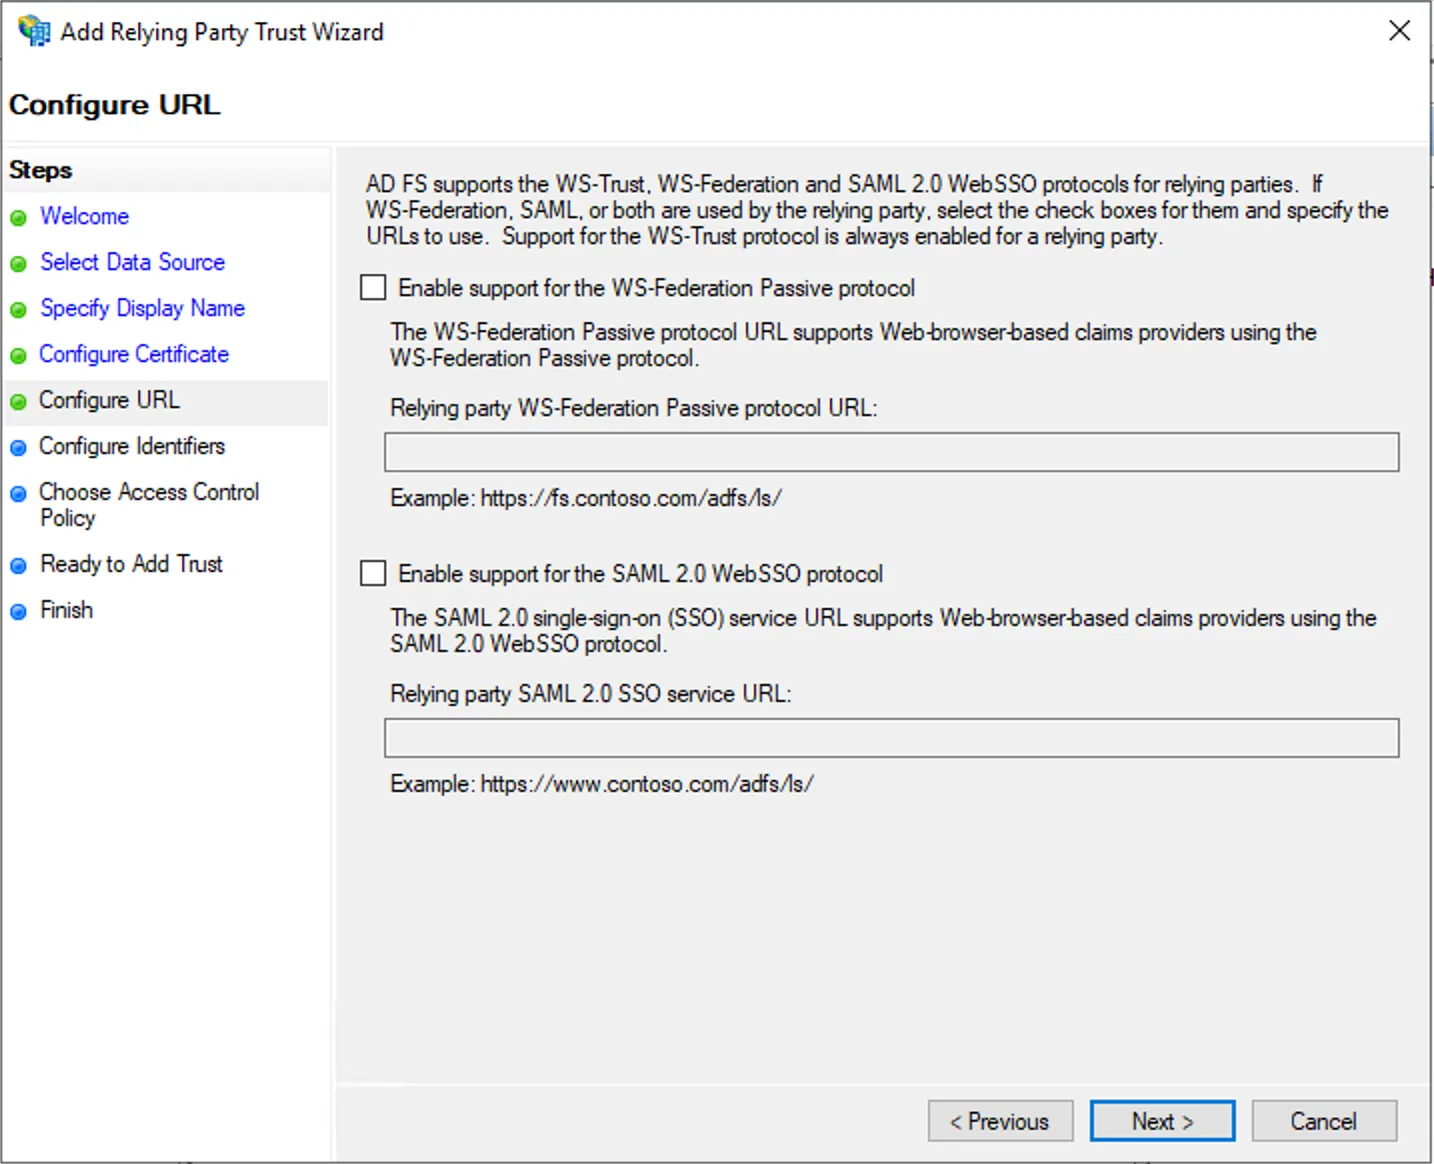
Step 6 - Windows GUI
Section titled “Step 6 - Windows GUI”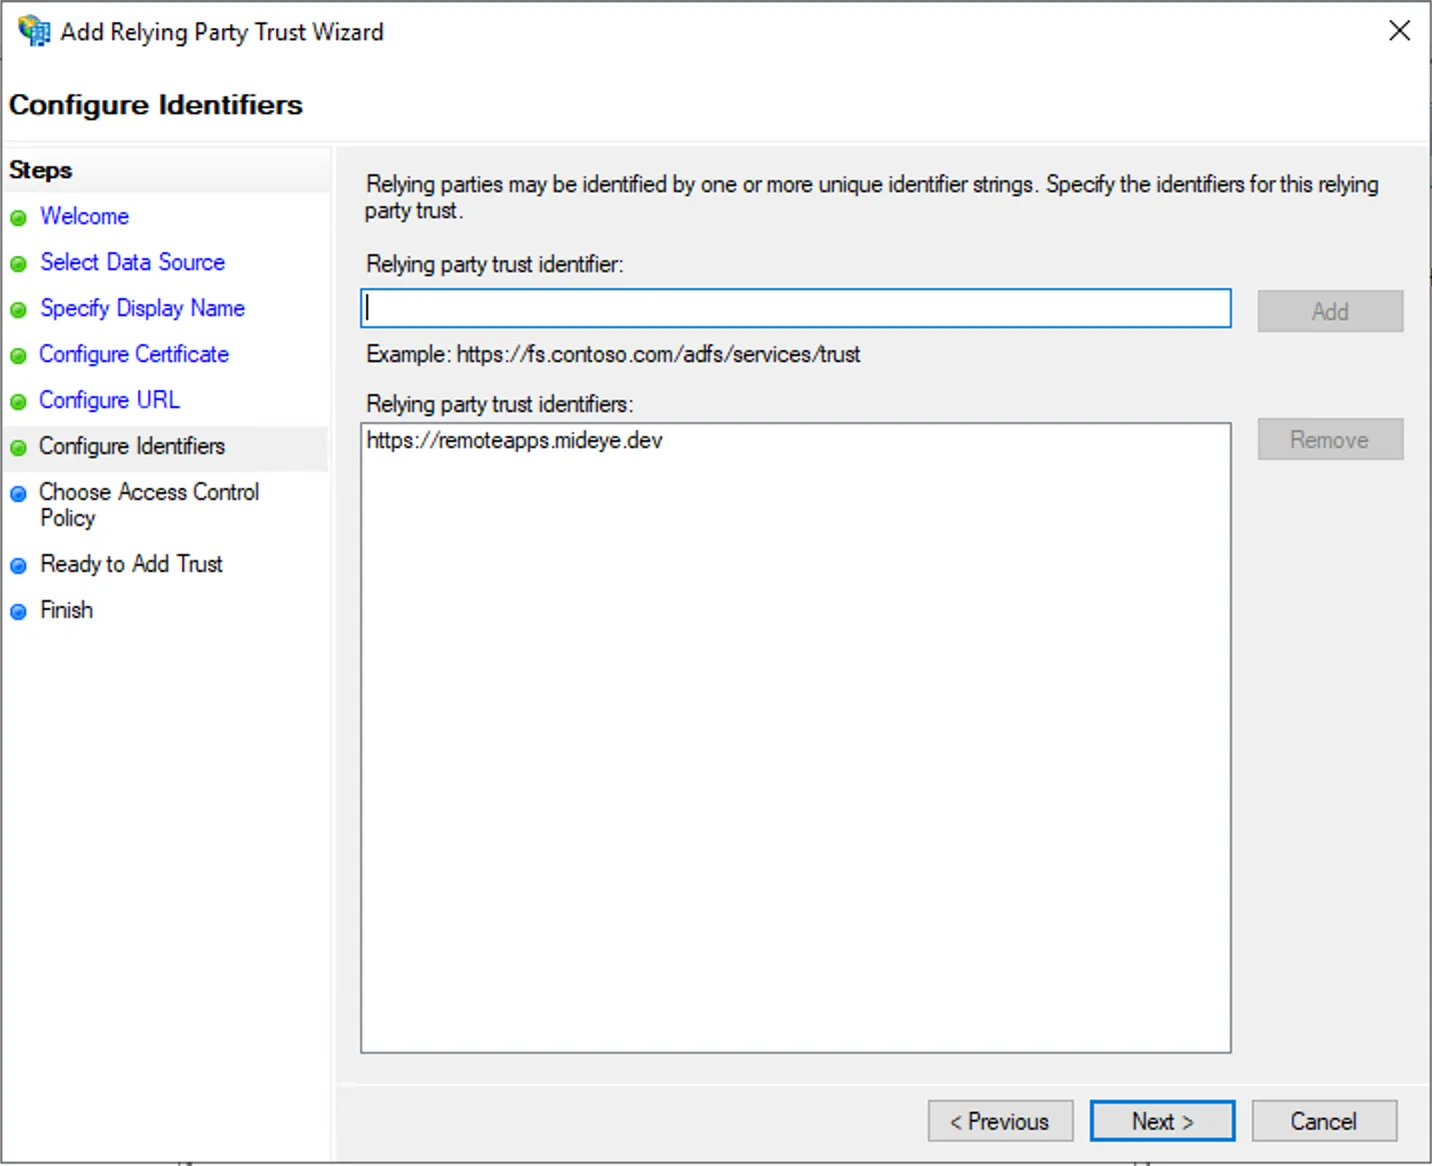
Step 7 - Windows GUI
Section titled “Step 7 - Windows GUI”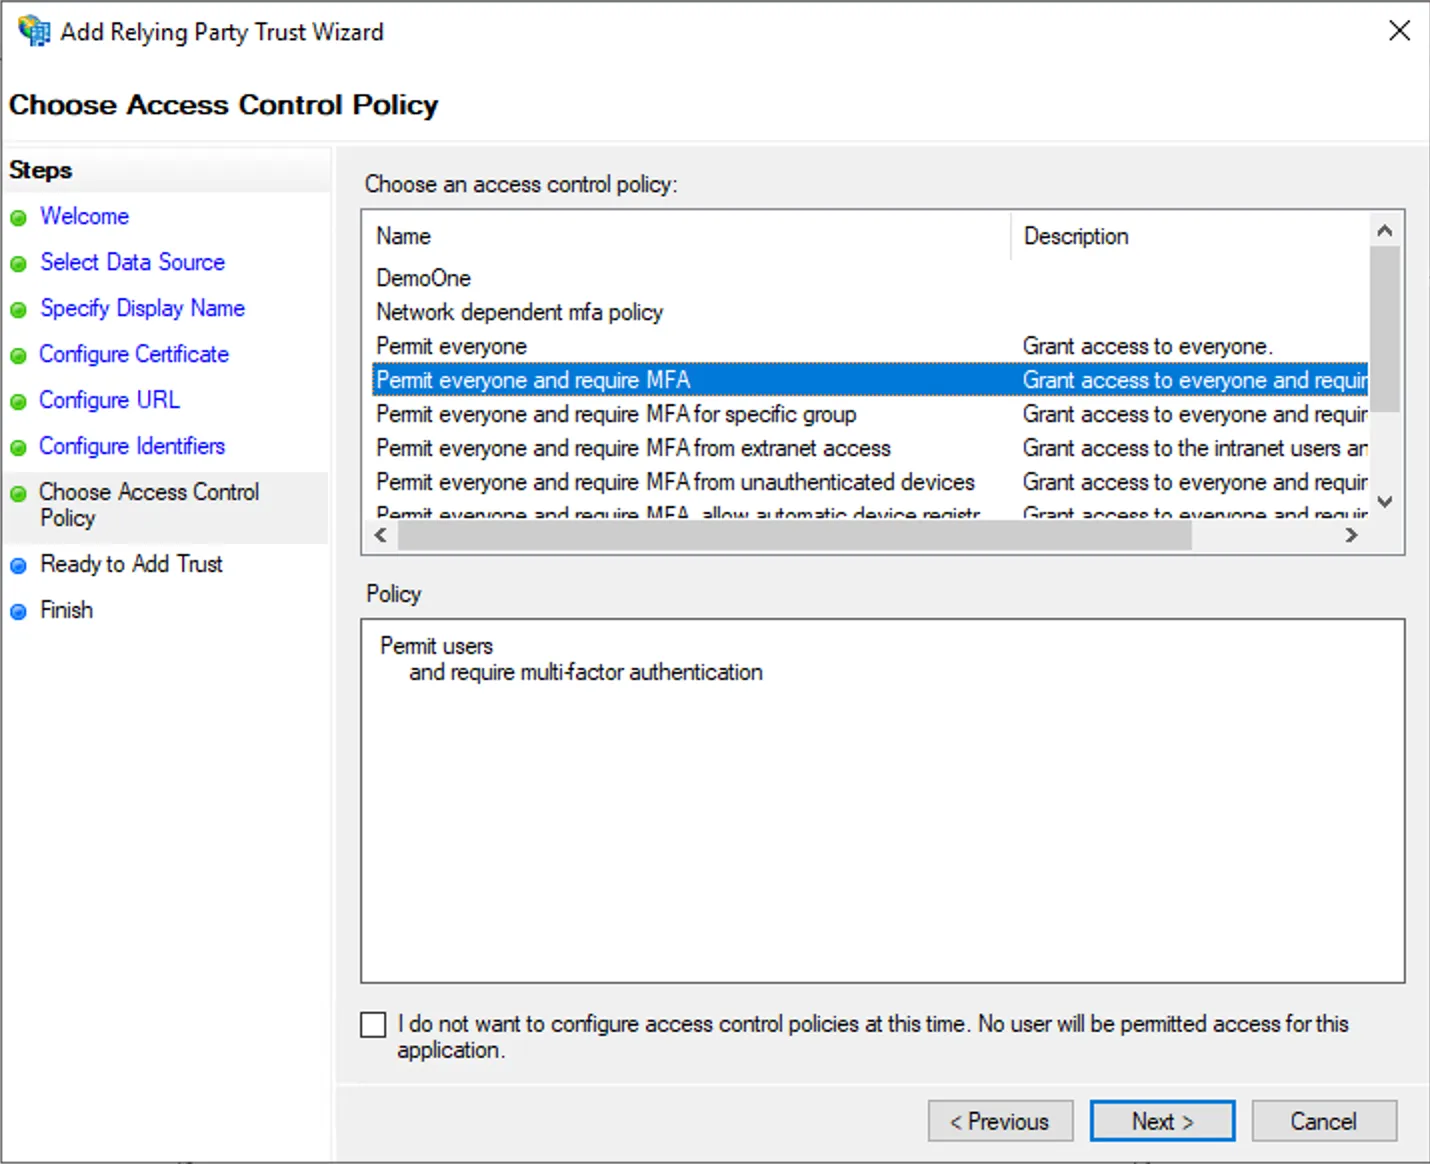
Step 8 - Windows GUI
Section titled “Step 8 - Windows GUI”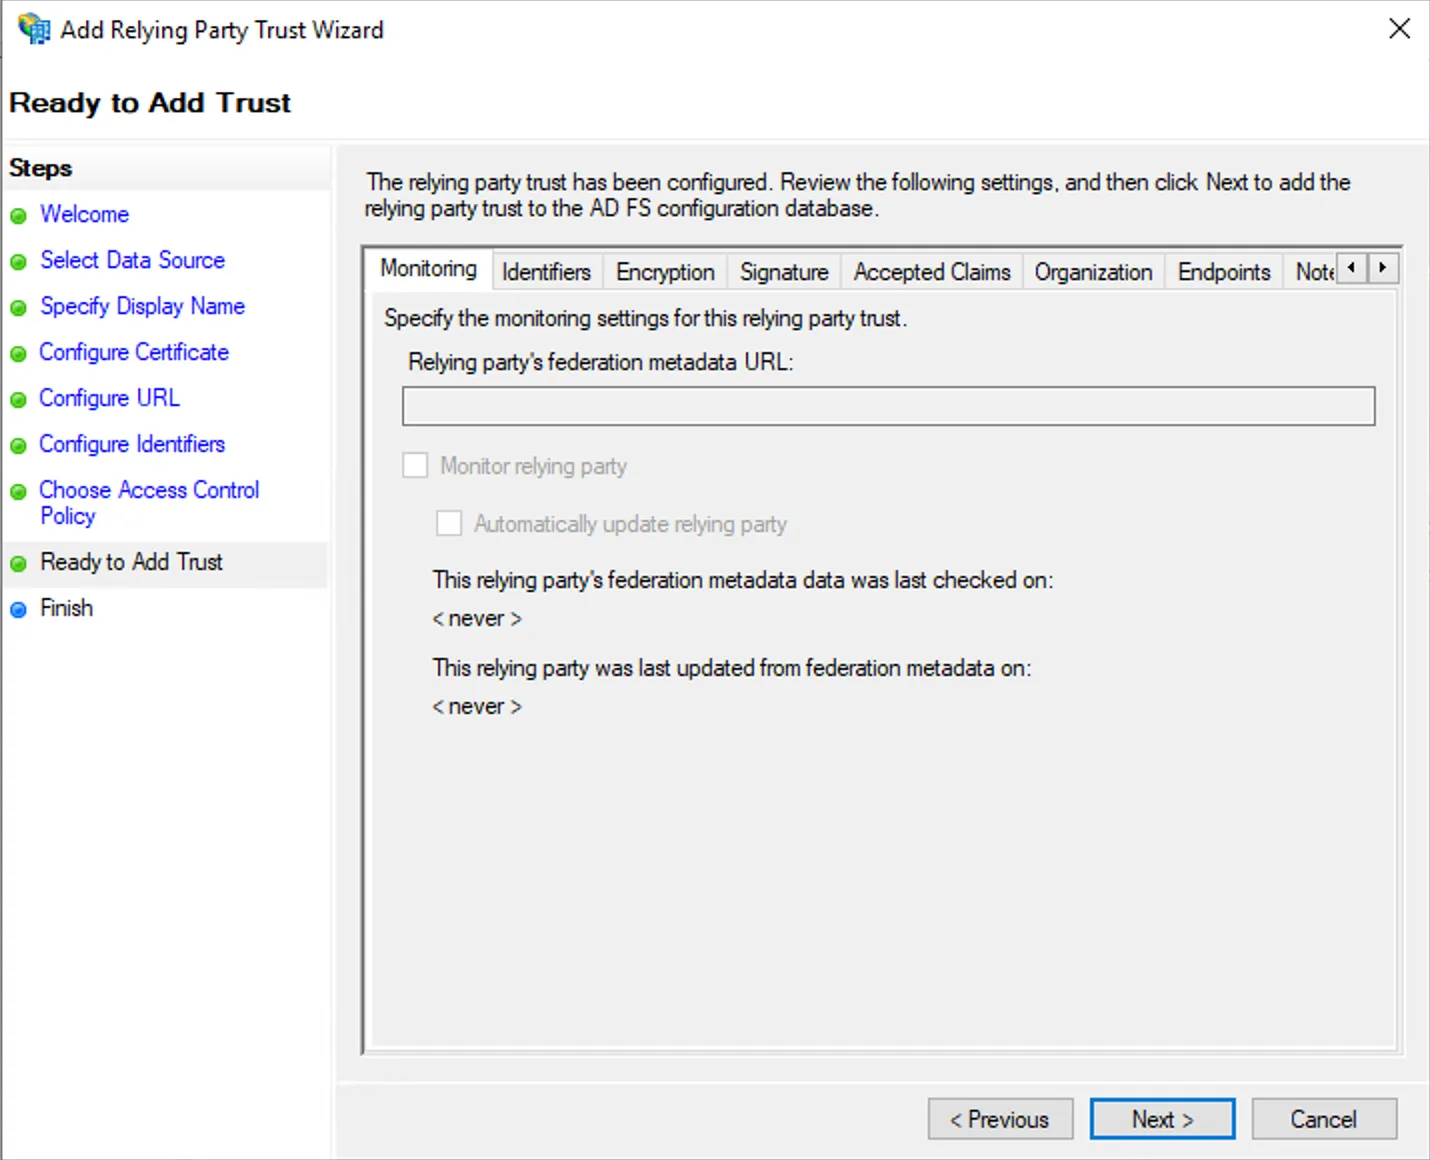
Step 9 - Windows GUI
Section titled “Step 9 - Windows GUI”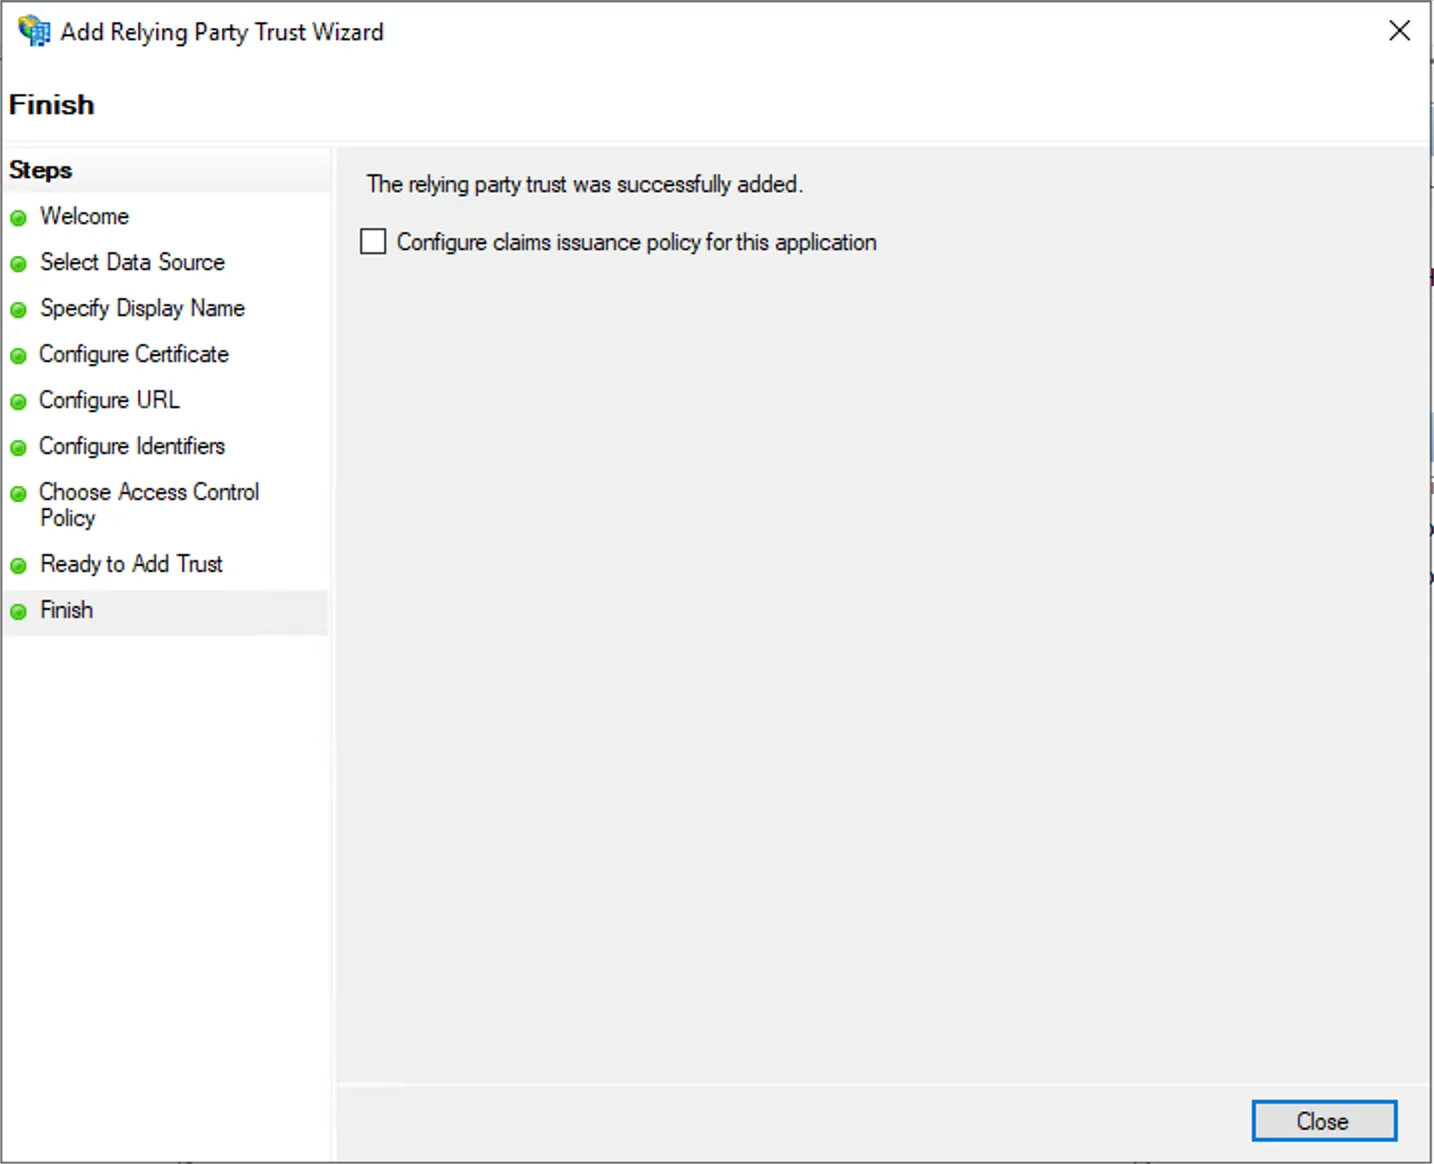
Configure ADFS relying party in Powershell
Section titled “Configure ADFS relying party in Powershell”Add-AdfsRelyingPartyTrust -Name "RDS-2019" -Identifier "https://remoteapps.mideye.dev"Set-AdfsRelyingPartyTrust -TargetName "RDS-2019" -AccessControlPolicyName "Permit everyone and require MFA"2. Active Directory - Configure ServicePrincipal Name on WAP
Section titled “2. Active Directory - Configure ServicePrincipal Name on WAP”Add A service principal name for the Web Application Proxy (WAP), This should be the same as the external DNS for end users, in this scenario HTTP/remoteapps.mideye.dev
Do this configuration either in powershell or Windows GUI
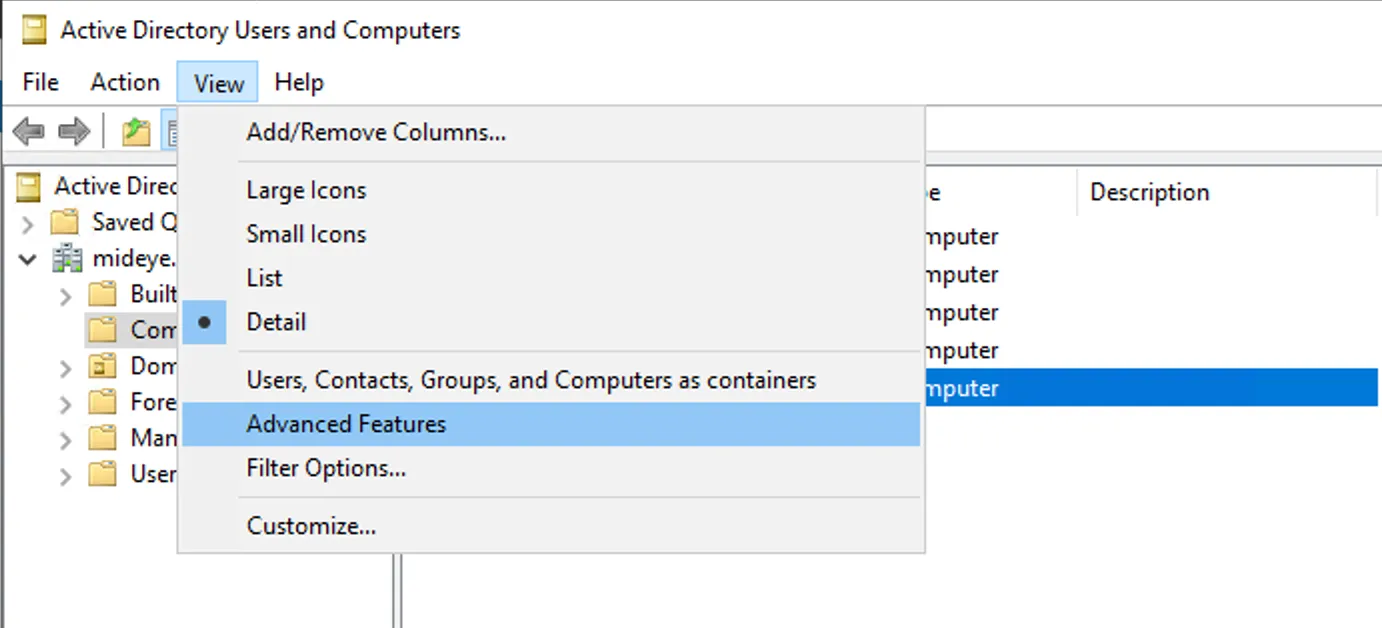
Step 1 - Windows GUI
Section titled “Step 1 - Windows GUI”Enable Advanced features
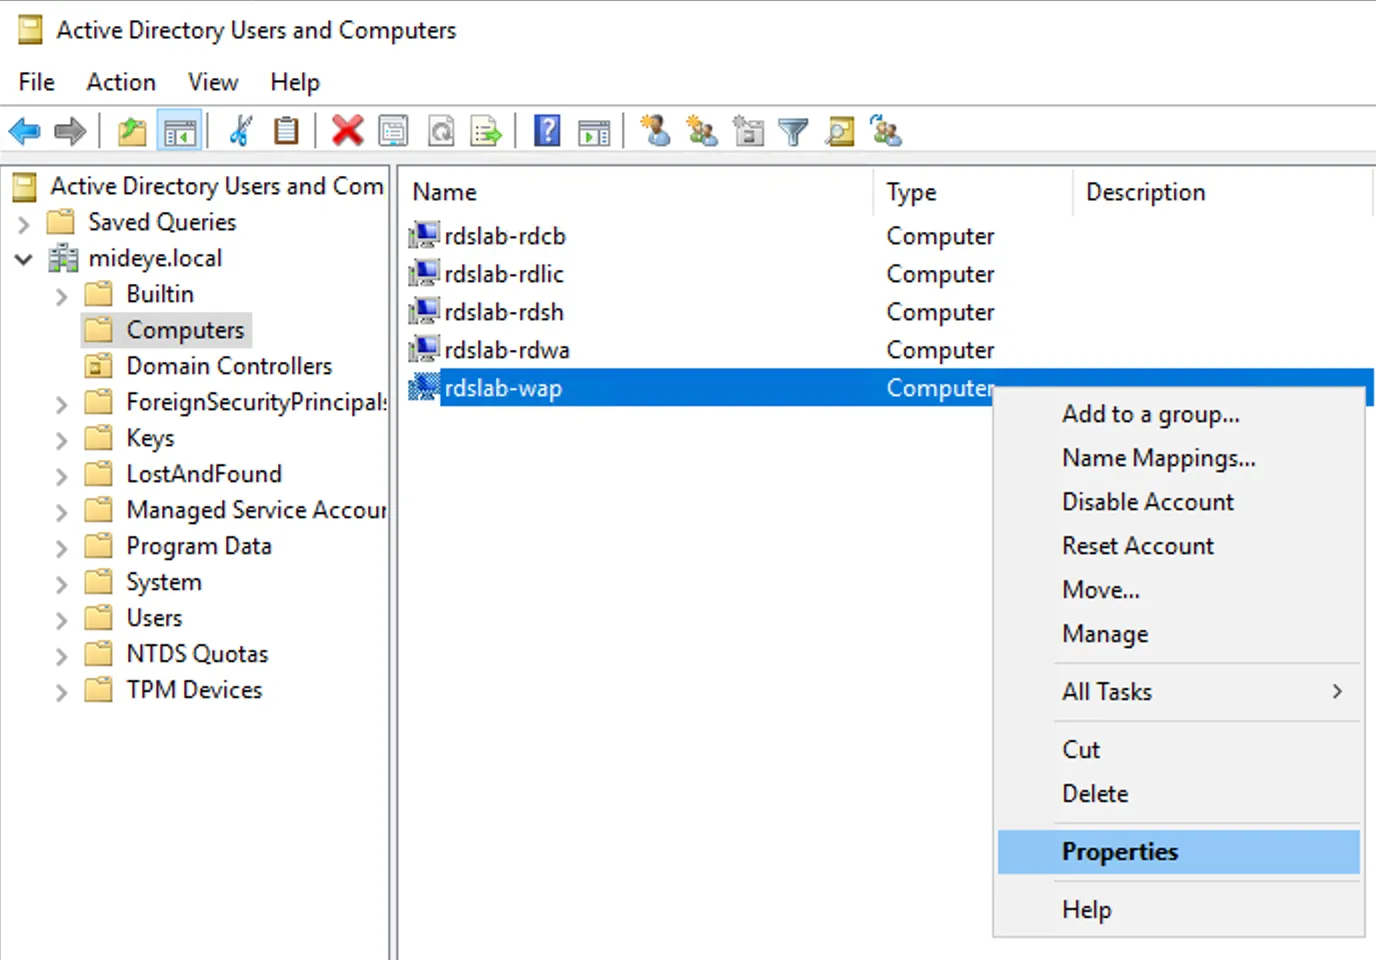
Step 2 - Windows GUI
Section titled “Step 2 - Windows GUI”Select WAP computer properties
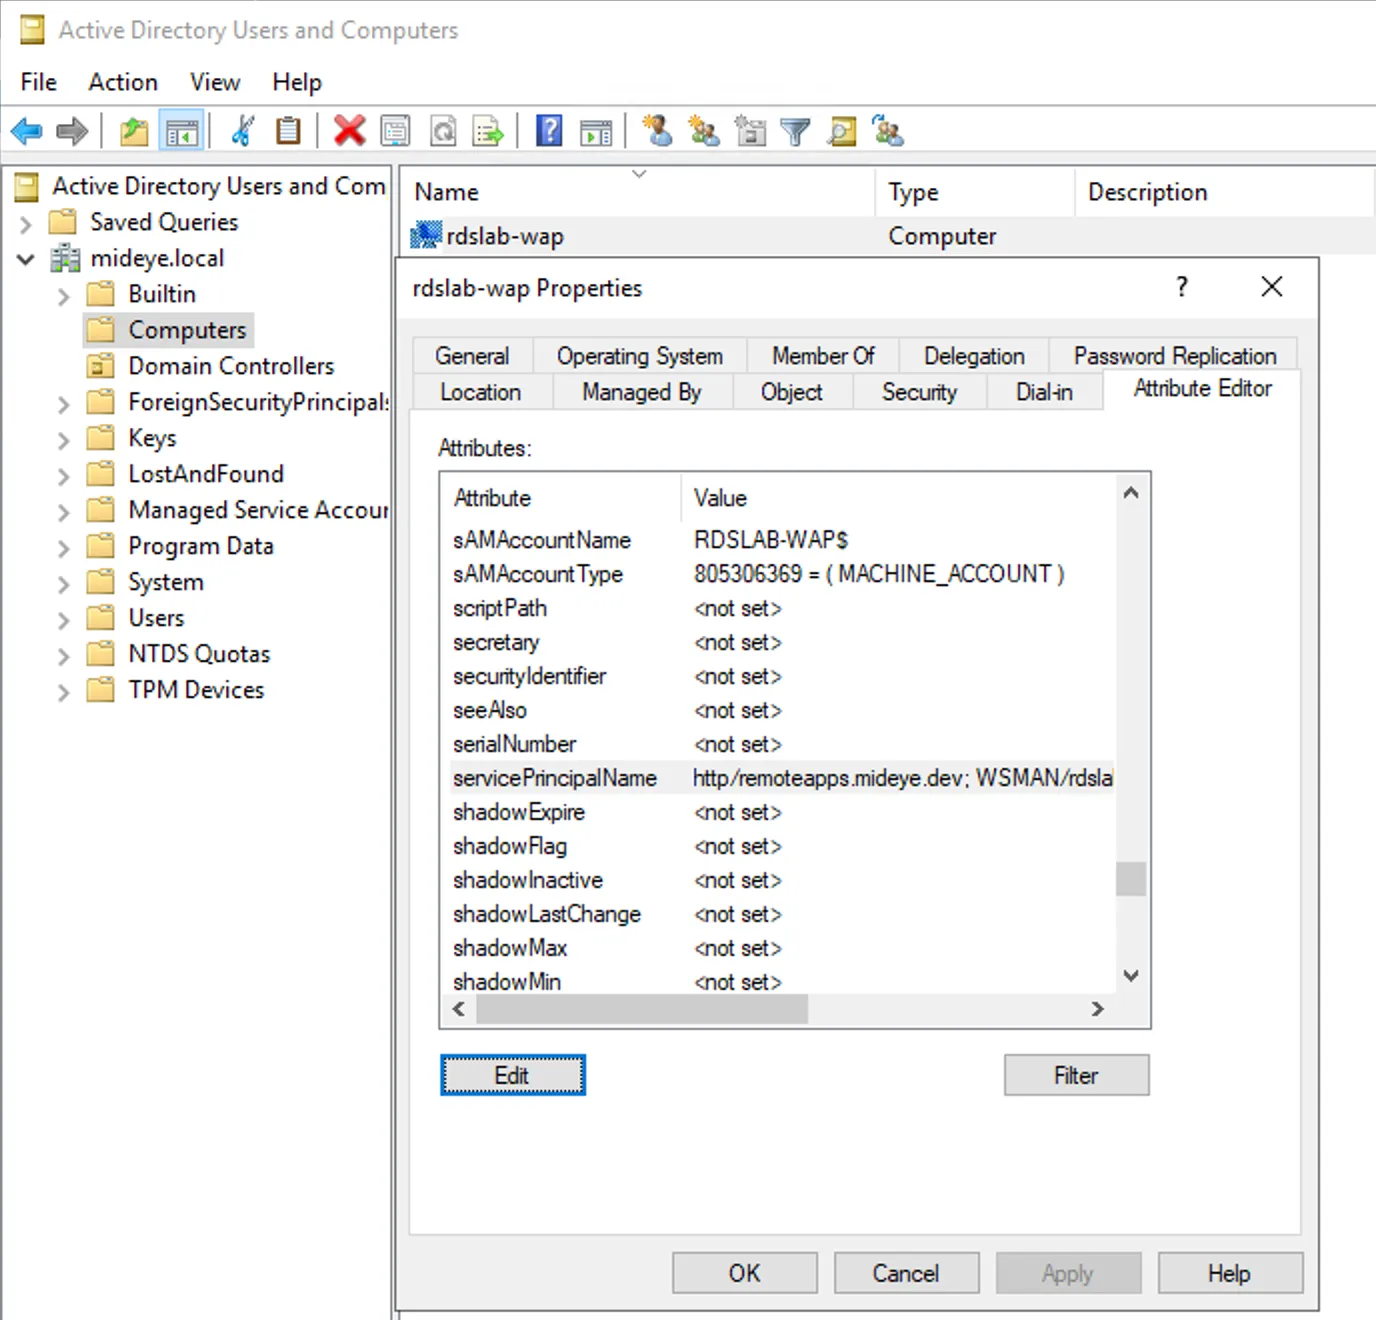
Step 3 - Windows GUI
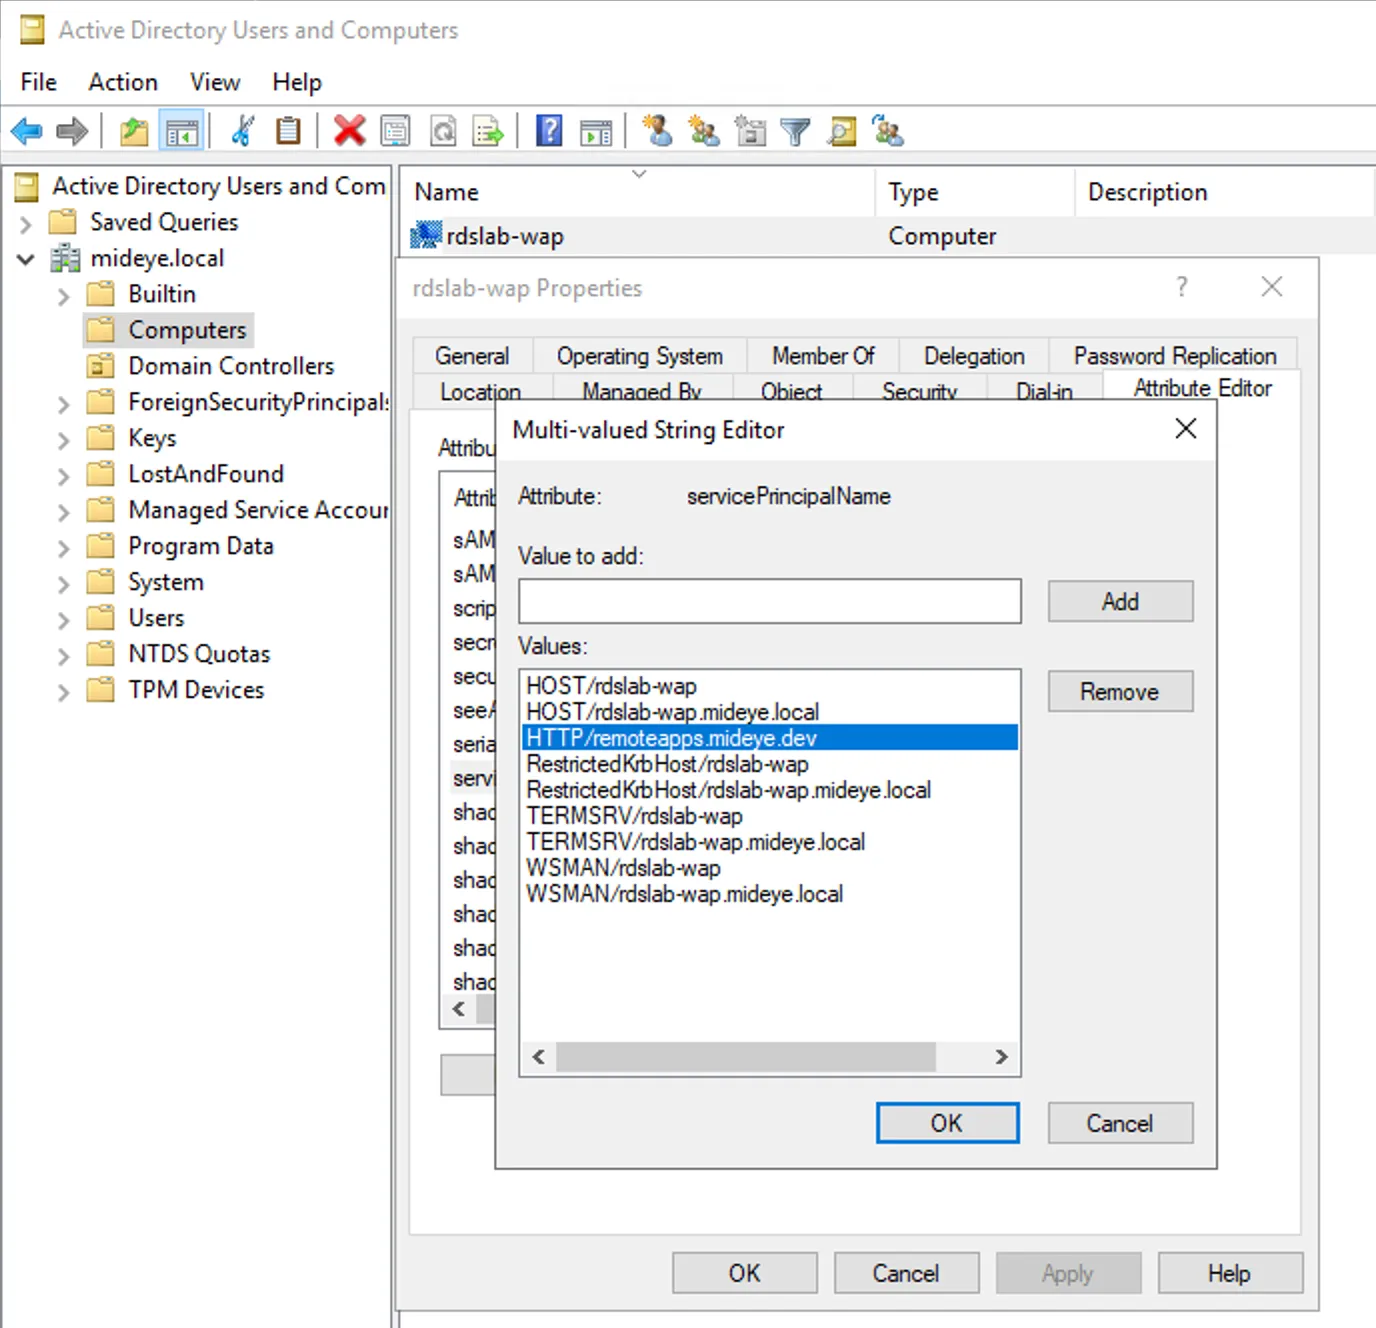
Section titled “Step 3 - Windows GUI”Edit servicePrincipalName
Step 4 - Windows GUI
Section titled “Step 4 - Windows GUI”Add HTTP/remoteapps.mideye.dev (External RDGW URL) as SPN
Step 1 - Powershell
Section titled “Step 1 - Powershell”Get all ServicePrincipalNames of WAP server and verify HTTP/remoteapps.mideye.dev does not exist there already.
Get-ADcomputer -Identity "rdslab-wap" -Properties ServicePrincipalNames |Select-Object -ExpandProperty ServicePrincipalNames
WSMAN/rdslab-wapWSMAN/rdslab-wap.mideye.localTERMSRV/rdslab-wapTERMSRV/rdslab-wap.mideye.localRestrictedKrbHost/rdslab-wapHOST/rdslab-wapRestrictedKrbHost/rdslab-wap.mideye.localHOST/rdslab-wap.mideye.local
Step 2 - Powershell
Section titled “Step 2 - Powershell”Add RDS gateway SPN to WAP server in a Active Directory Domain Controller.
Set-ADComputer -Identity "rdslab-wap" -Add @{"ServicePrincipalName"="HTTP/remoteapps.mideye.dev"}3. Active Directory - Configure Delegation on WAP
Section titled “3. Active Directory - Configure Delegation on WAP”Delegate HTTP/remoteapps.mideye.dev to WAP.
Do this configuration either in powershell or Windows GUI
Step 1 - Windows GUI
Section titled “Step 1 - Windows GUI”Select WAP computer properties
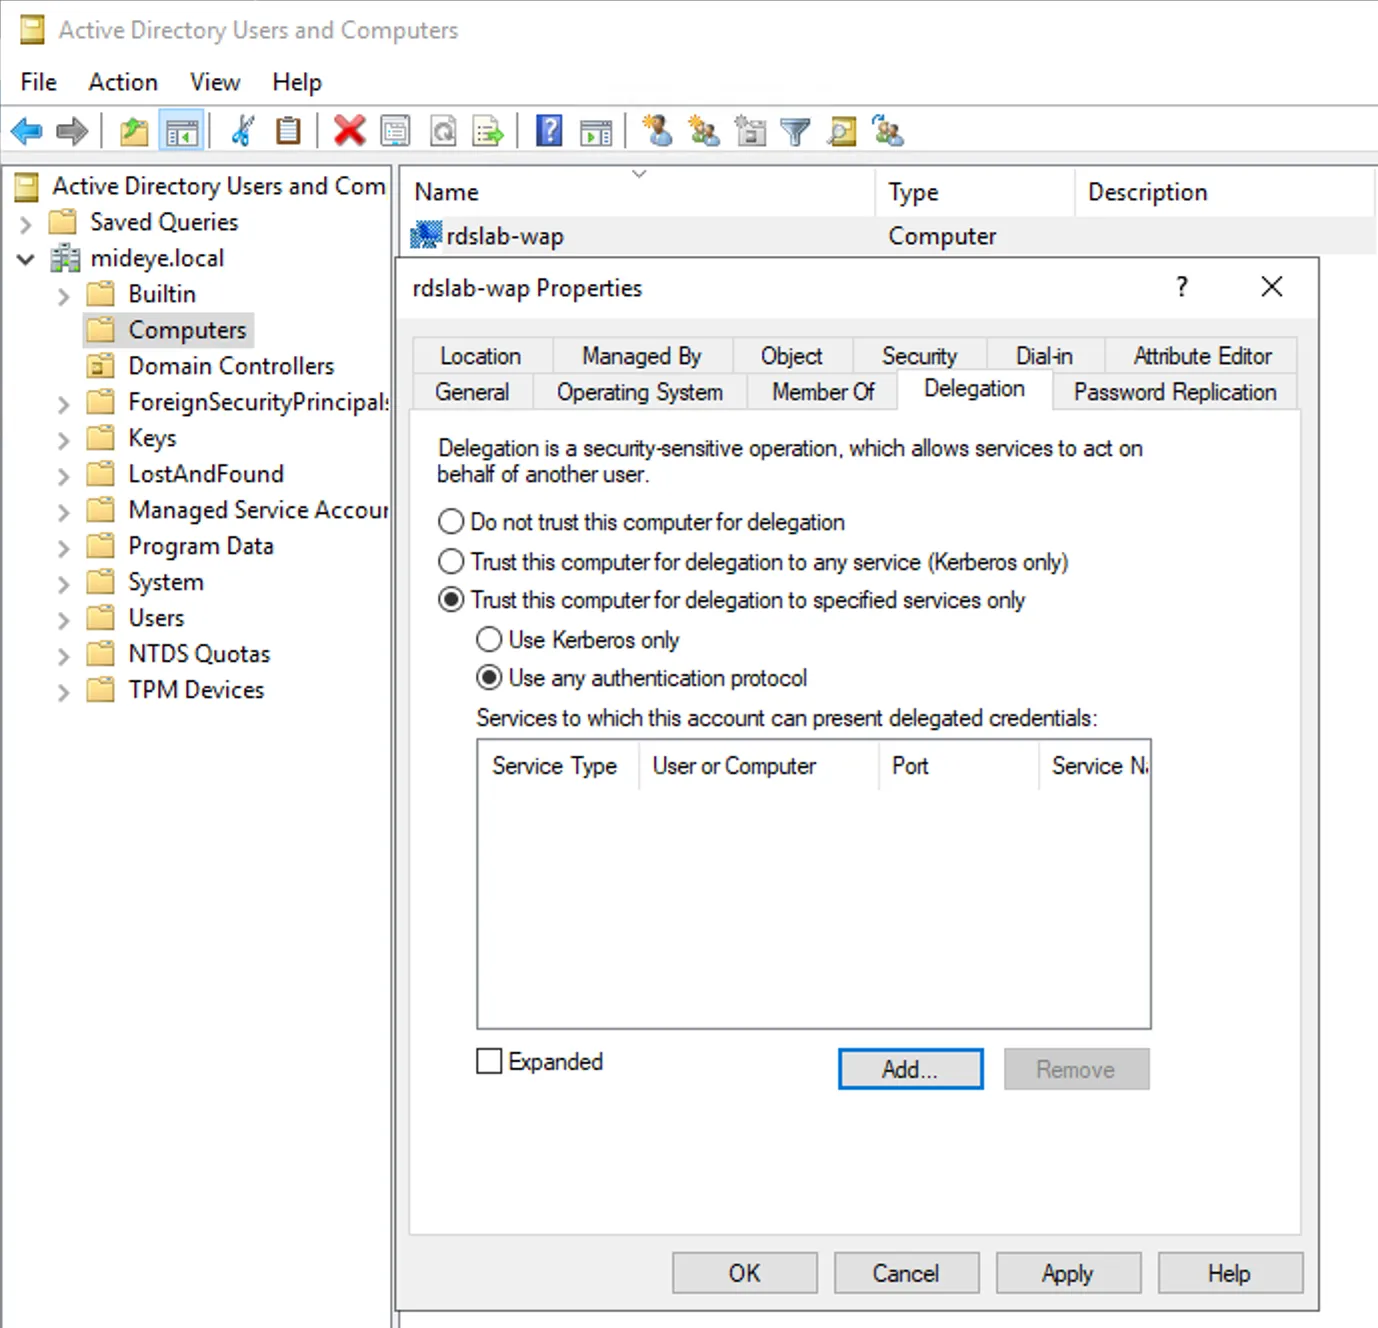
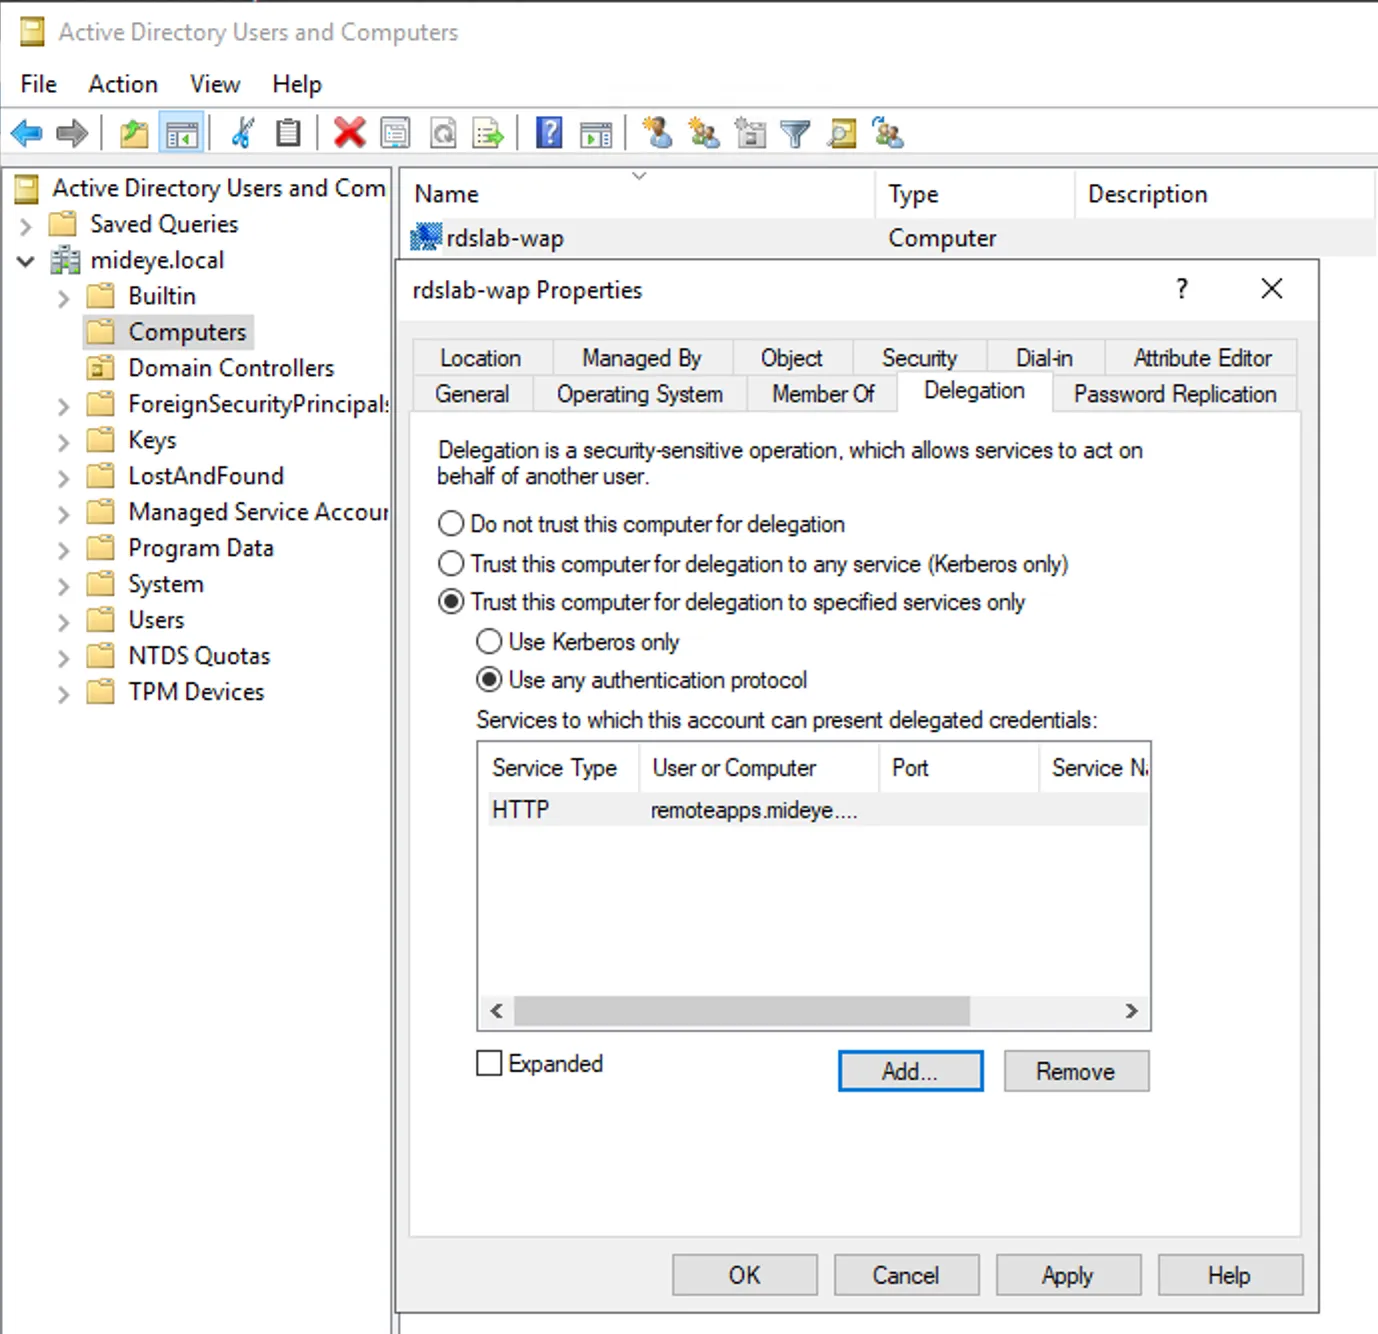
Step 2 - Windows GUI
Section titled “Step 2 - Windows GUI”Set Trust this computer for delegation to specified services only and Use any authentication protocol and click Add…
Step 3 - Windows GUI
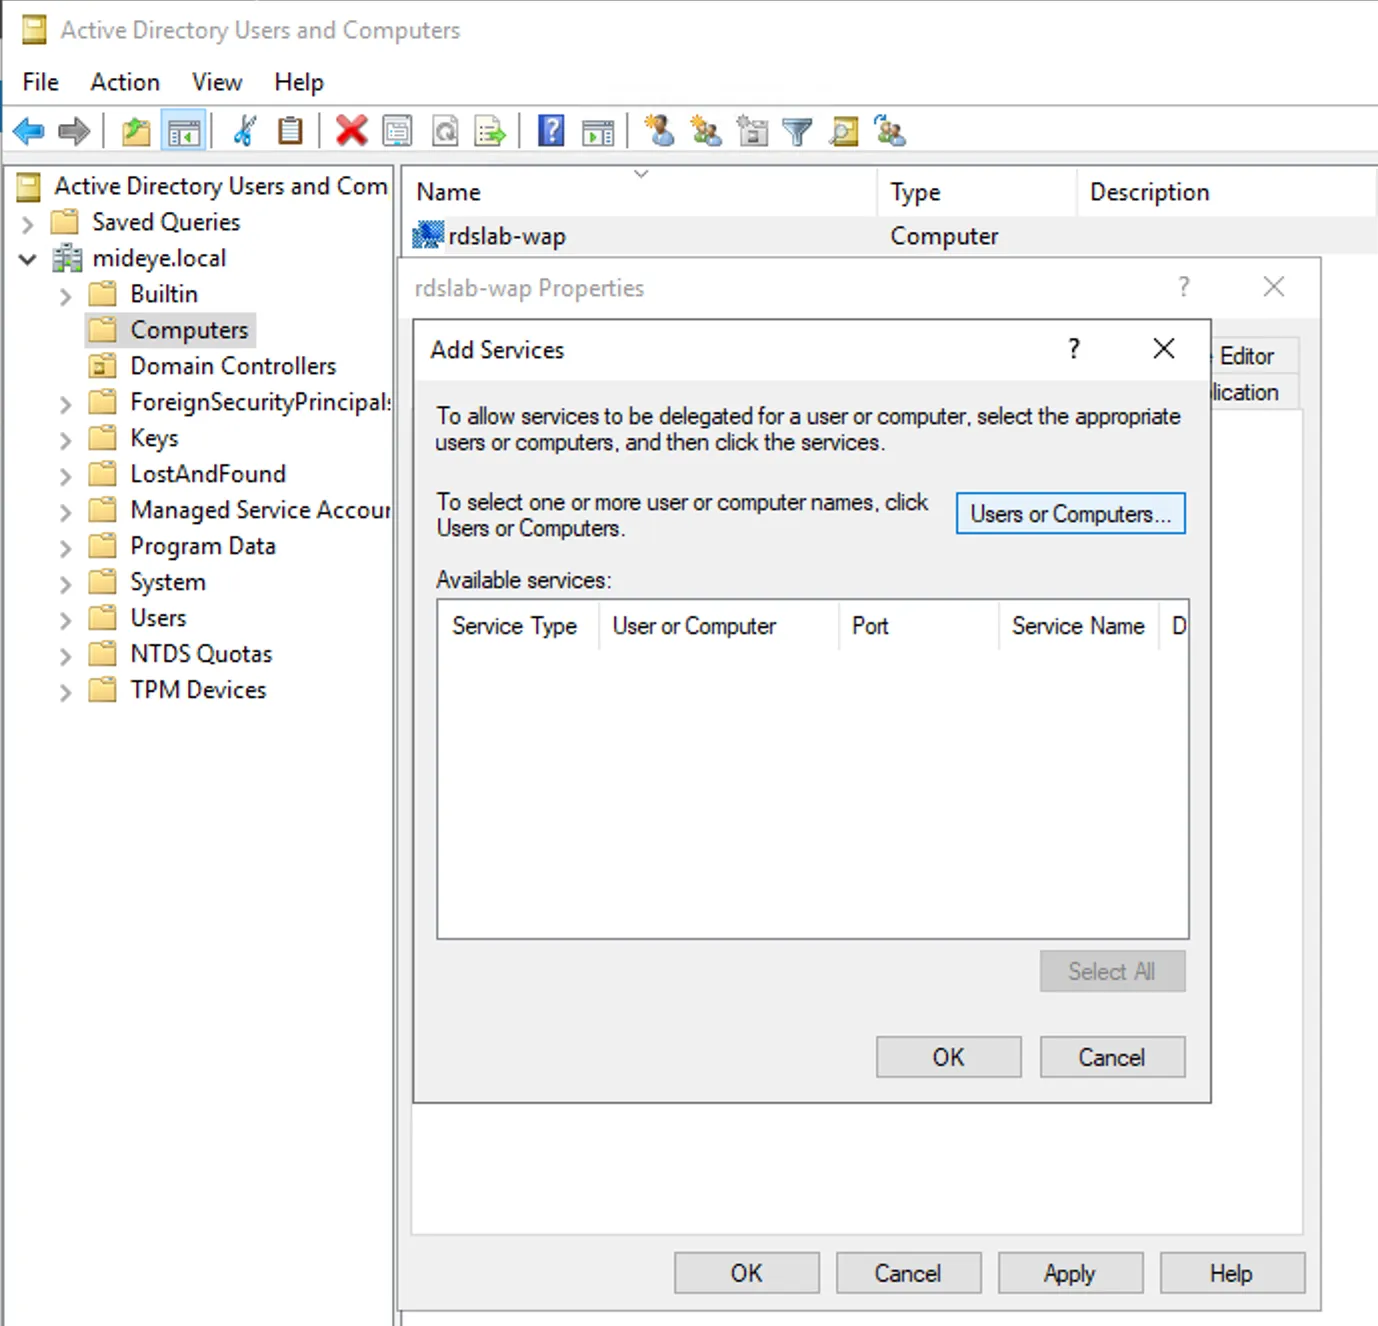
Section titled “Step 3 - Windows GUI”Click Users or Computers… to find a computer to delegate from.
Step 4 - Windows GUI
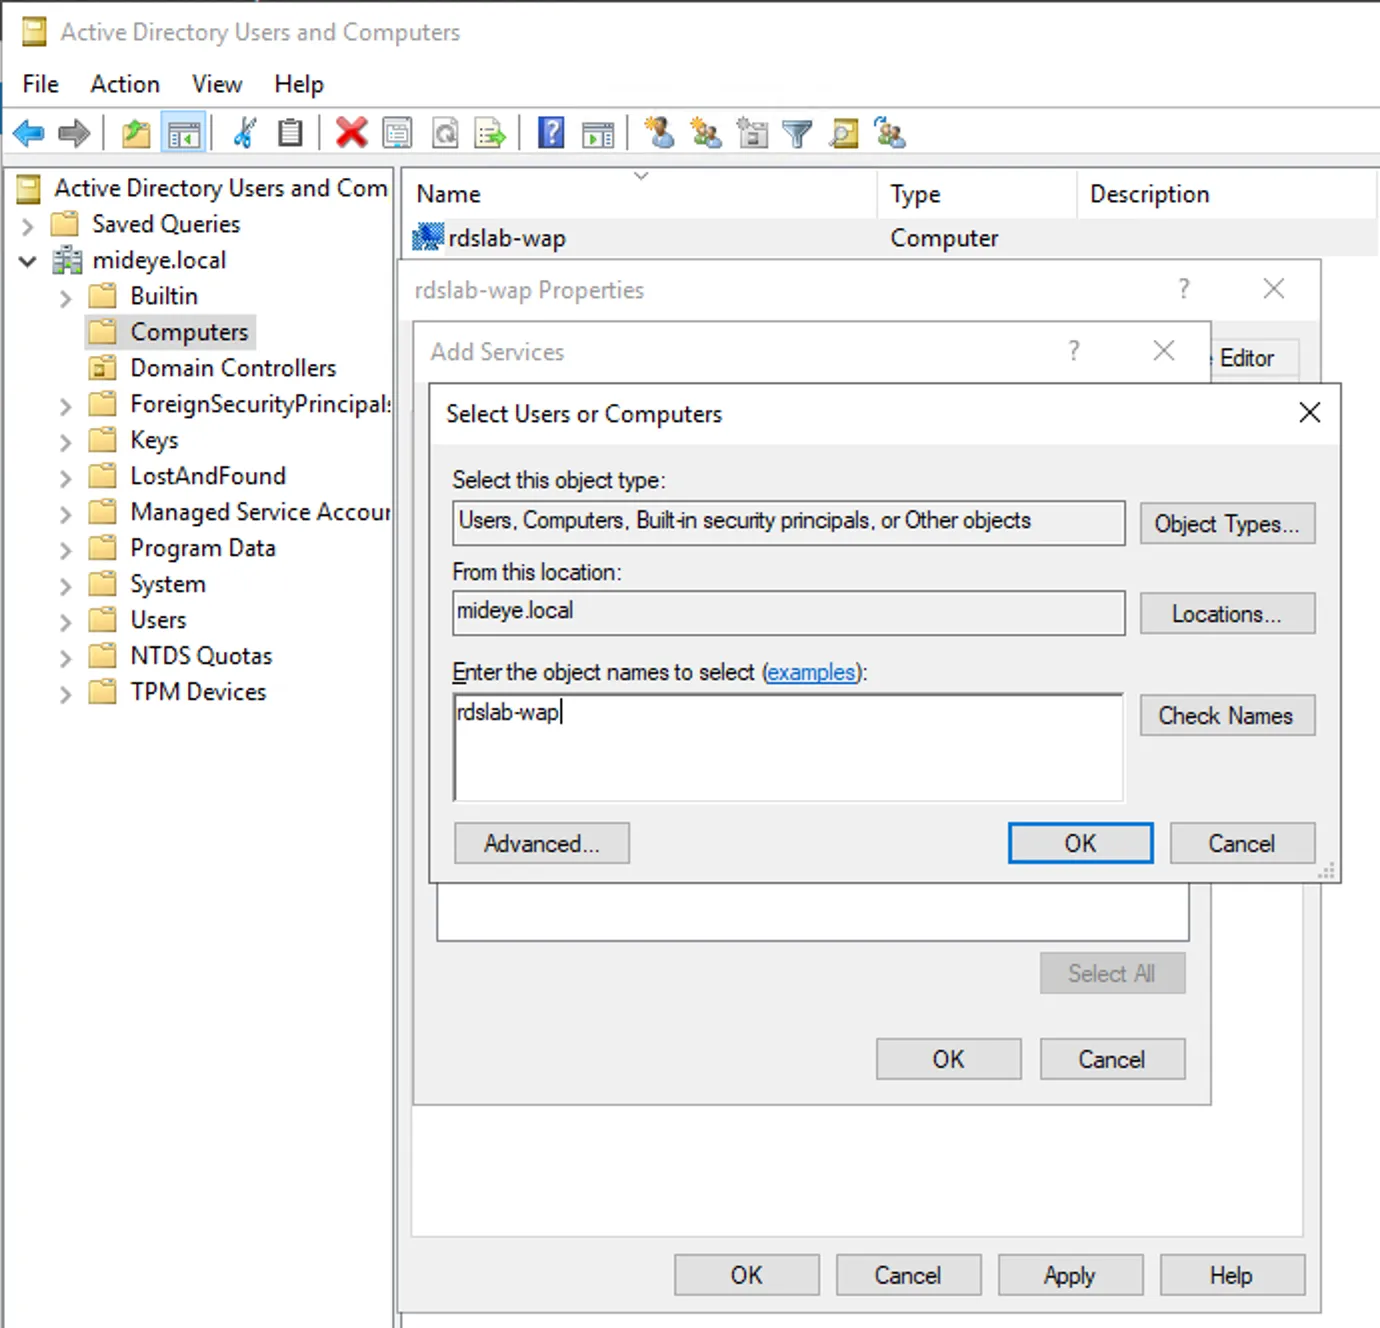
Section titled “Step 4 - Windows GUI”Type the name of the WAP. Click check-names and OK.
Step 5 - Windows GUI
Section titled “Step 5 - Windows GUI”Select Service Type: HTTP and User or Computer: remoteapps.mideye.dev
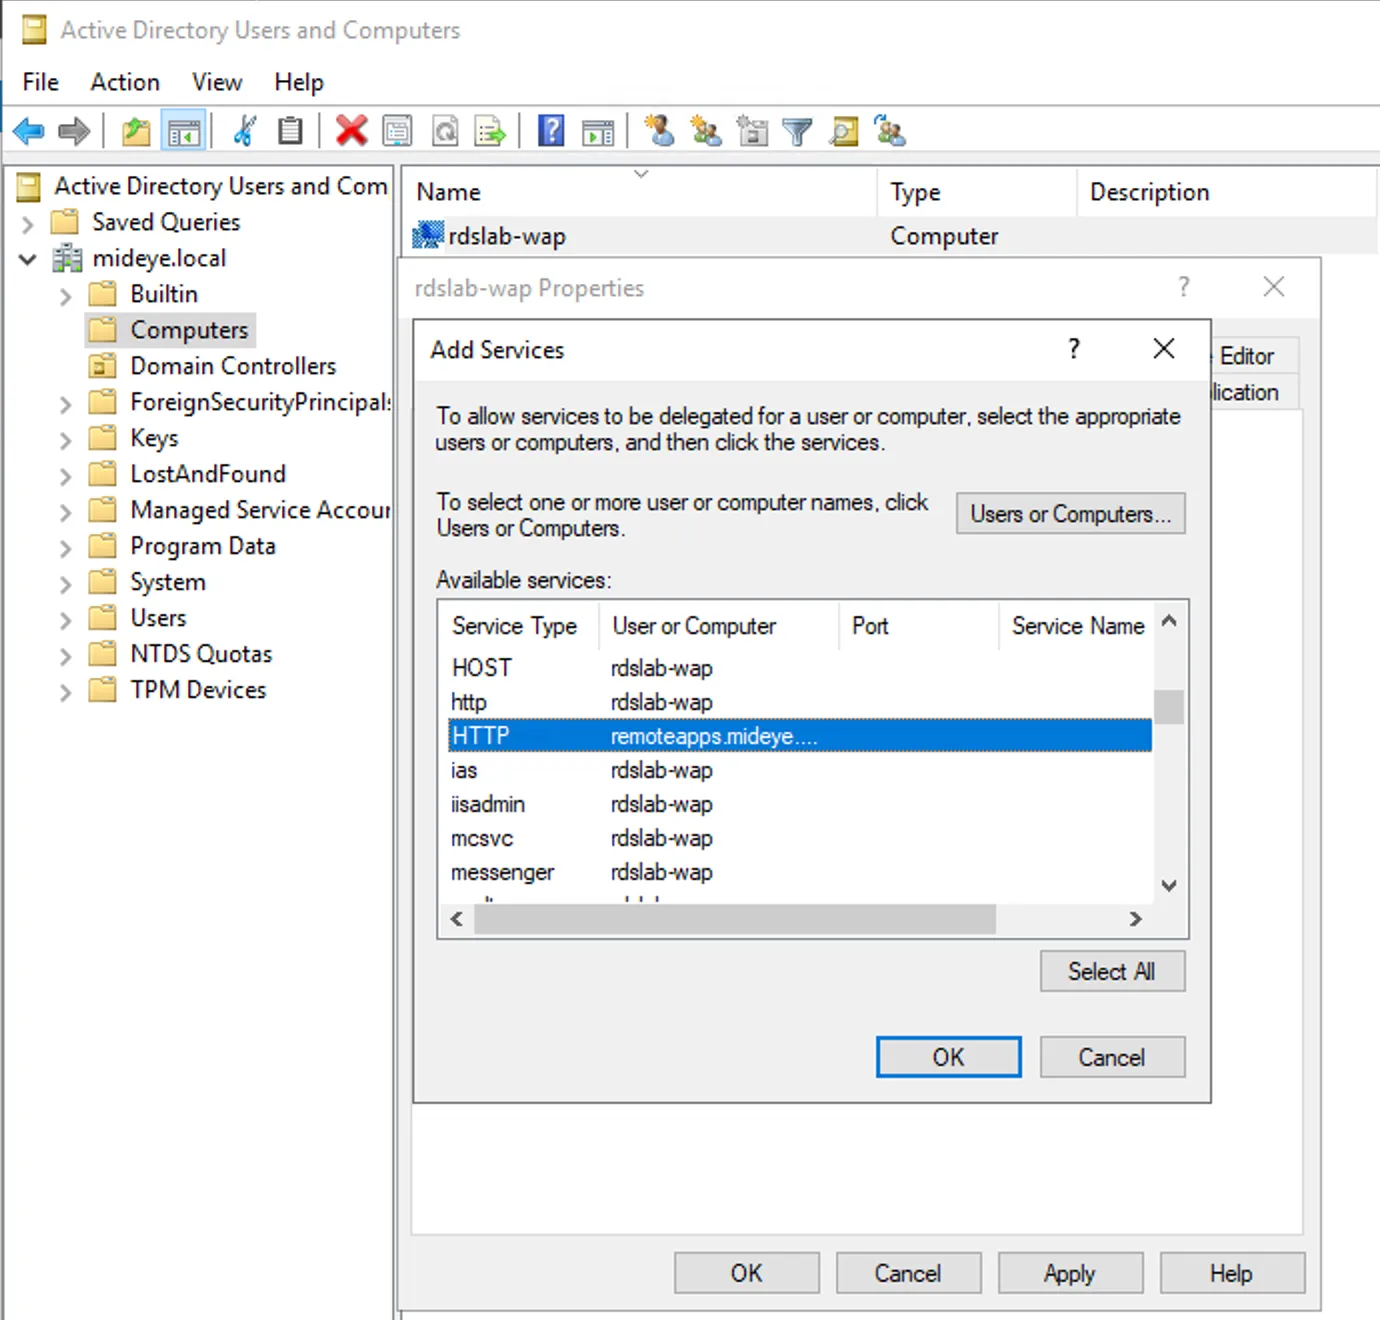
Step 6 - Windows GUI
Section titled “Step 6 - Windows GUI”Now the http delegation should be added to the WAP server.
Step 1- Powershell
Section titled “Step 1- Powershell”```Get-ADComputer -Identity "rdslab-wap" | Set-ADAccountControl -TrustedToAuthForDelegation $TrueSet-ADComputer -Identity "rdslab-wap" -Add @{'msDS-AllowedToDelegateTo'=@('HTTP/remoteapps.mideye.dev')}```4. Web Application Proxy - Publish a web application
Section titled “4. Web Application Proxy - Publish a web application”DNS RECORD
At this time remoteapps.mideye.dev DNS should externally point at the WAP. Internally remoteapps.mideye.dev needs to point at the Remote Desktop Services Web Access Gateway. If remoteapps.mideye.dev points at WAP internally also, then WAP remoteapps.mideye.dev needs to be in the hosts file.
Right-click Windows button and open Windows PowerShell (Admin)
notepad.exe $env:windir\System32\drivers\etc\hostsAdd a new entry that points to the internal ip of remoteapps.mideye.dev (Or Remote Desktop Services Web Access Gateway)
10.10.10.10 remoteapps.mideye.dev
Publish remoteapps in wap
Open the WAP-console and click “publish”. Select ADFS followed by Web and MSOFBA. Select the Relying party created on the ADFS-server and give the publish a friendly name followed by the external DNS and the internal DNS. This should be the same, and in this scenario https://rdweb.mideye.com. Select a valid certificate.
Do this configuration either in powershell or Windows GUI
Step 1 - Windows GUI
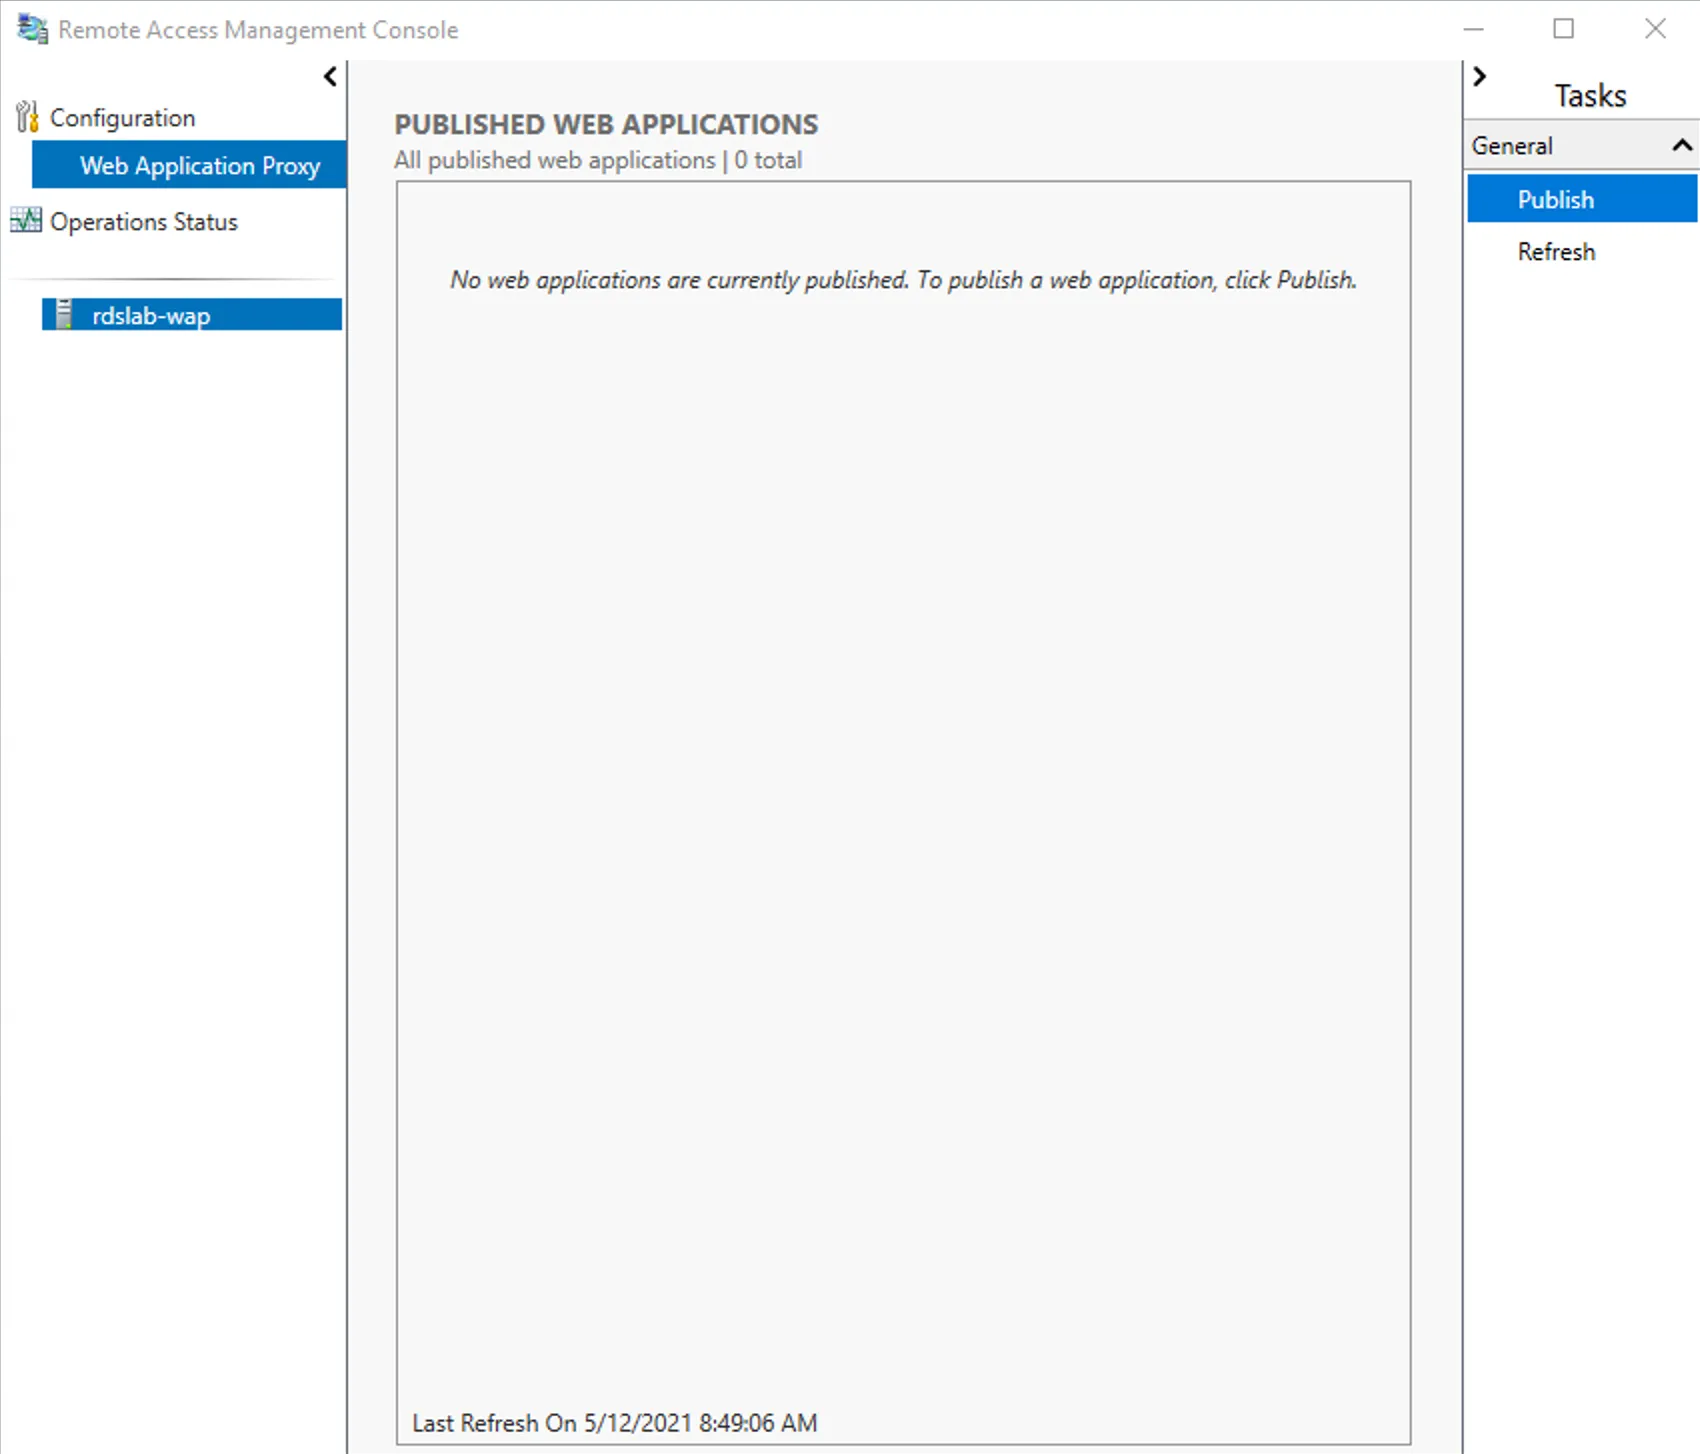
Section titled “Step 1 - Windows GUI”- Click Publish in Remote Access Management Console
Step 2 - Windows GUI
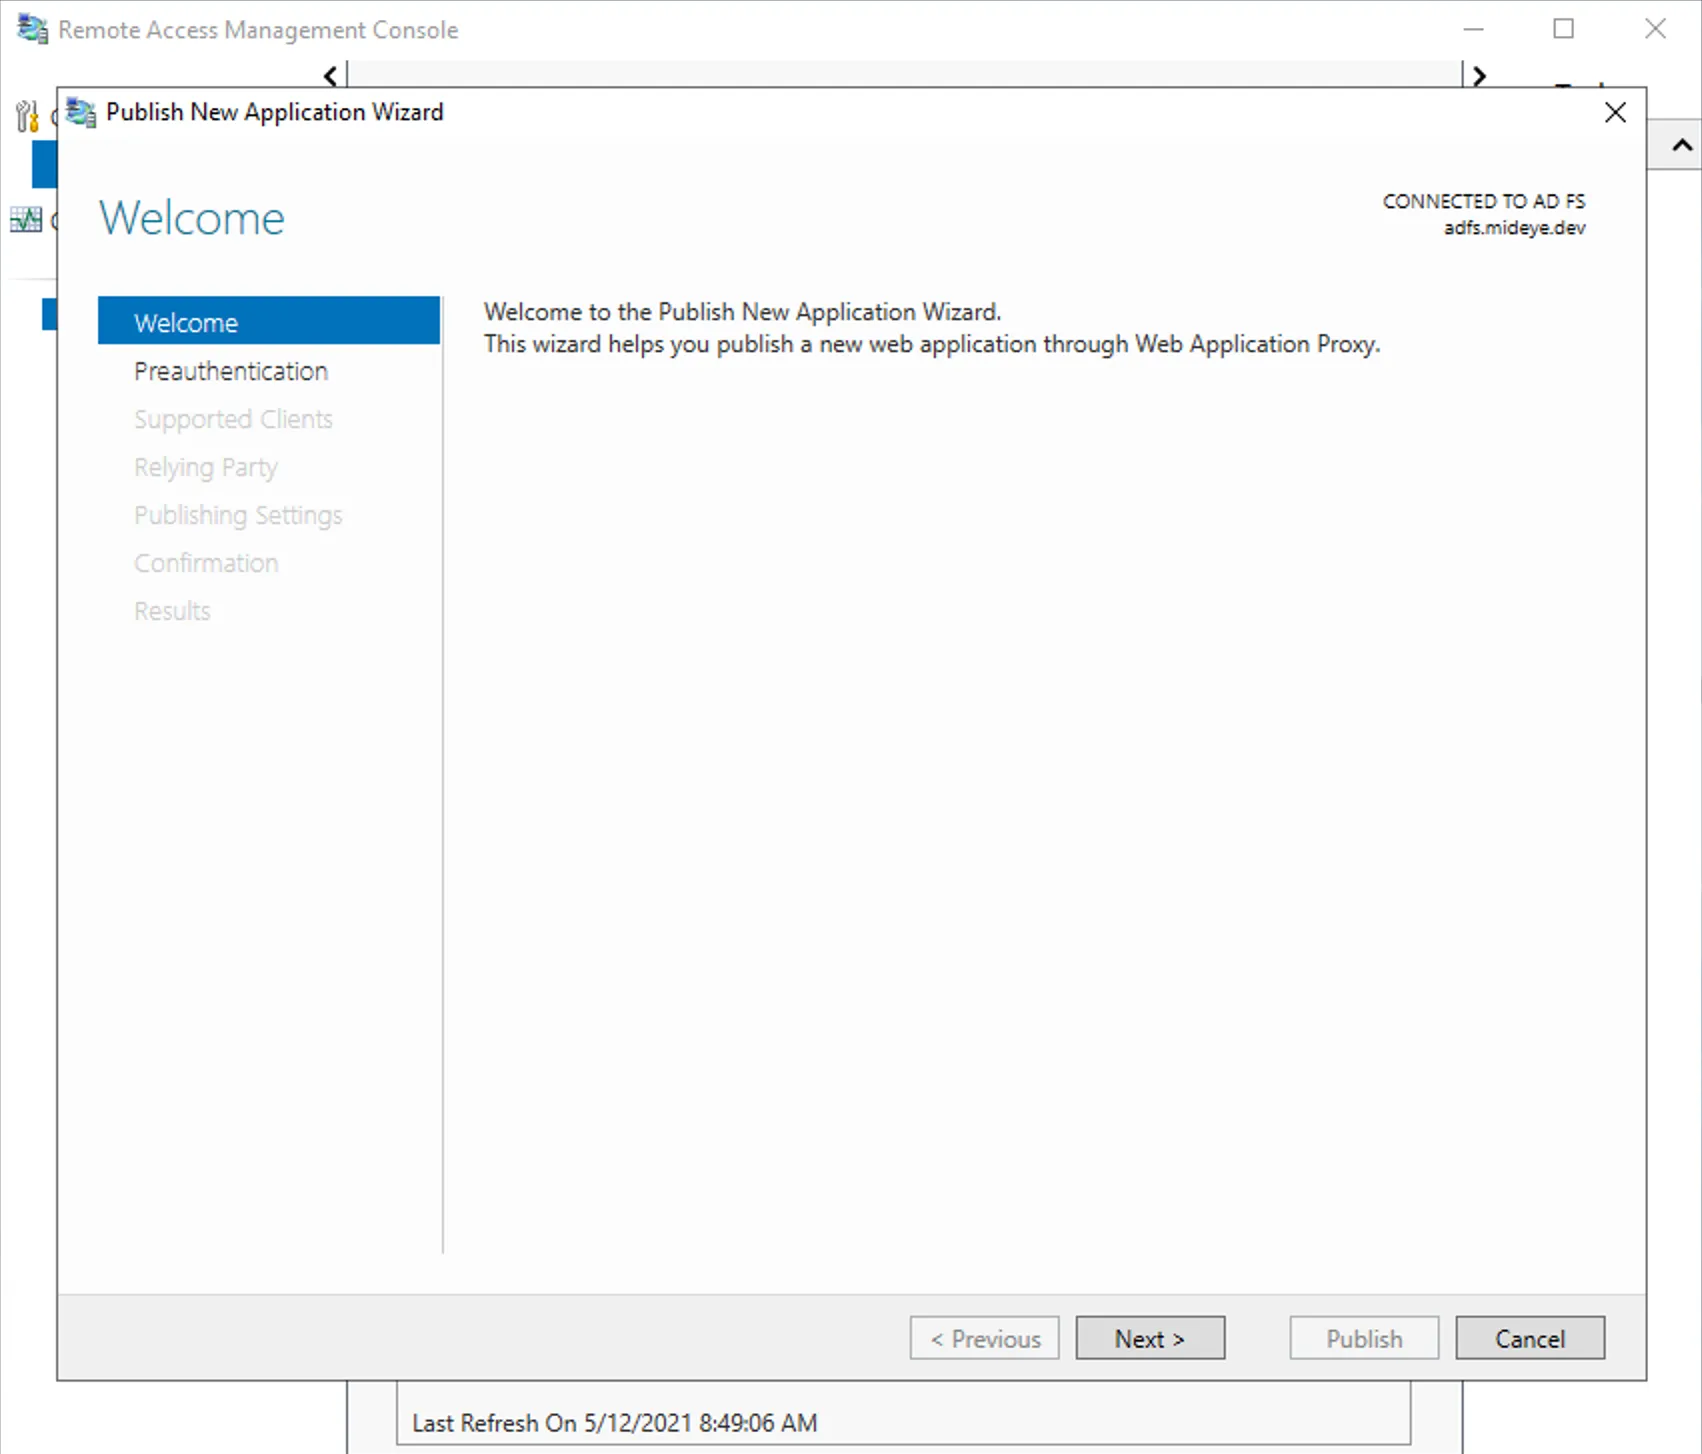
Section titled “Step 2 - Windows GUI”- Click Next in Welcome screen
Step 3 - Windows GUI
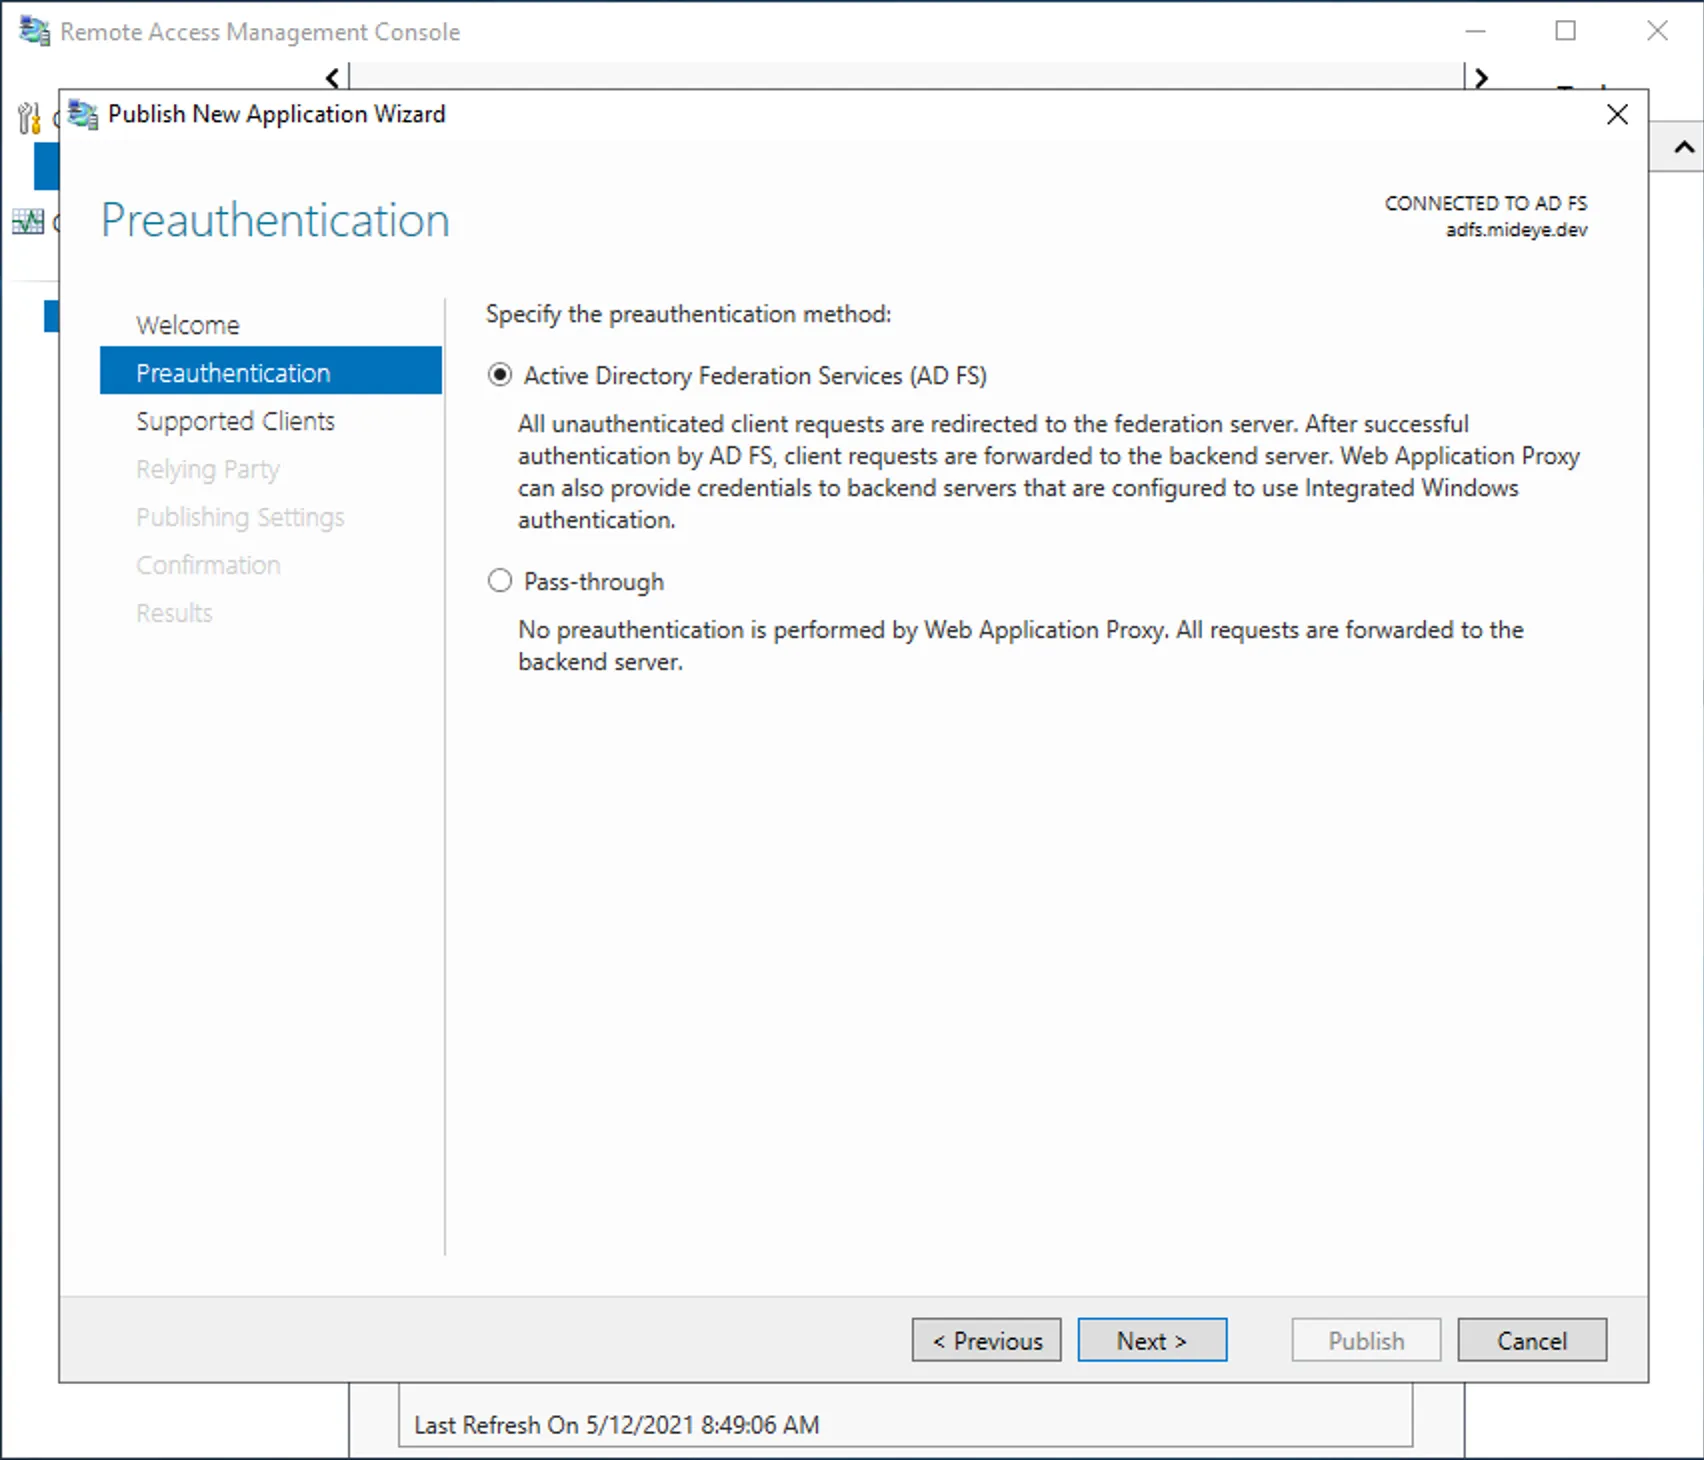
Section titled “Step 3 - Windows GUI”- Select Active Directory Federation Services (AD FS)
Step 4 - Windows GUI
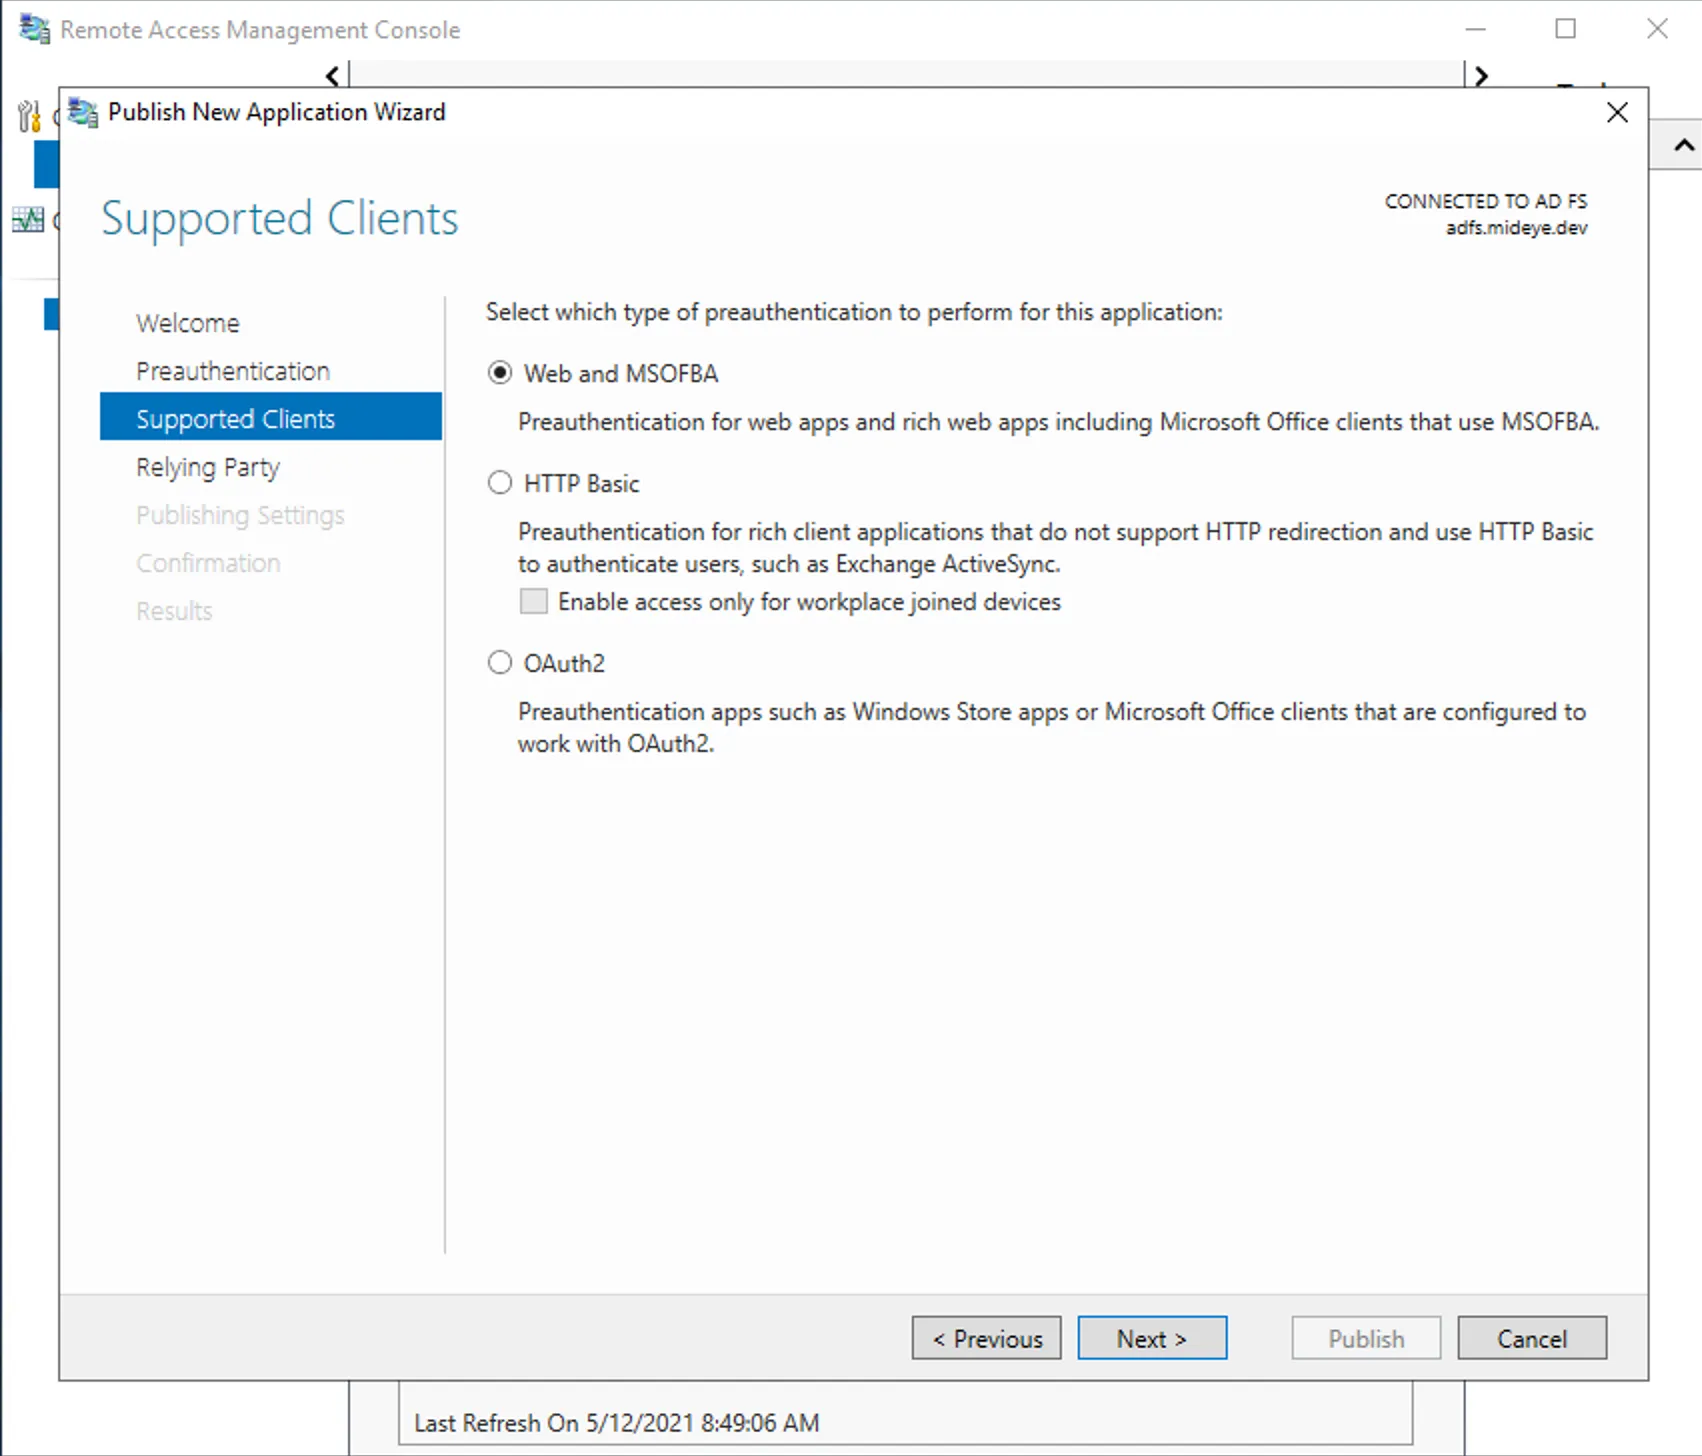
Section titled “Step 4 - Windows GUI”- Select Web and MSOFBA
Step 5 - Windows GUI
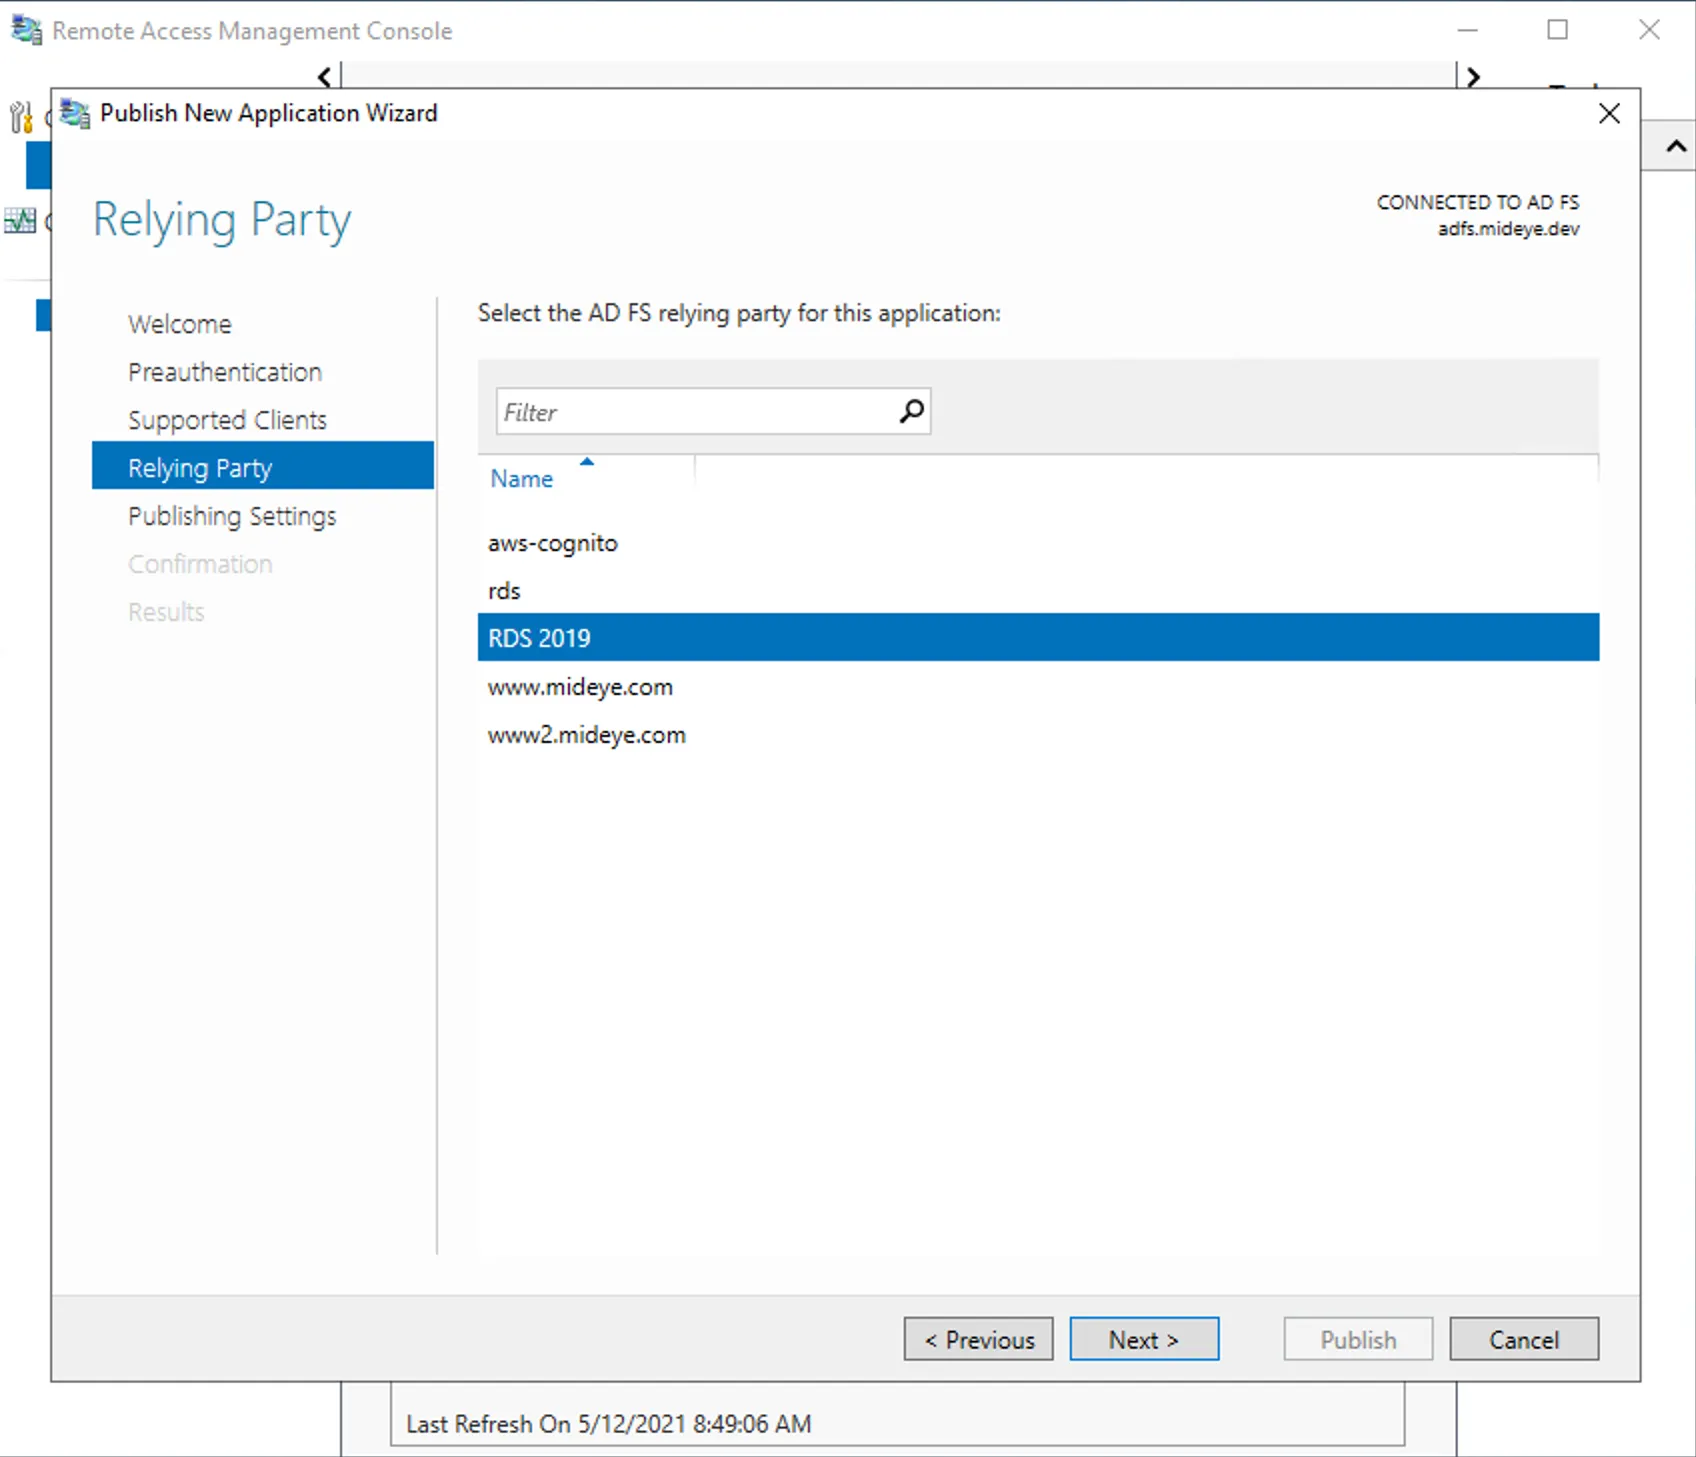
Section titled “Step 5 - Windows GUI”- Select the ADFS relying party that was created in Configure ADFS relying party
Step 6 - Windows GUI
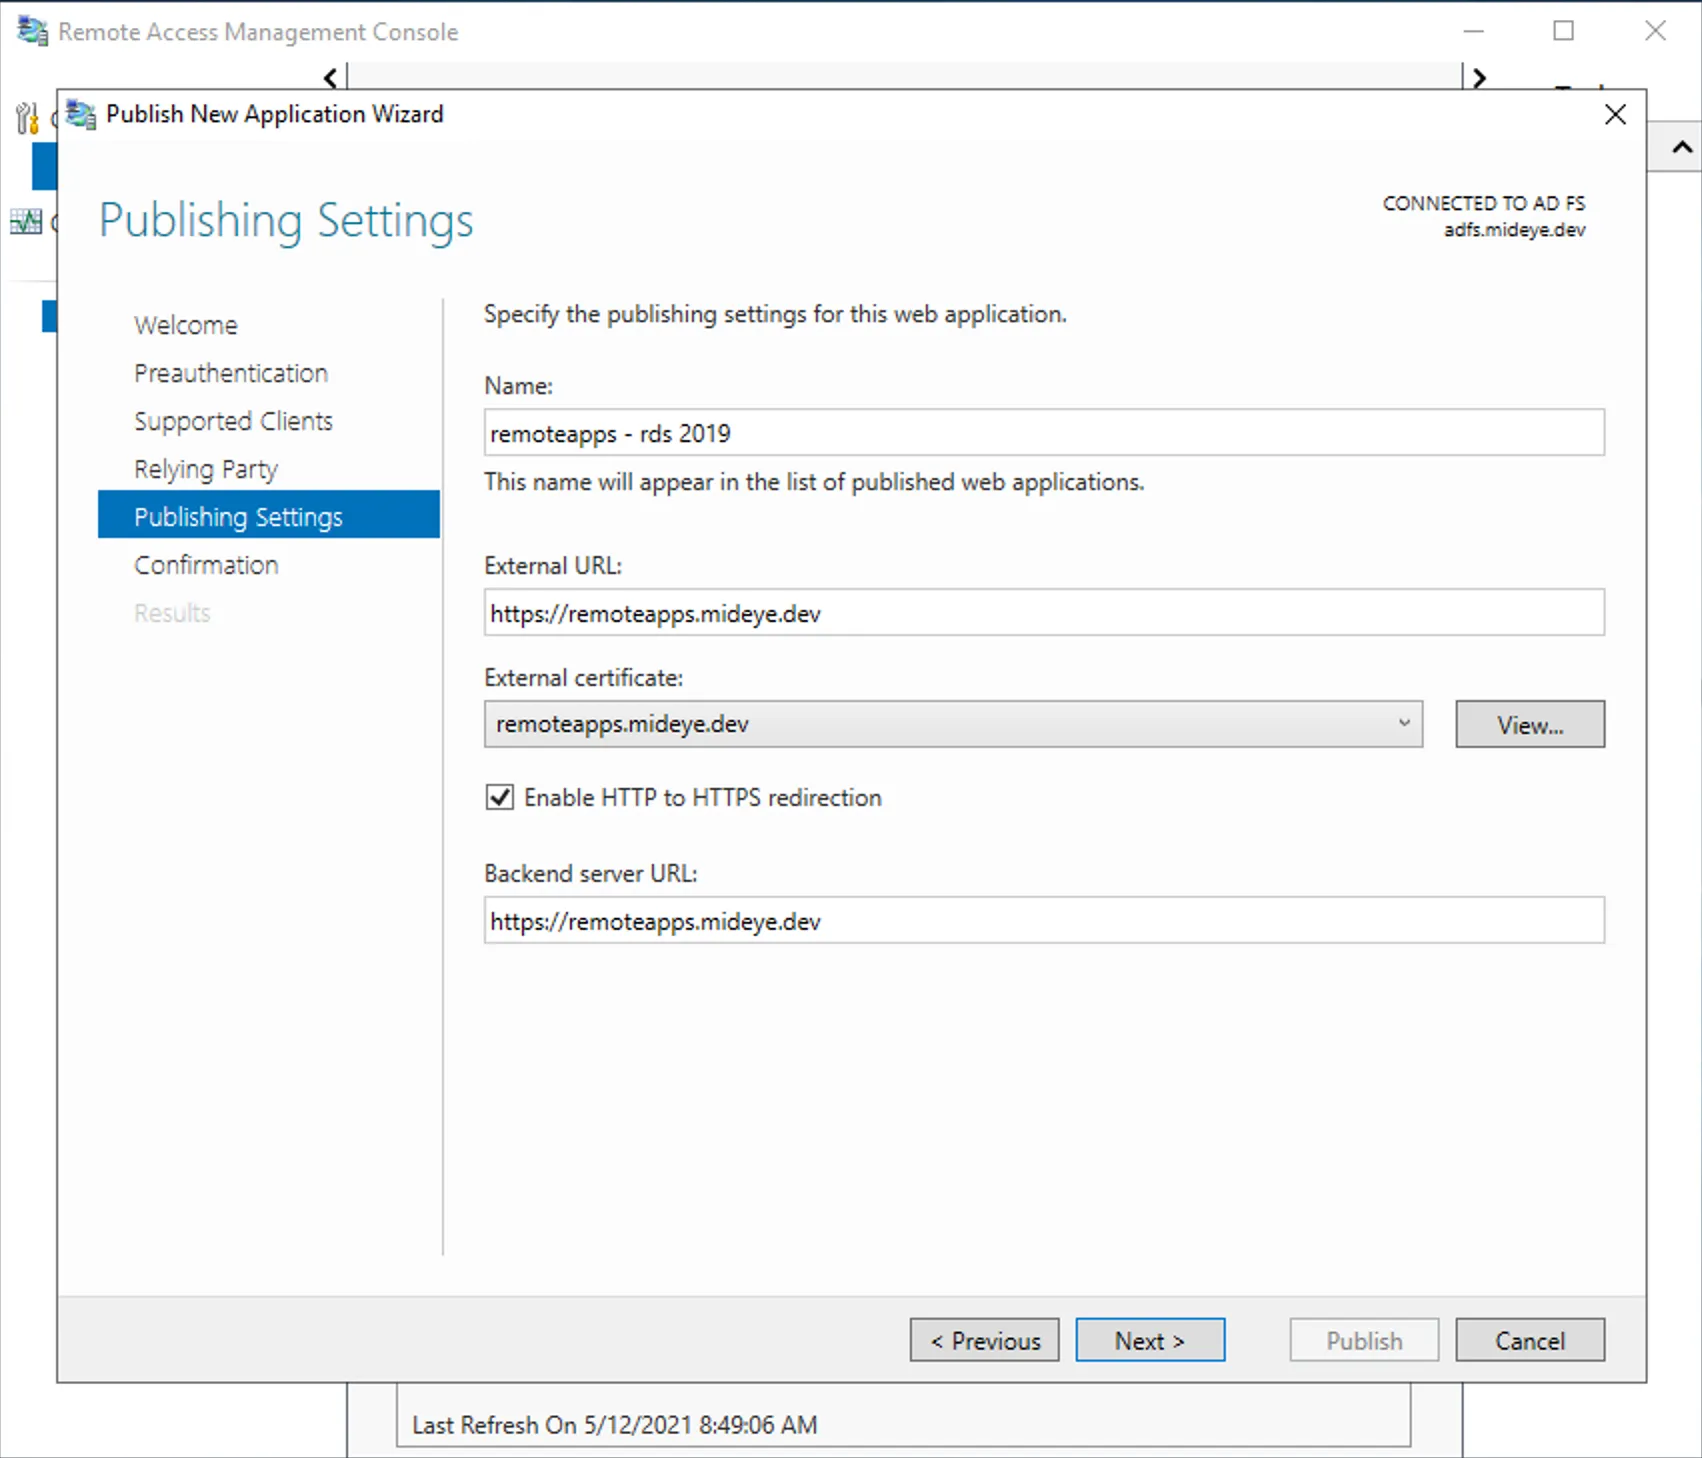
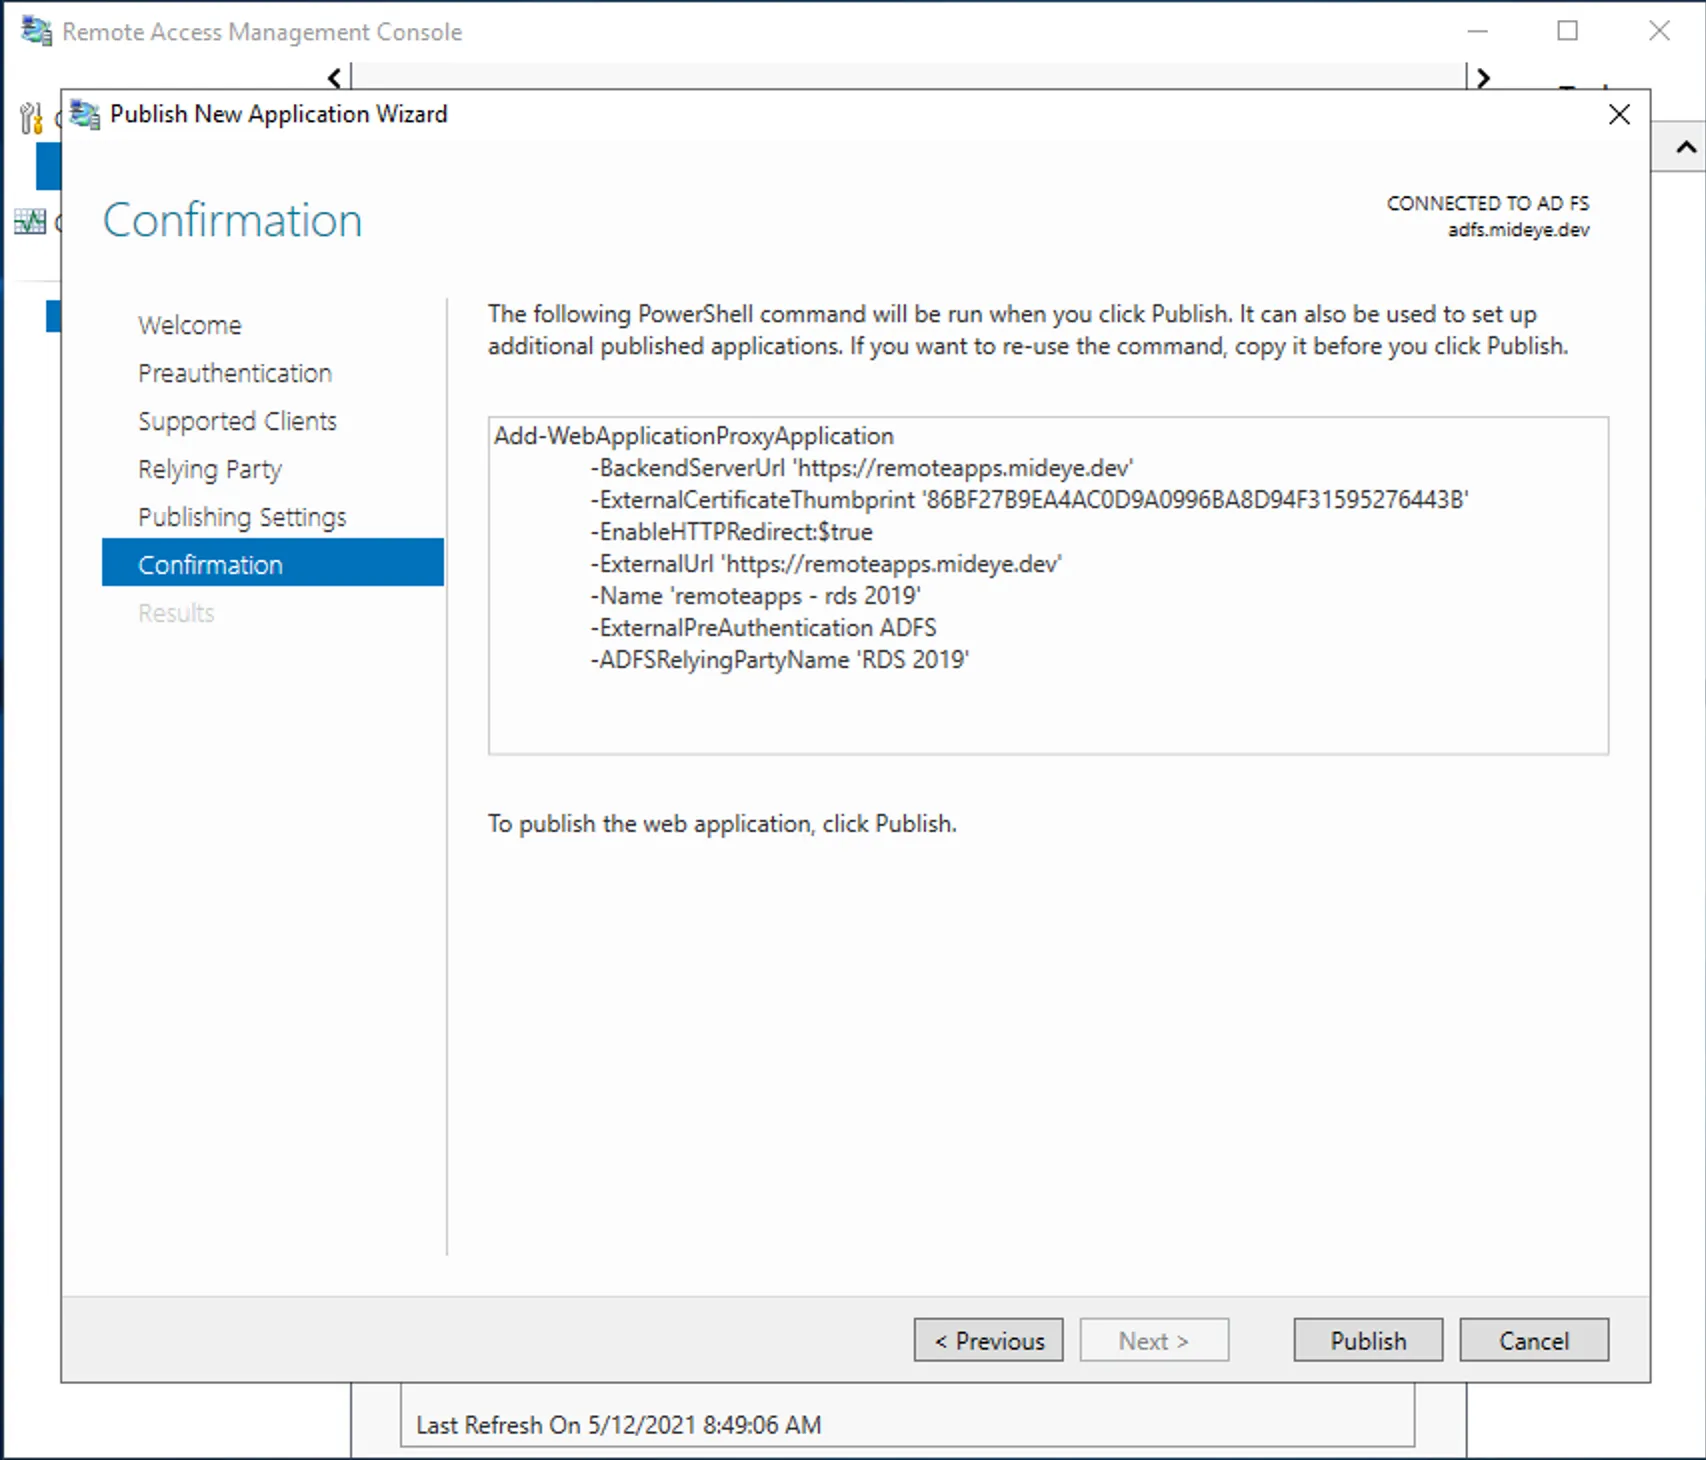
Section titled “Step 6 - Windows GUI”- Add a name, external URL, certificate and backend URL for RDGateway
Step 7 - Windows GUI
Section titled “Step 7 - Windows GUI”- Validate configuration or copy powershell command for documentation.
Step 8 - Windows GUI
Section titled “Step 8 - Windows GUI”- Continue when Application is published successfully.

Step 9 - Windows GUI
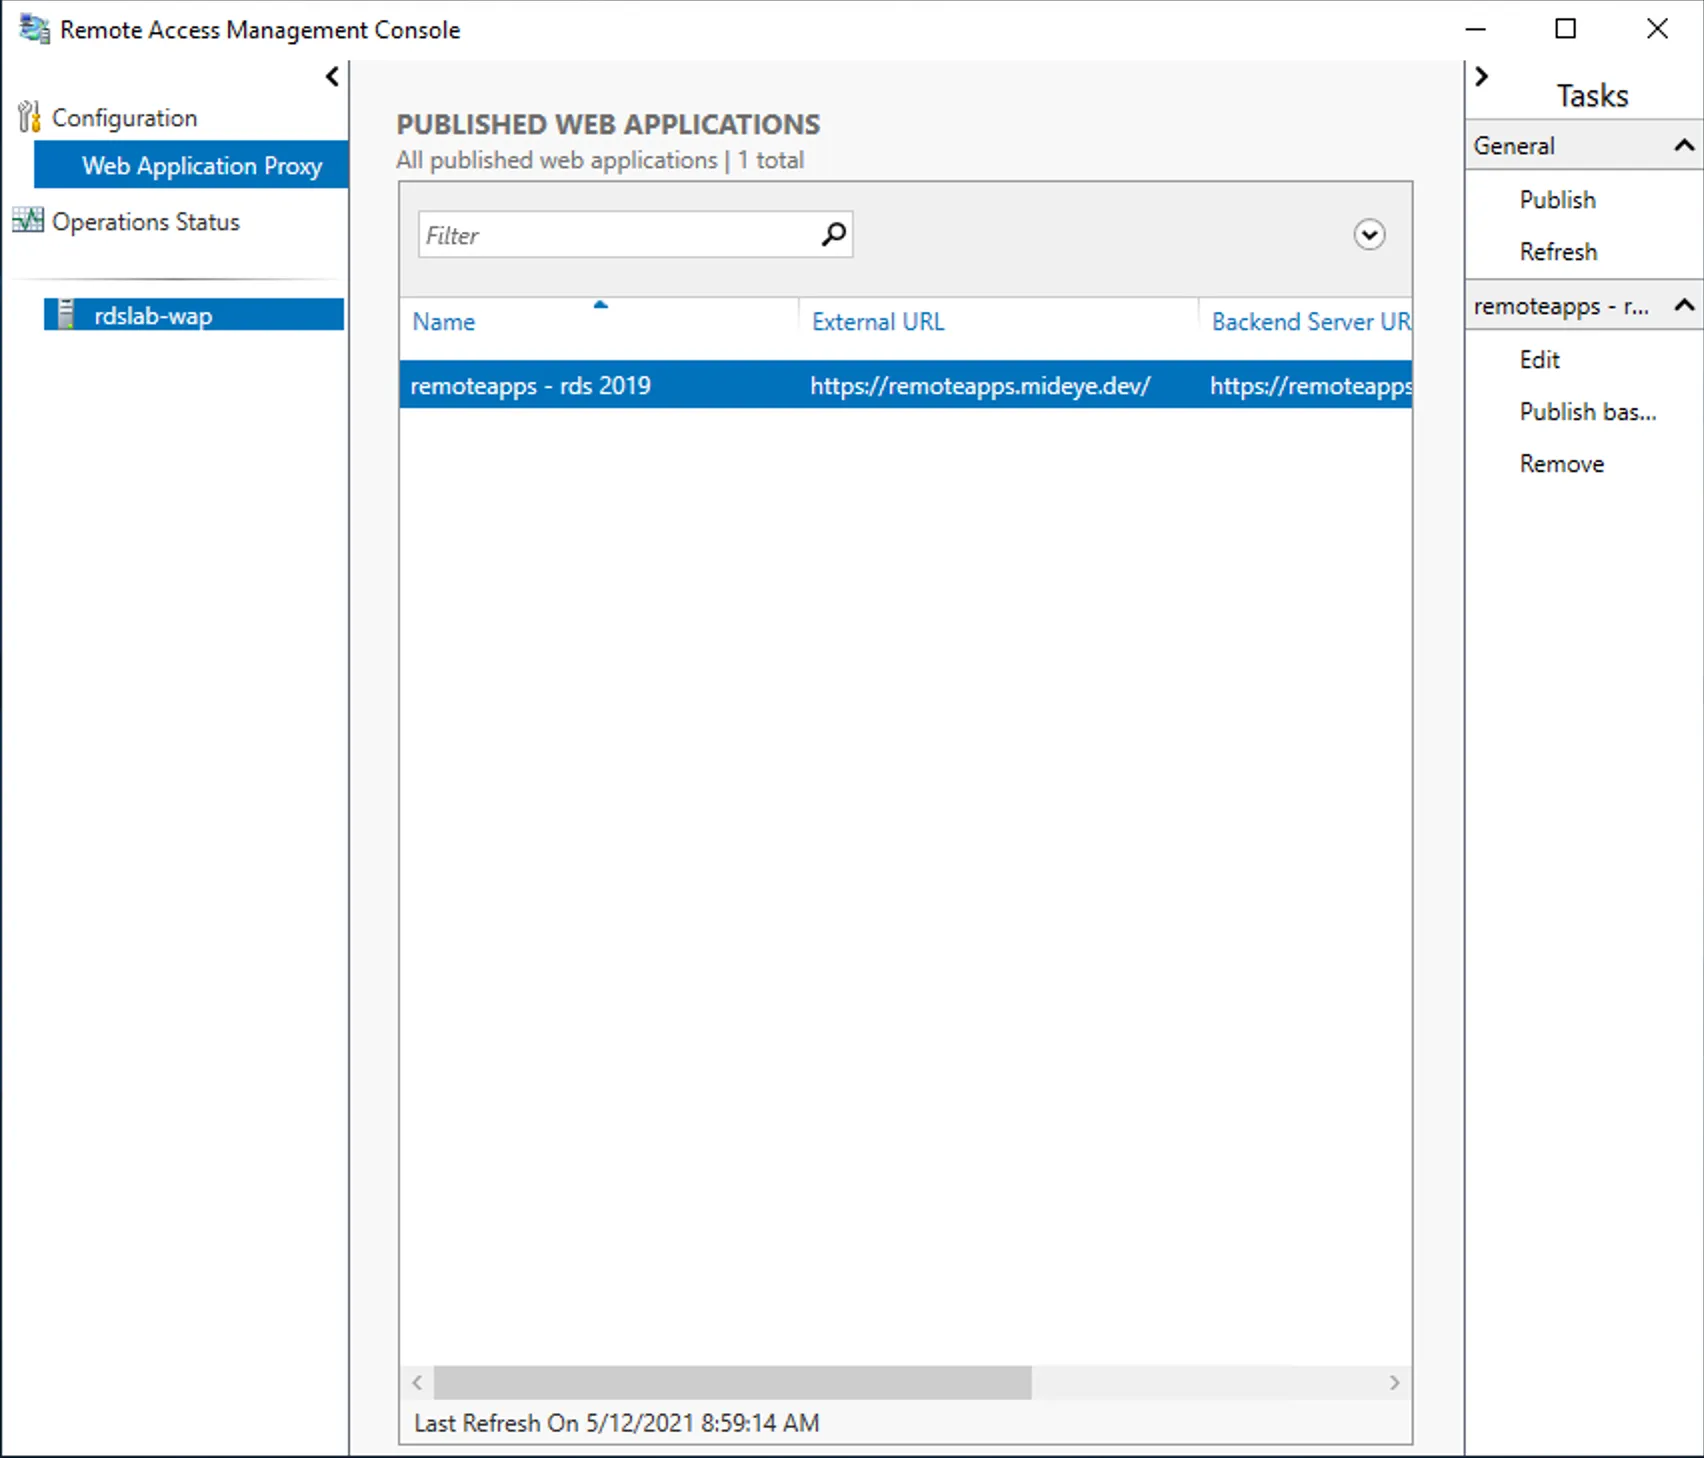
Section titled “Step 9 - Windows GUI”- Verify that name and external URL is correct in published web applications.
Step 1 - Powershell
Section titled “Step 1 - Powershell”Remember to change BackendServerUrl, ExternalUrl, ADFSRelyingPartyName and Thumbprint accordingly.```powershellAdd-WebApplicationProxyApplication -BackendServerUrl 'https://remoteapps.mideye.dev' -ExternalCertificateThumbprint '86BF27B9EA4AC0D9A0996BA8D94F31595276443B' -EnableHTTPRedirect:$true -ExternalUrl 'https://remoteapps.mideye.dev' -Name 'remoteapps - rds 2019' -ExternalPreAuthentication ADFS -ADFSRelyingPartyName 'RDS 2019'```Disable Cookie Protection
On the WAP server. Right-click Windows button and open Windows PowerShell (Admin)
-Name should be the same as in WebApplication Proxy Application created in previous step.
Get-WebApplicationProxyApplication -Name "remoteapps - rds 2019" | Set-WebApplicationProxyApplication -DisableHttpOnlyCookieProtection:$true5. Configure RDweb / RDgateway
Section titled “5. Configure RDweb / RDgateway”- Enable Windows Auth
Enable windows authentication and disable forms.
Step 1 - Windows Auth
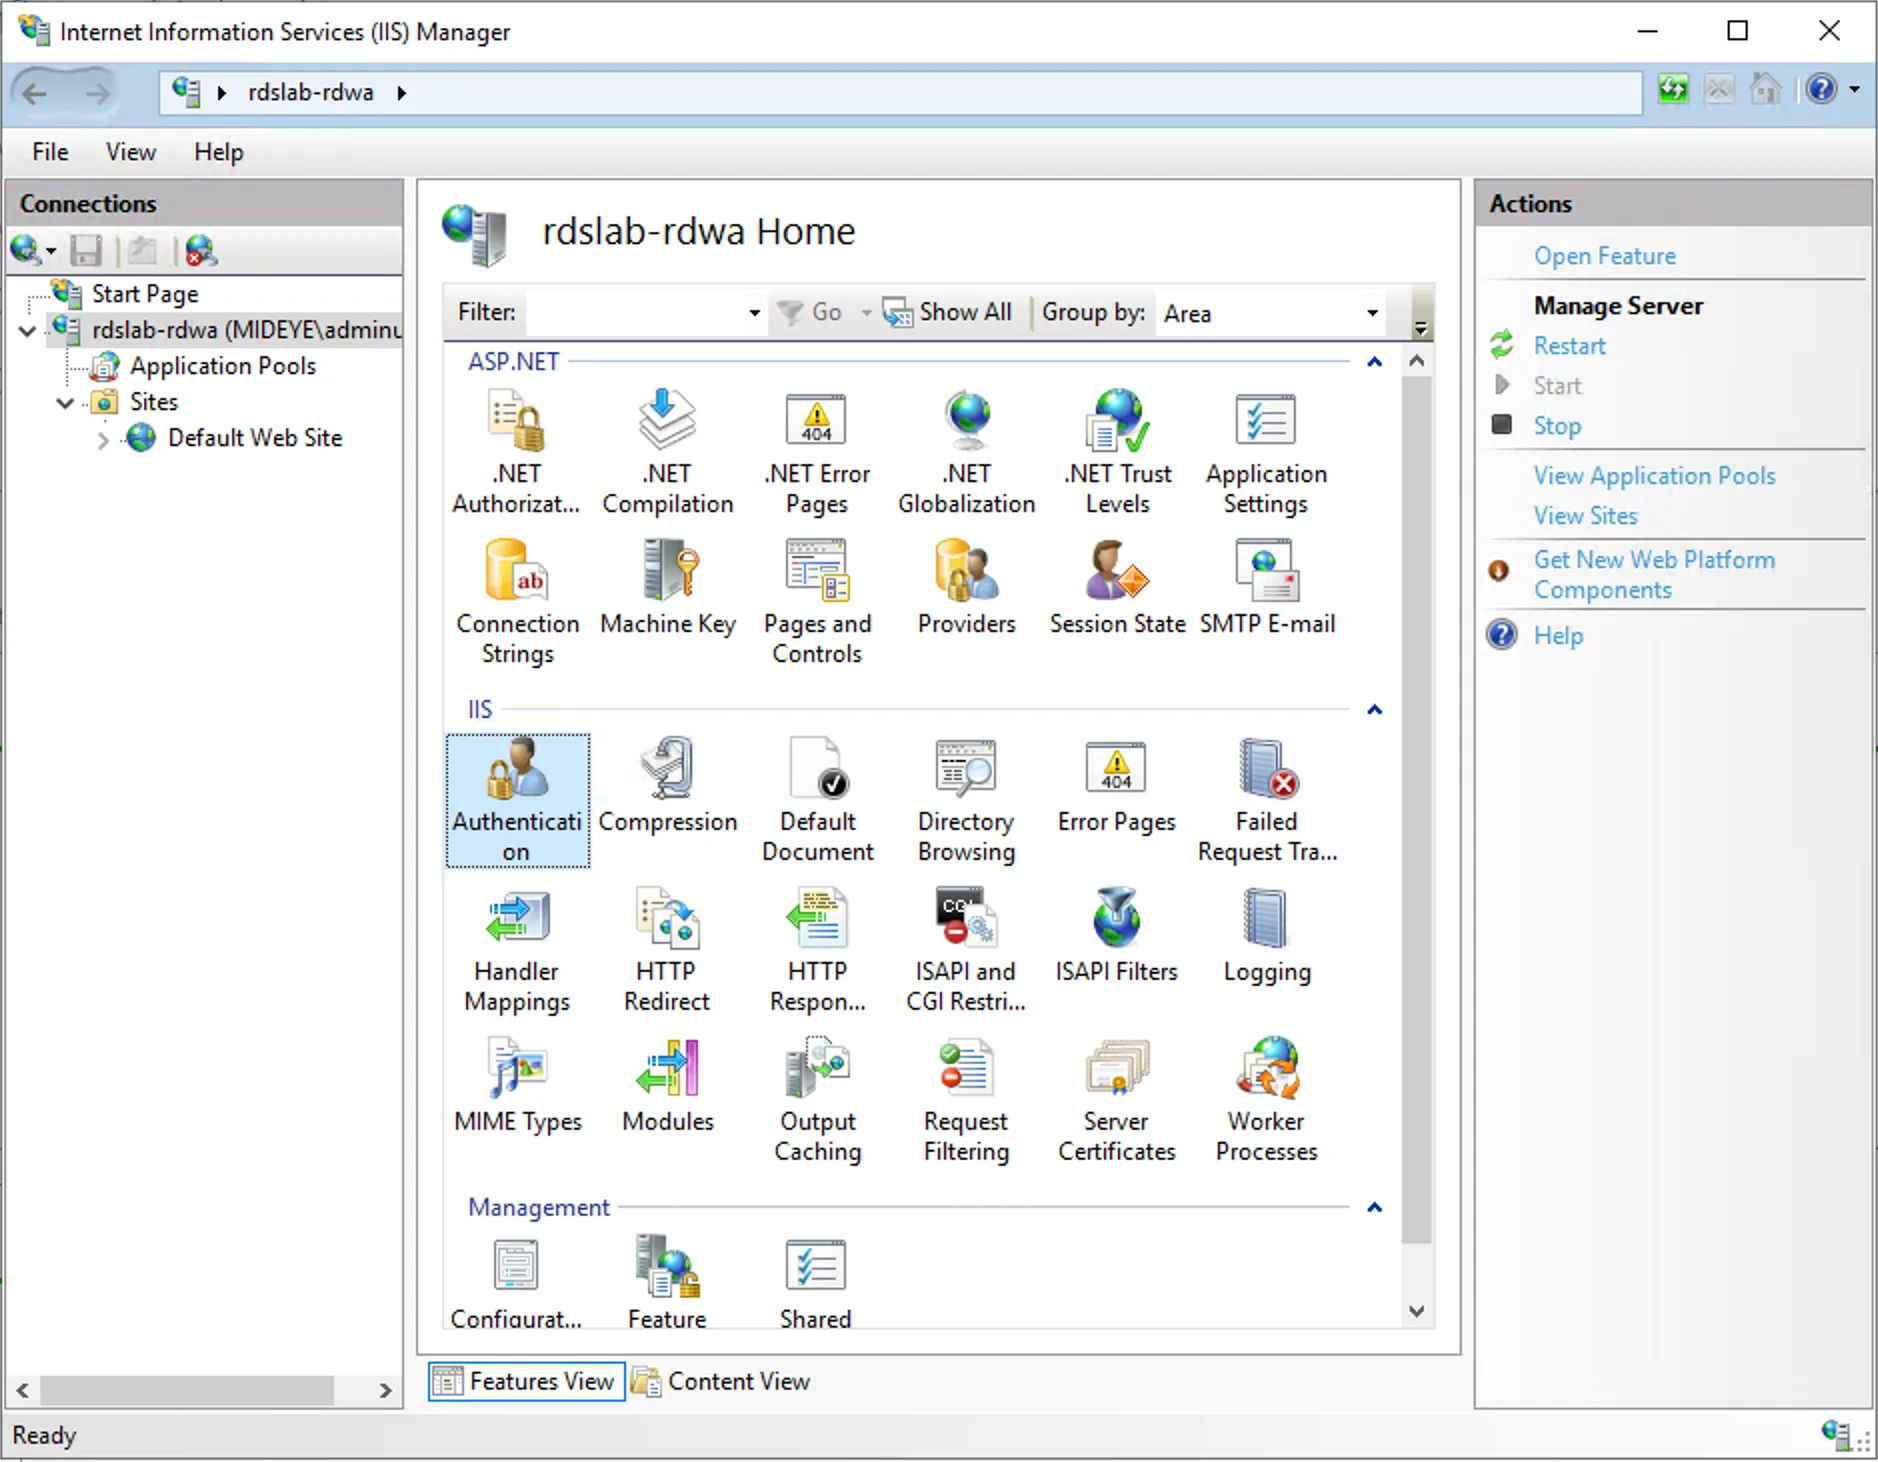
Section titled “Step 1 - Windows Auth”- Open IIS and navigate to the server and open “Authentication”
Step 2 - Windows Auth
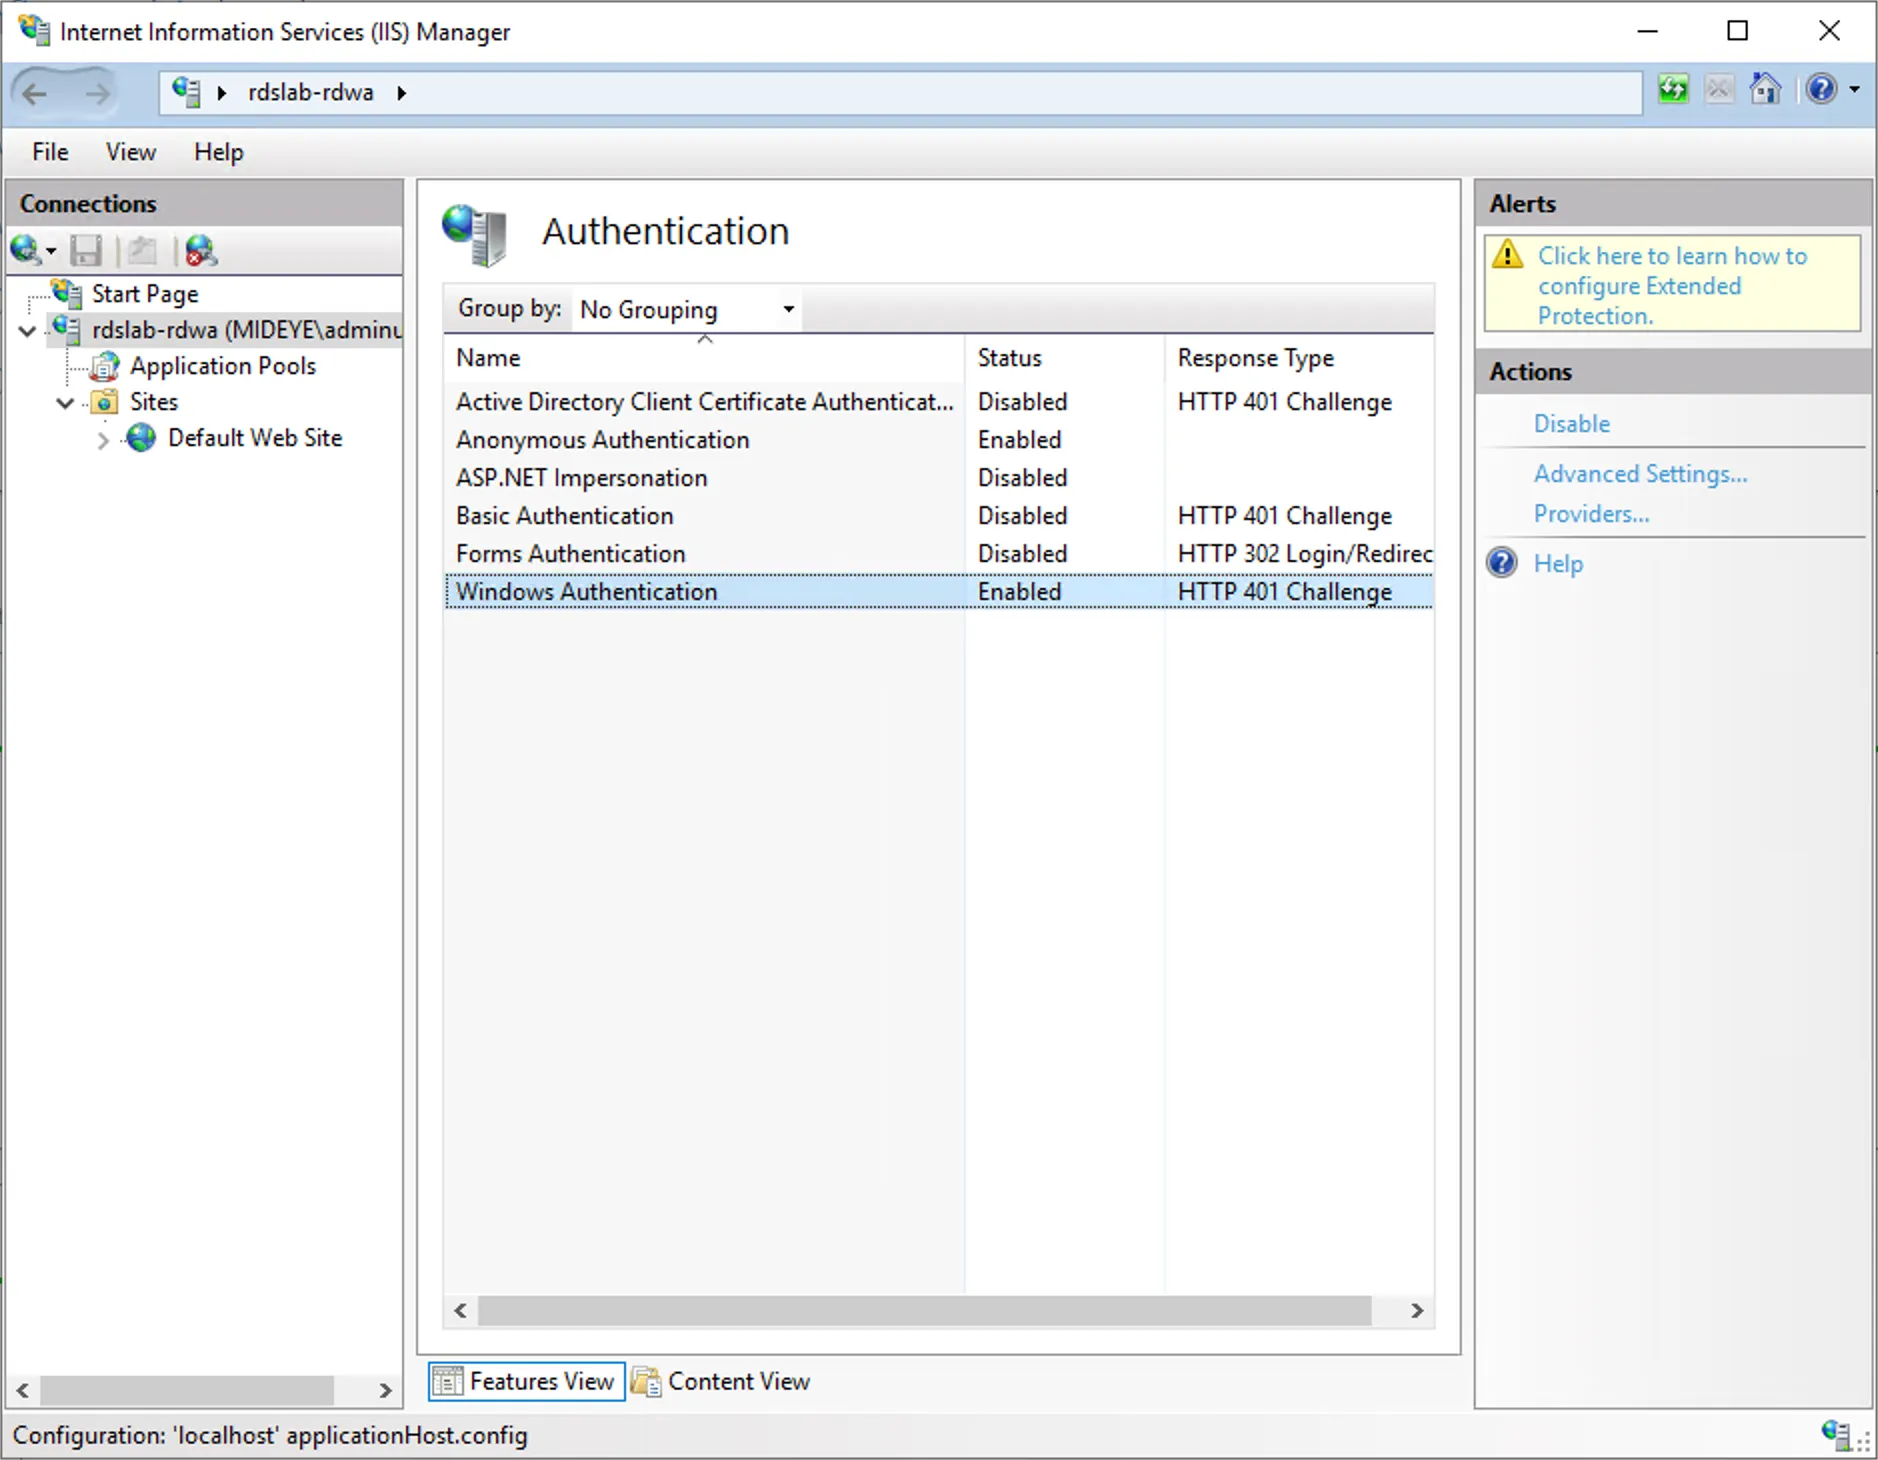
Section titled “Step 2 - Windows Auth”- Set Windows authentication to “Enabled”
- Set Forms Authentication to “Disabled”
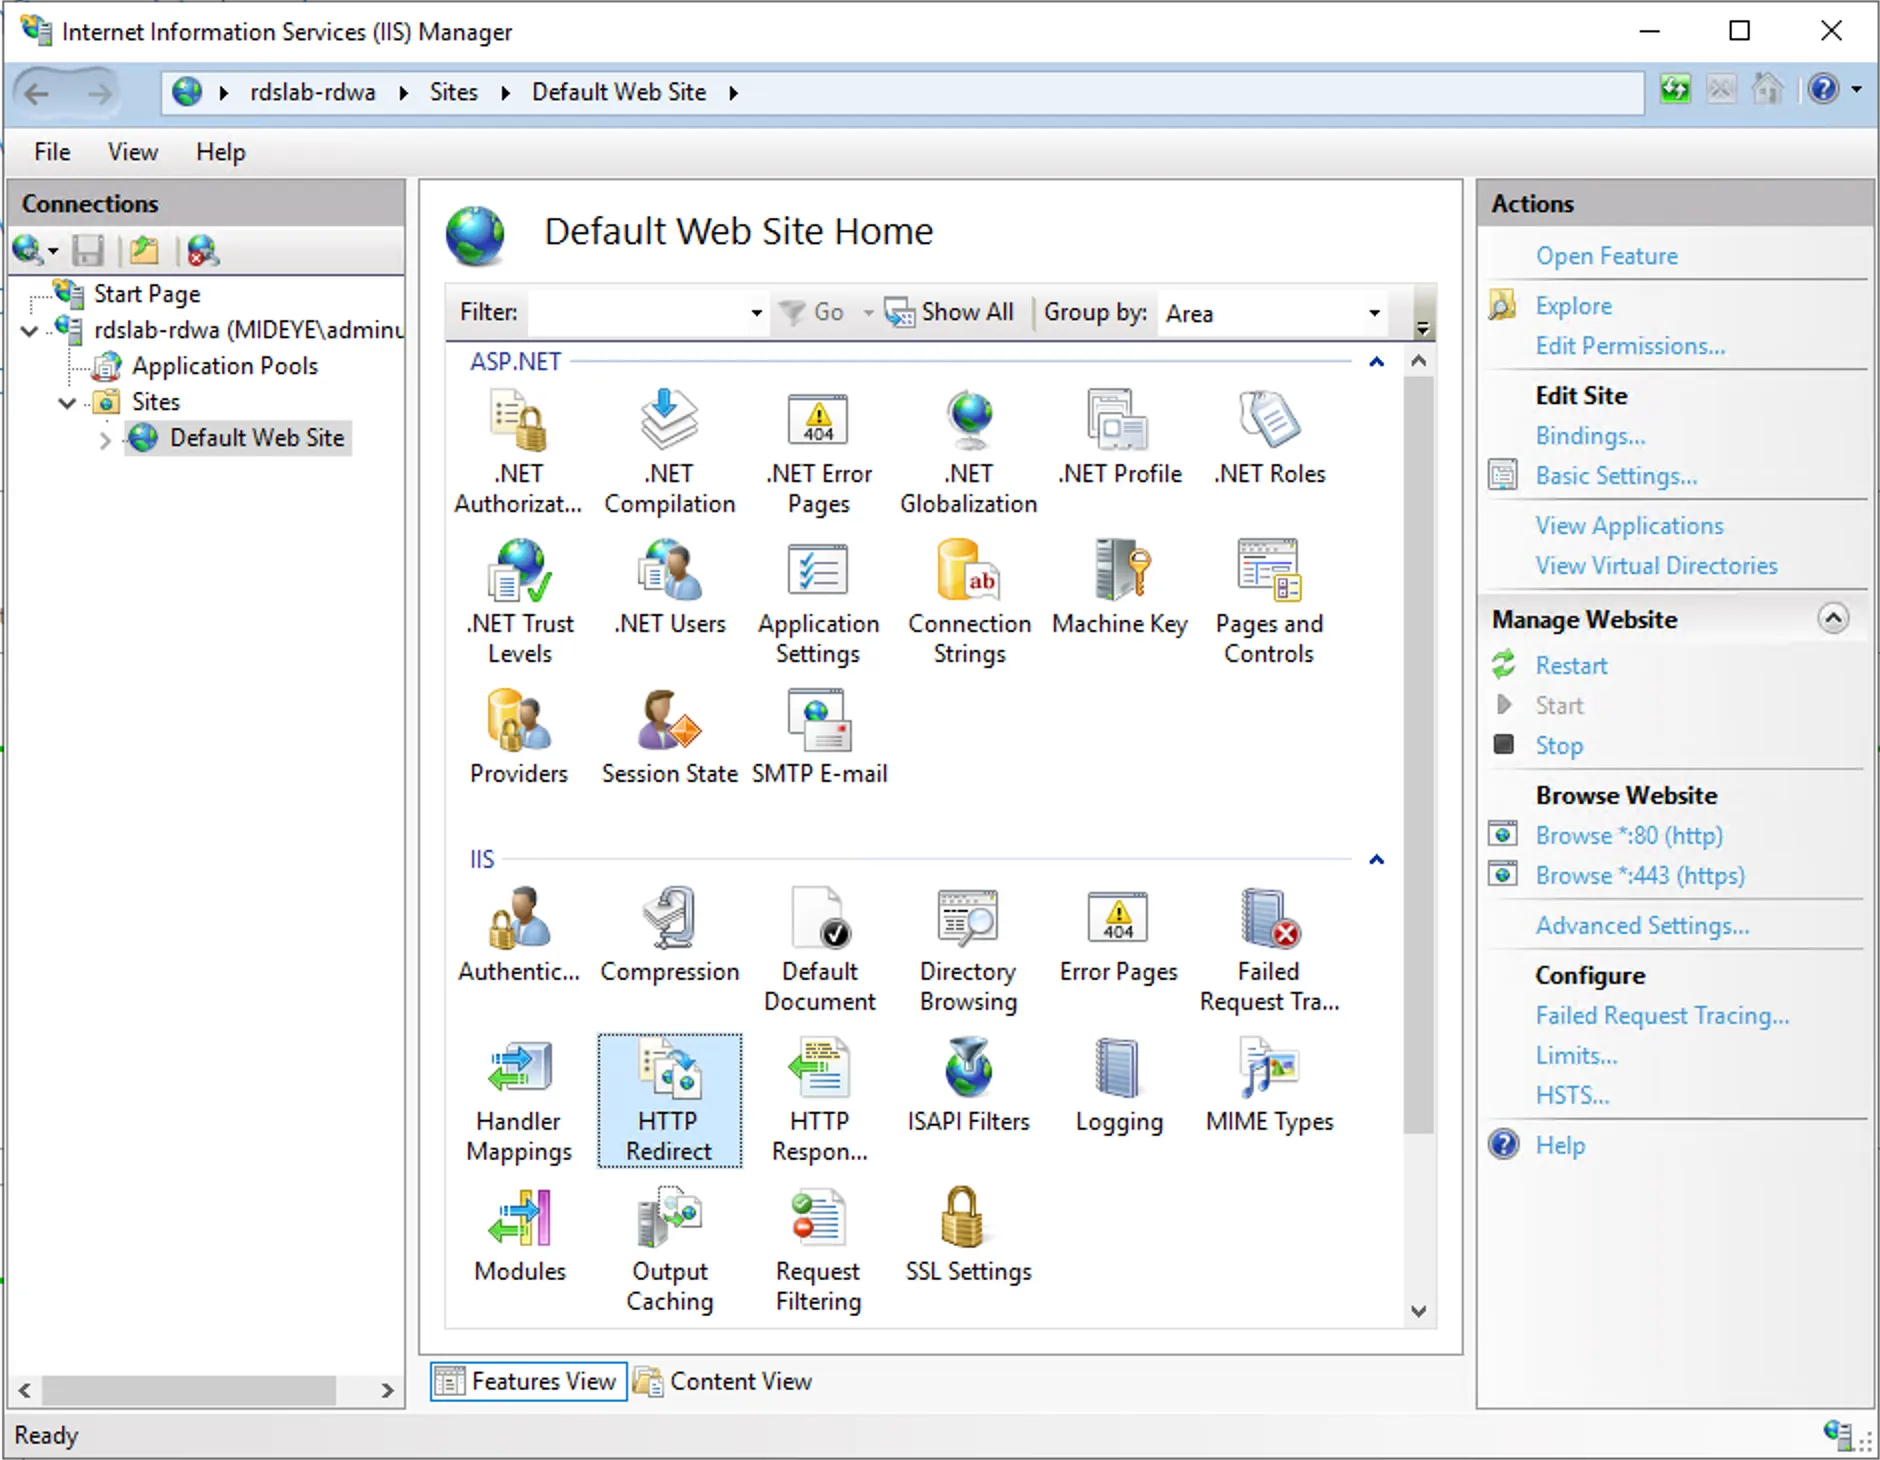
- HTTP Redirect
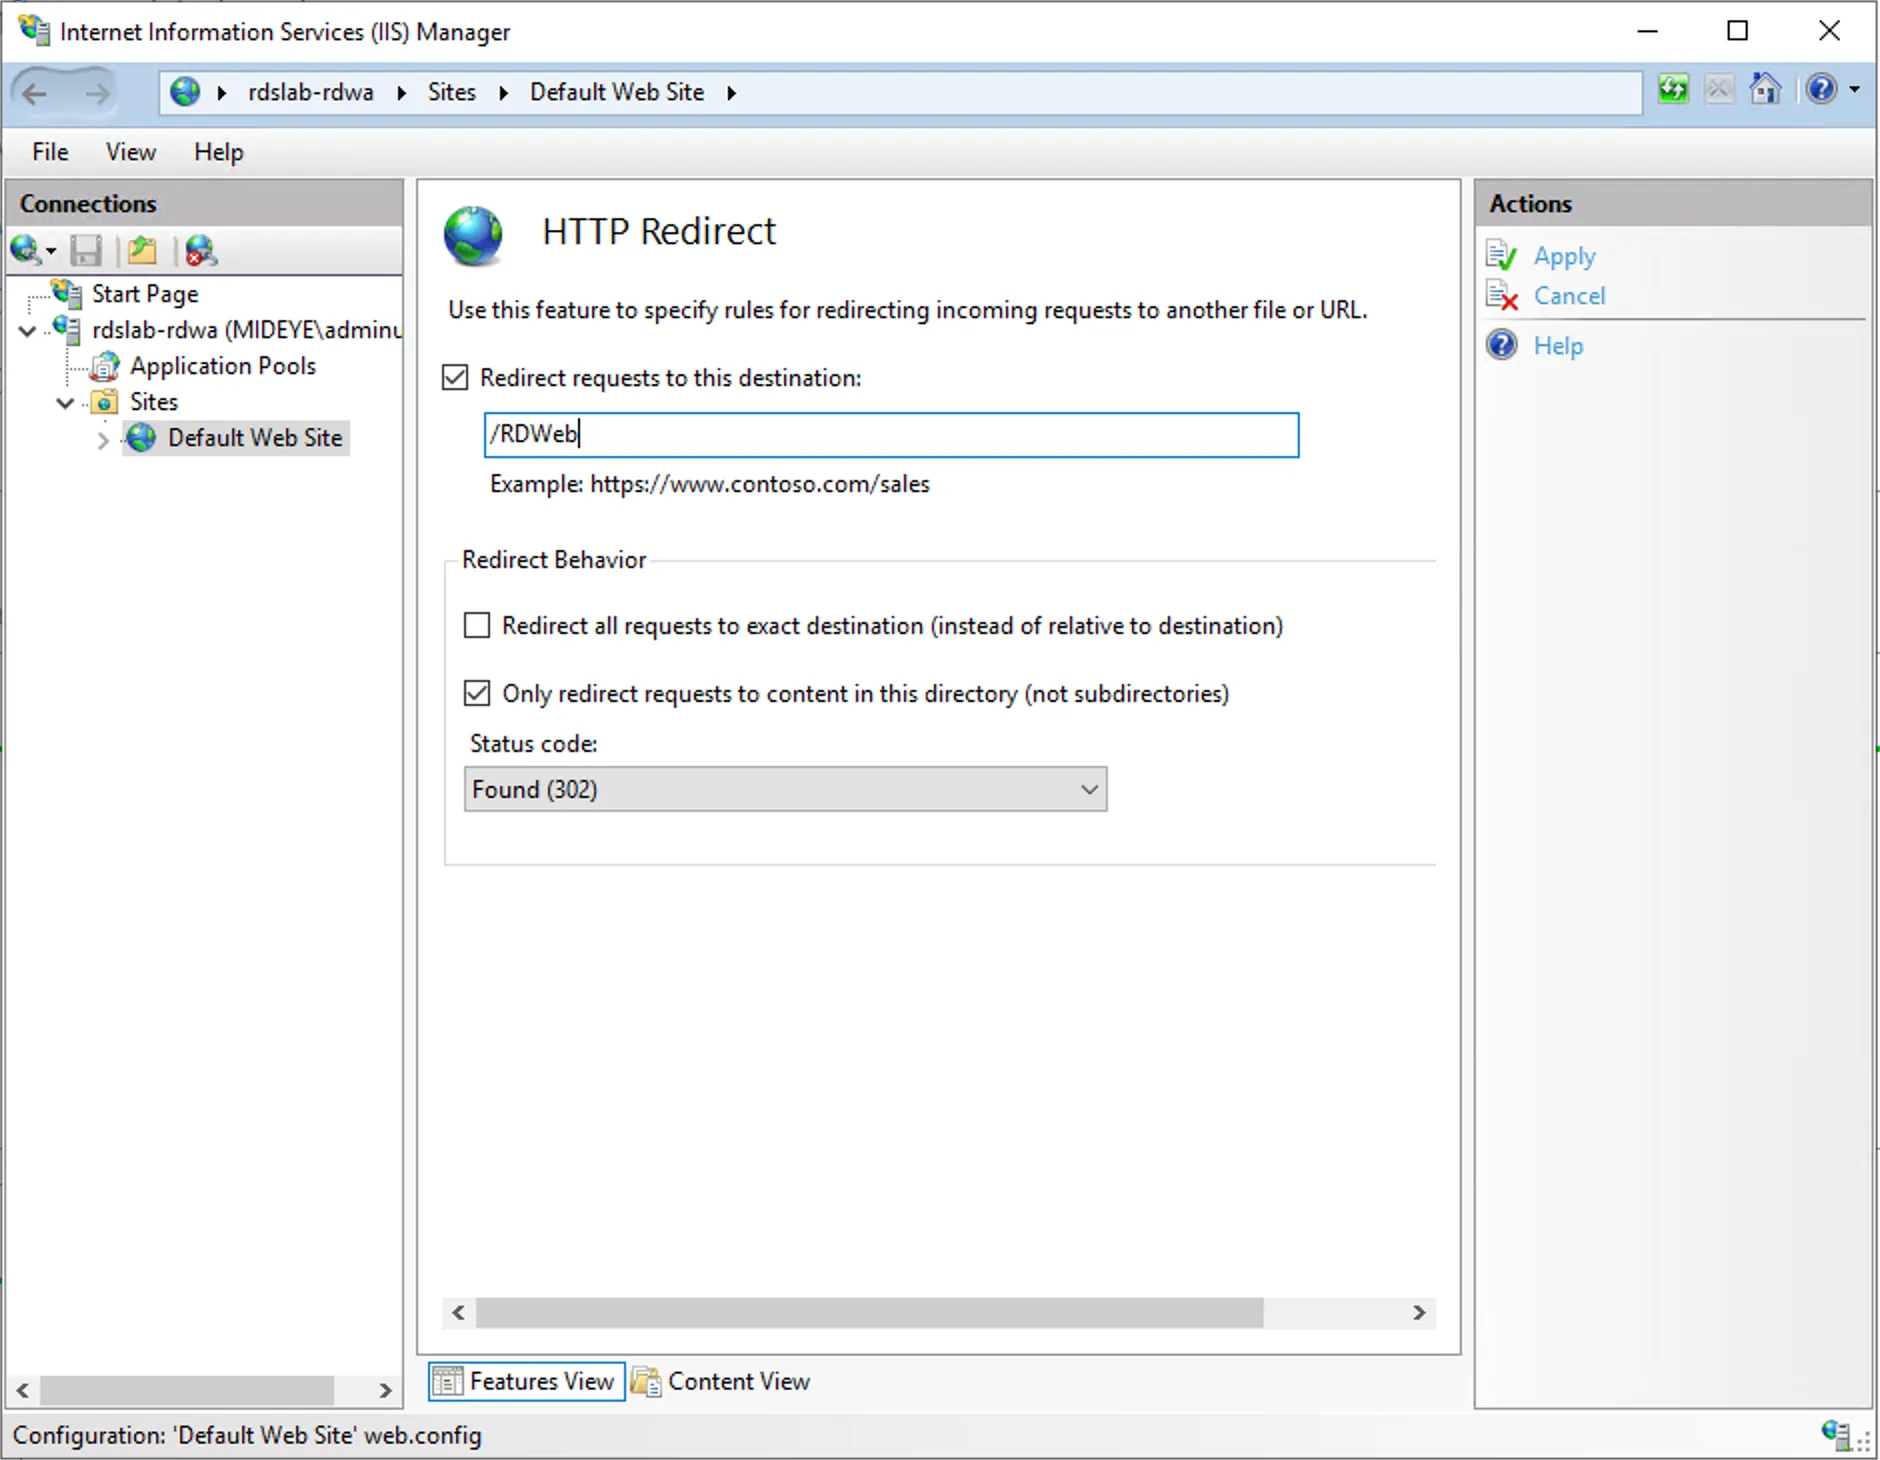
Navigate to “Default Web Site” followed by “HTTP redirect”. Create a redirect to /RDweb and check the “Only redirect requests to content in this directory” box. Click apply.
Step 1 - HTTP Redirect
Section titled “Step 1 - HTTP Redirect”- Open IIS Management console
Step 2 - HTTP Redirect
Section titled “Step 2 - HTTP Redirect”- Navigate to Default Site and HTTP redirect
Step 3 - HTTP Redirect
Section titled “Step 3 - HTTP Redirect”- Change Redirect url to /RDweb
- Uncheck Redirect all requests to exact destination (instead of relative to destination)
- Check the Only redirect requests to content in this directory (not subdirectories)
- Modify web.config
Right-click Windows button and open Windows PowerShell (Admin)
Edit Webconfig
notepad.exe $env:windir\Web\RDWeb\Pages\Web.config- Enable Windows authentication (uncomment)
- Disable Forms authentication (comment)
Enable Windows Authentication
xml <authentication mode="Windows"> <!-- <authentication mode="Forms"> <forms loginUrl="default.aspx" name="TSWAAuthHttpOnlyCookie" protection="All" requireSSL="true" /> </authentication> -->
File before edit
xml <!-- <authentication mode="Windows"/> --> <authentication mode="Forms"> <forms loginUrl="default.aspx" name="TSWAAuthHttpOnlyCookie" protection="All" requireSSL="true" /> </authentication>
- Disable the forms authentication module
Disable Forms Module
xml </handlers> <!-- <modules runAllManagedModulesForAllRequests="true"> <remove name="FormsAuthentication" /> <add name="RDWAFormsAuthenticationModule" type="Microsoft.TerminalServices.Publishing.Portal.FormAuthentication.TSDomainFormsAuthentication" /> </modules> -->
File before Edit
xml </handlers> <modules runAllManagedModulesForAllRequests="true"> <remove name="FormsAuthentication" /> <add name="RDWAFormsAuthenticationModule" type="Microsoft.TerminalServices.Publishing.Portal.FormAuthentication.TSDomainFormsAuthentication" /> </modules>
- Set windowsauthentication to true
- Set anonymousAuthentication to false
Set authentication methods
xml <security> <authentication> <windowsAuthentication enabled="true" /> <anonymousAuthentication enabled="false" /> </authentication> </security>
File before edit
xml <security> <authentication> <windowsAuthentication enabled="false" /> <anonymousAuthentication enabled="true" /> </authentication> </security>
Save and close Web.config file.
Modify default.aspx
Right-click Windows button and open Windows PowerShell (Admin)
notepad.exe $env:windir\Web\RDWeb\Pages\en-US\Default.aspxEdit line 35 so it looks like following usually its just bPrivateMode = true that needs to be changed.
public bool bShowPublicCheckBox = false, bPrivateMode = true, bRTL = false;Save and close.
Right-click Windows button and open Windows PowerShell (Admin)
Run iisreset
iisreset.exe6. Configuration Connection Broker(s)
Section titled “6. Configuration Connection Broker(s)”From the active connection broker, run the following command from an elevated powershell prompt. Change collection name and pre-authentication server.
Right-click Windows button and open Windows PowerShell (Admin)
Import-Module RemoteDesktopSet-RDSessionCollectionConfiguration -CollectionName RemoteApps -CustomRdpProperty "pre-authentication server address:s:https://remoteapps.mideye.dev`nrequire pre-authentication:i:1"Verify configuration
(Get-RDSessionCollectionConfiguration -CollectionName RemoteApps).CustomRdpProperty
pre-authentication server address:s:https://remoteapps.mideye.devrequire pre-authentication:i:1use redirection server name:i:17. Configure Users Client Internet Explorer ONLY!
Section titled “7. Configure Users Client Internet Explorer ONLY!”-
Open Internet Explorer and go to Internet Options. Select Security and add the URL to trusted sites (https://remoteapps.mideye.dev which should point at WAP)
-
Click Close and select Custom Level
-
At the bottom of the list, select automatic logon with current username and password.
Troubleshooting
Section titled “Troubleshooting”Remote Desktop Connection Failed
Section titled “Remote Desktop Connection Failed”Description: Error message with Your computer can’t connect to the remote computer because authentication to the firewall failed due to missing firewall credentials…
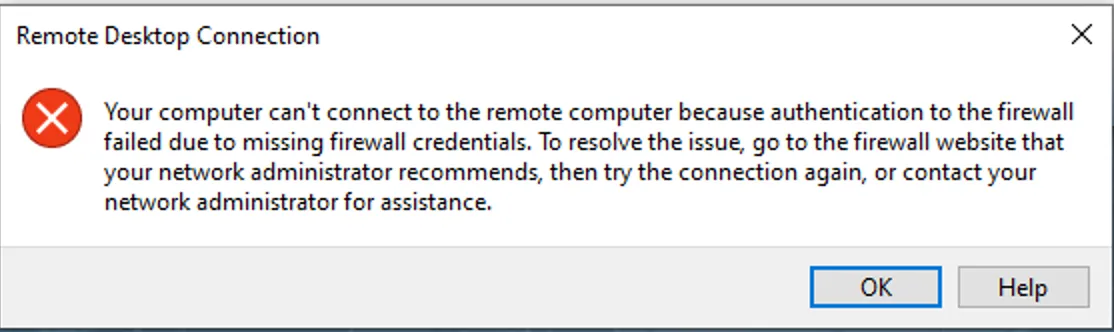
This happens when opening the RDP file/link from something else than Internet Explorer to connect to RDWeb.
Related links
Section titled “Related links”Mideye documentation
Section titled “Mideye documentation”- ADFS Mideye Module — install the Mideye ADFS authentication module
- RDS with Touch Accept — alternative RDS approach without ADFS/WAP
- Windows Integrations — overview of all Windows integration options
Official Microsoft documentation
Section titled “Official Microsoft documentation”- Remote Desktop Services — RDS deployment and configuration
- Web Application Proxy — WAP deployment reference
- ADFS Overview — Active Directory Federation Services