Install Mideye Server 4 on Linux (RHEL/CentOS)
Introduction
Section titled “Introduction”This guide helps system administrators install, upgrade, or uninstall Mideye Server version 4 on CentOS 7 or RHEL 7. Mideye Server provides MFA (multi-factor authentication) via RADIUS for VPNs, Citrix, and other enterprise applications.
Use this guide if you need to:
- Perform a fresh installation of Mideye Server on Linux
- Upgrade an existing Mideye Server v4 installation
- Uninstall Mideye Server while preserving data
See also: Pre-install checklist
Installation
Section titled “Installation”This chapter describes the procedure for a fresh installation of Mideye Server. If a previous version of Mideye Server is already installed, please see the section Upgrade below.
Prerequisites
Section titled “Prerequisites”Before executing the Mideye Server installation package you need the following:
- An updated release of CentOS 7.
- A clean database on MySQL dedicated to Mideye.
Root Account
Section titled “Root Account”In order to install Mideye Server it is necessary to execute the installation package as root.
Obtaining Installation Package
Section titled “Obtaining Installation Package”Mideye Server installation package can be downloaded from the Downloads page with username and password provided by Mideye Support. Provide your phone number when asking for credentials since the download page is protected with two-factor authentication.
In the Linux folder, you will find installation packages (rpm) for 64 bit (x86_64) operating systems.
Database
Section titled “Database”Mideye Server needs a database that be can installed locally or be hosted on an external server. Supported database servers are listed in the Pre-install checklist. Installing or upgrading Mideye Server requires a database account with rights to ALTER, CREATE and DELETE tables in the Mideye database. Detailed instructions on how to set up the database can be found in the Configuration guide.
Firewall
Section titled “Firewall”For required firewall openings, please refer to the Firewall section of the Pre-install checklist. It is possible to proceed with the installation steps below while waiting for firewall openings. However, one-time password delivery requires that the server-switch communication is working.
Installation Path
Section titled “Installation Path”The Mideye Server default installation folder is different depending on the operating system architecture. In this document, all the paths referring to the Mideye Server’s installation directory relate to the MideyeServer folder.
For 64-bit Linux operating systems the default path is:
/opt/mideyeserver/Mideye Server Installation
Section titled “Mideye Server Installation”Copy the Mideye Server installation package to the Linux machine and open a terminal in the same folder as the installation package.
Note: If a previous version of the Mideye Server is already installed, please see the section Upgrade below.
For 64-bit platforms, execute the following command:
# sudo yum install mideyeserver-package-4.X.X.rpmMideye Server, as well as all required dependencies, will be installed.
To finalize the installation, the Mideye Configuration tool must be executed, see the next section.
Post-installation Configuration
Section titled “Post-installation Configuration”Configuration Tool
Section titled “Configuration Tool”When the Mideye Server has been installed, execute the following command as root:
# mideyeconfigNote: if the command is executed from a remote machine through SSH, X-forwarding is needed (adding the -X option to the SSH command). Alternatively, connect with a remote desktop (i.e. using a VNC client/server).
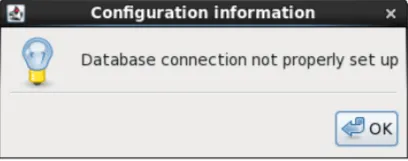
The first time Mideye Configuration Tool is executed, a popup window will inform that the database needs to be configured.
Database not configured
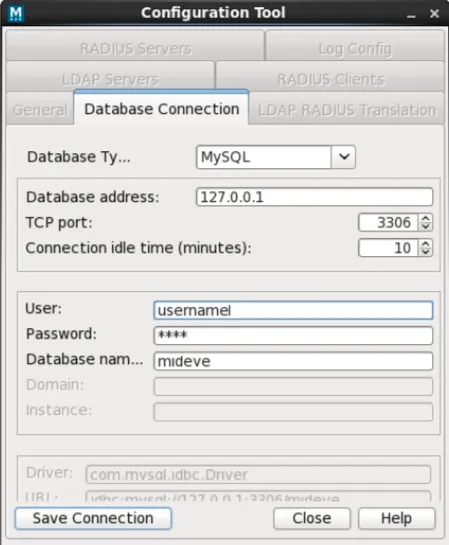
In the Database Connection tab, enter the database credentials (see section ‘Database connection’ in the configuration guide).
Database Configuration
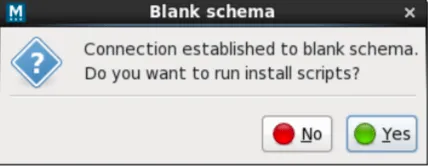
The following dialog will be shown when a connection with the database is established:
Running install scripts on a new database
The install scripts have been executed successfully
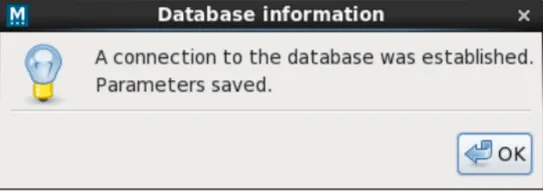
The install scripts will create all the required tables. In order to apply changes, it is necessary to restart Mideye services.
This is done by executing the following command as root:
# /etc/init.d/mideyeserver restartTo check the status of the Mideye Server use the following command:
# /etc/init.d/mideyeserver statusNote: Other possible commands are stop and start.
BUG: Due to changes in CentOS 7 the tomcat 7 service shows an error on startup. This can be ignored since the service is started correctly. To stop and restart the mideye-webserver service you need to kill it with command: kill -9 <pid>
To get the pid of tomcat use command: ps aux |grep tomcat
Upgrade
Section titled “Upgrade”Upgrading the Mideye Server involves two steps: Executing the installation package, followed by upgrading the database.
Backup
Section titled “Backup”Before proceeding with an upgrade, take a backup of the Mideye Server file system and the Mideye database. Some files containing customized settings may need to be replaced after the update.
Mideye Server file system
Section titled “Mideye Server file system”To take a backup of the Mideye Server, copy or compress the whole Mideye Server installation directory. The default directory is:
/opt/mideyeserverTo copy the entire /opt/mideyeserver folder execute the following two commands:
# mkdir /opt/mideye_backup# cp -rp /opt/mideyeserver /opt/mideye_backupDatabase
Section titled “Database”To back up a database on MySQL, run the following command:
# mysqldump -u[username] -p[password] [database name] > mideye_backup.sqlwhere [username]/[password] are the database login credentials.
Upgrade Mideye Server
Section titled “Upgrade Mideye Server”In order to upgrade Mideye Server follow the following steps:
- Download the latest release of Mideye Server and execute the following command:
#yum update mideyeserver-package-4.X.X.rpm-
Enter database connection parameters (see the ‘Database’ section in Pre-install checklist).
-
Click “Save”, then “Close”.
-
Restart services by executing the following command as root:
# /etc/init.d/mideyeserver restart
Note: In Configuration Tool, tab “General”, upper left, you can verify that the Mideye Server has been upgraded to the correct version.
Post-upgrade tasks
Section titled “Post-upgrade tasks”After an upgrade, some files from the pre-upgrade backup may need to be restored:
- Customized log configuration (Syslog, log levels etc):
/opt/mideyeserver/webserver/conf/logging.properties- Customized SSL port for the administrative web interface:
/opt/mideyeserver/webserver/conf/server.xml- SSL certificates for the administrative web interface. Stored in the directory:
/opt/mideyeserver/webserver/conf/- Any custom certificates in:
/opt/mideyeserver/certificatesUninstall
Section titled “Uninstall”To uninstall Mideye Server run the following command as root:
# yum remove mideyeserverUninstallation keeps the database, configuration and log files intact. These can be removed manually by: # rm -rf /opt/mideyeserver
Configuration
Section titled “Configuration”Further configuration of the Mideye Server can be found in the Configuration guide.
Troubleshooting
Section titled “Troubleshooting”This section aims to solve common issues that may arise during the installation.
can’t Connect to Database
Section titled “can’t Connect to Database”Mideye Configuration Tool will not start if a connection to the database can’t be established. To solve the problem delete DbConnection.properties located in /opt/mideyeserver/config:
# rm /opt/mideyeserver/config/DbConnection.propertiesAnd run Mideye Configuration Tool:
# mideyeconfigNow you can reconfigure the database with correct settings.