LDAP & AD Configuration for Mideye Server 4
Overview
Section titled “Overview”Need to connect Mideye Server 4 to your user directory for MFA authentication? This guide explains how to configure LDAP integration with Active Directory, eDirectory, OpenLDAP, and other LDAP-compliant directories. Learn how to set up encrypted LDAPS connections, configure user search parameters, and implement group-based access control.
LDAP Server Configuration
Section titled “LDAP Server Configuration”Mideye Server 4 reads user information (phone numbers, authentication types) from your existing directory service. Supported directories include:
| Directory Type | Default Port | SSL Port |
|---|---|---|
| Active Directory | TCP/389 | TCP/636 |
| Novell eDirectory | TCP/389 | TCP/636 |
| Sun Directory Server | TCP/389 | TCP/636 |
| Lotus Domino | TCP/389 | TCP/636 |
| OpenLDAP | TCP/389 | TCP/636 |
Complete the following steps to configure Mideye Server to read from a directory:
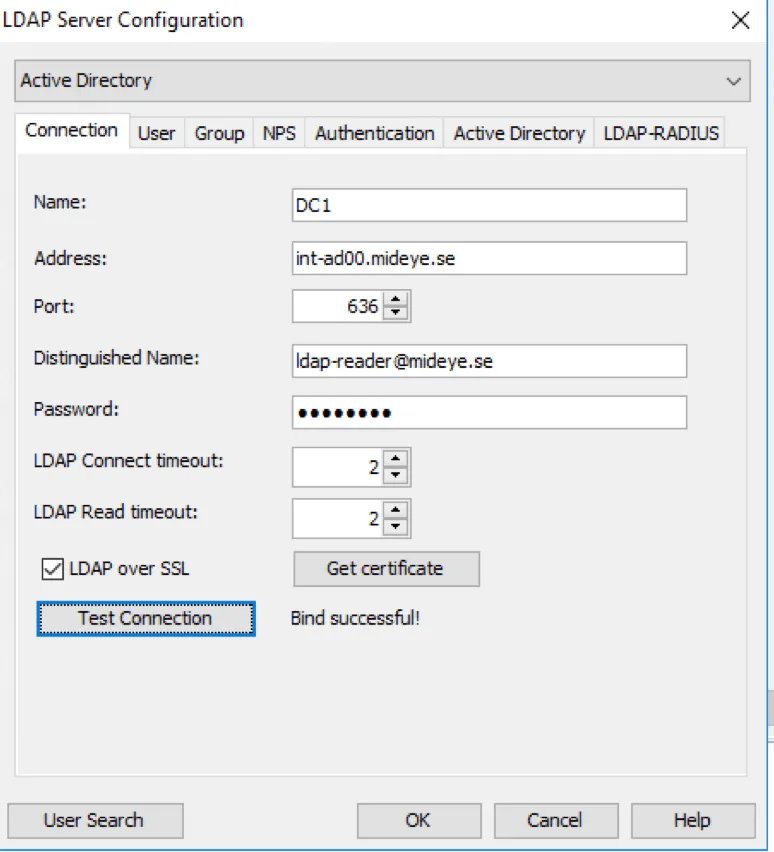
- Choose what kind of directory that should be integrated in the dropdown list. In this guide, Active Directory will be configured.
- Name: Give the LDAP-server a friendly name.
- Address: Enter the IP-address or hostname of the Domain Controller.
- Port: Default port for none encrypted bindings is tcp/389. If a Certificate Authority is installed on the Domain Controller, port tcp/636 can be used to encrypt the connection between the Mideye Server and the Domain Controller. Make sure to check the “LDAP over SSL” and import the certificate from the Certificate Authority when using an encrypted connection. This can be done by clicking the “Get Certificate” button. The default validity length of the certificate used for encrypted traffic between the Mideye Server and the Domain controller is one year. When this certificate expires, Mideye will have to fetch the new certificate by manually adding it using the “Get Certificate” button. Be advised that when the old certificate expires and the new certificate still hasn’t been manually added, all authentication using the LDAP server will fail. See section Extend certificate validation time for LDAPS on how to increase the time from 1 year.
- Distinguished Name & Password: Mideye Server needs a service account and password from the directory to be able to read LDAP-data. This account needs the “Domain User” permission. Enter the username as DN or UPN format. Add the password. Remember to check the flag “Password never expires”.
- Test Connection: Click the Test connection button to verify that it is properly setup.
Extend certificate validation time for LDAPS
Section titled “Extend certificate validation time for LDAPS”This guide offers two different ways to extend the validation time of the Kerberos authentication certificate used to encrypt traffic.
Add the CA-certificate to Mideye Server keystore
Section titled “Add the CA-certificate to Mideye Server keystore”From the Domain Controller, export the Domain CA by executing mmc.exe from the start menu. Click “Add/Remove snap-in” from the File menu and select a certificate followed by “Computer Account”. Select “Local Computer” (or where the CA is located) and click “OK”.
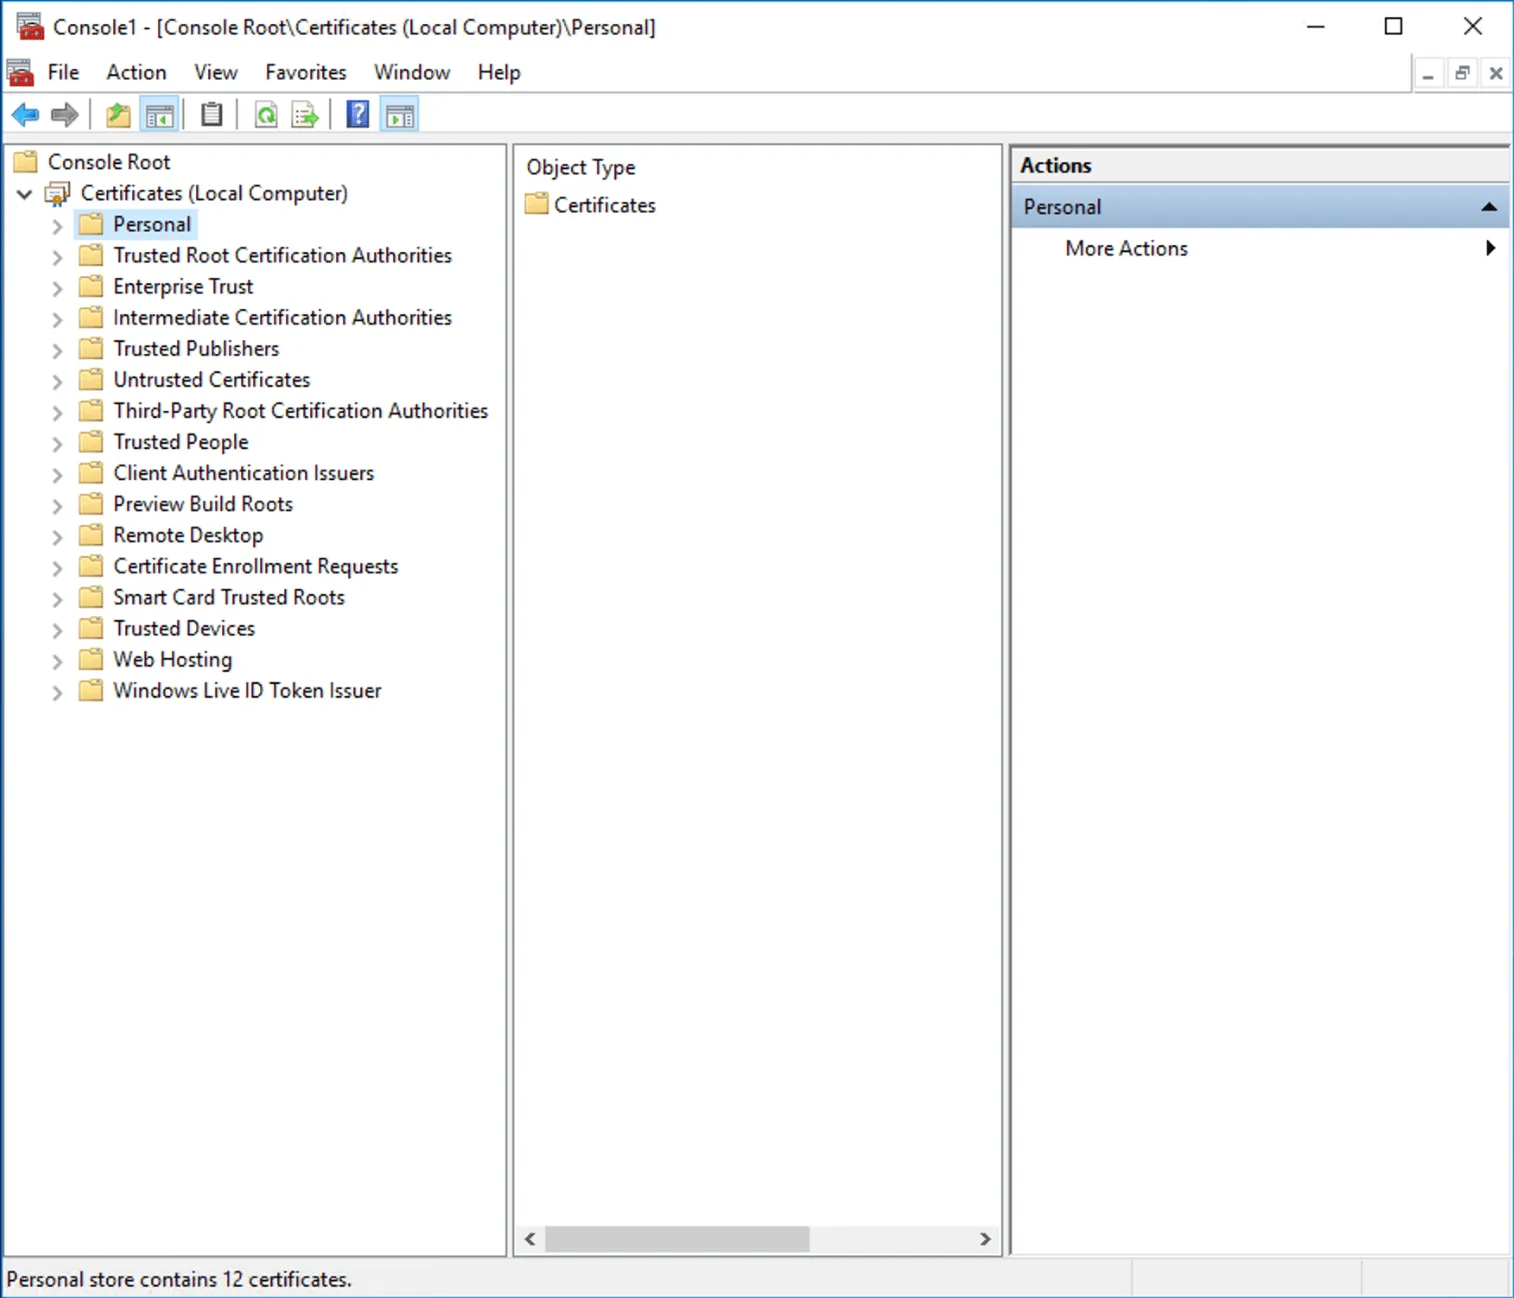
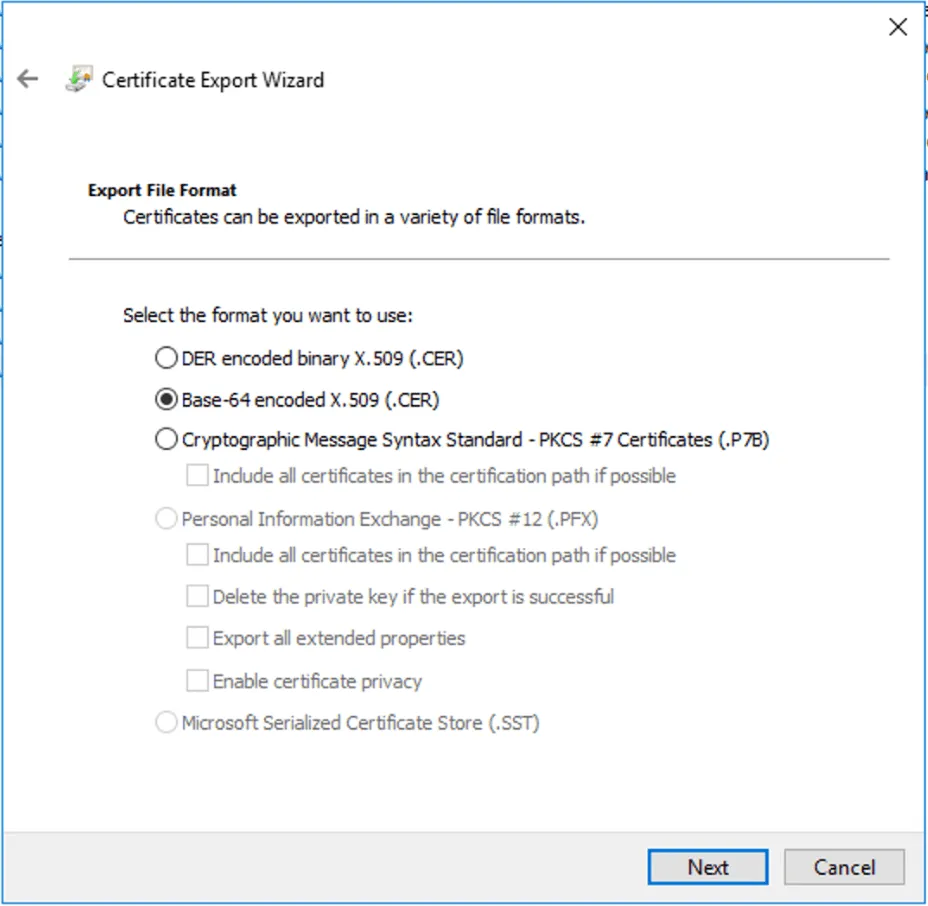
Expand Certificate –> Personal –> Certificate and right-click the CA-certificate and select All Tasks –> Export. Choose not to export the private key. Select Base-64 encoded X.509 (.CER)
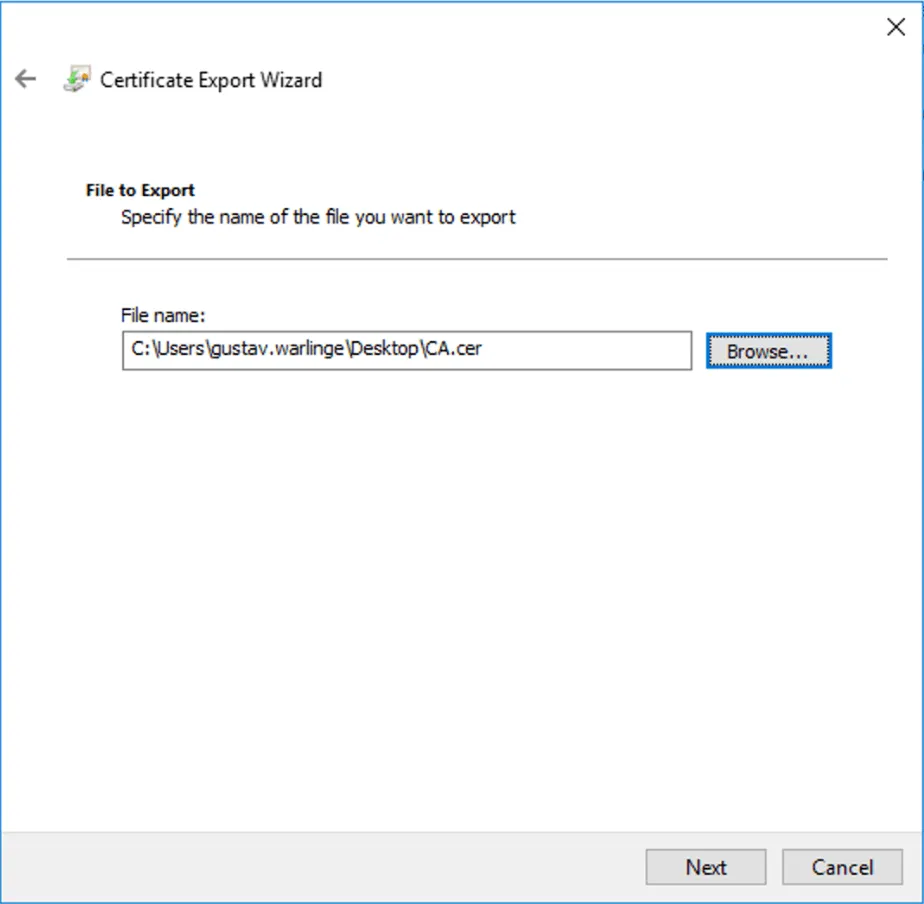
Save the CA-certificate and complete the export.
Import certificate in Windows
Section titled “Import certificate in Windows”Copy the exported certificate to C:\Program Files (x86)\Mideye Server\config on the Mideye Server.
Execute cmd.exe as an administrator and navigate to C:\Program Files (x86)\Mideye Server\jre\bin
Type keytool -import -trustcacerts -file ca.cer -keystore “c:\Program Files (x86)\Mideye Server\config\GipsKey.jceks” -storetype jceks -alias DomainCA
When asked for, enter the password that can be found in C:\Program Files (x86)\Mideye Server\config\DBconnection.properties. Click “Yes” to trust the certificate.
Linux: When asked for, enter the password that can be found in /opt/mideyeserver/config/DBconnection.properties. Click “Yes” to trust the certificate.
Import certificate in Linux
Section titled “Import certificate in Linux”Copy the exported certificate to /opt/mideyeserver/config on the Mideye Server.
Navigate to /opt/mideyeserver/jre/bin
Type keytool -import -trustcacerts -file ca.cer -keystore /opt/mideyeserver/config/GipsKey.jceks -storetype jceks -alias DomainCA
When asked for, enter the password that can be found in /opt/mideyeserver/config/DBconnection.properties. Click “Yes” to trust the certificate.
Create new Kerberos authentication certificate with longer validation time
Section titled “Create new Kerberos authentication certificate with longer validation time”The first step is to allow the Certificate authority to create certificates with a longer validity period than 2 years. From the Certificate Authority server, open CMD.exe as an administrator. Type:
certutil -setreg ca\ValidityPeriodUnits Xwhere X is the desired length that should be allowed. Be advised that this number can not be longer than the validity length of the CA certificate
Type:
certutil -setreg ca\Validityperiod= YearsRestart the Certificate Authority with the commands:
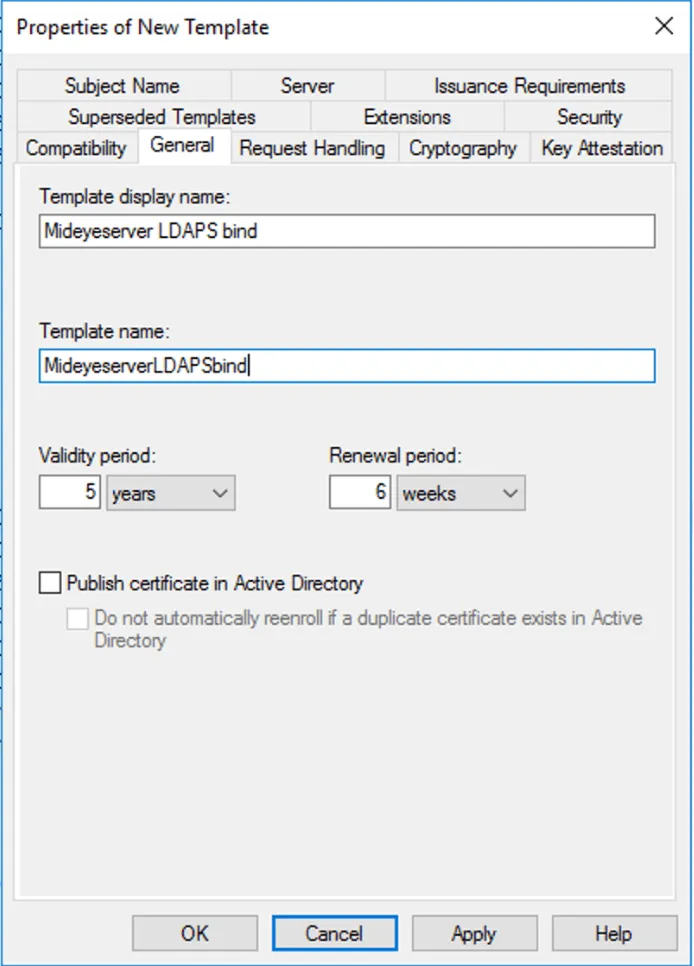
net stop certsvcNet start certsvcFrom the Certificate Authority console, right-click “Certificate Template” and click “Manage”. Right-click Kerberos Authentication template and select “Duplicate Template”. Click the “General” tab and give the template a friendly name and change the Validity period to the desired length. Be advised that the certificate can not have a validity period longer than the CA-certificate.
Change the validity time of the new template
Select the “Security” tab and add the computer account of the Domain Controller. Click “OK” and close the “Certificate Templates Console”.
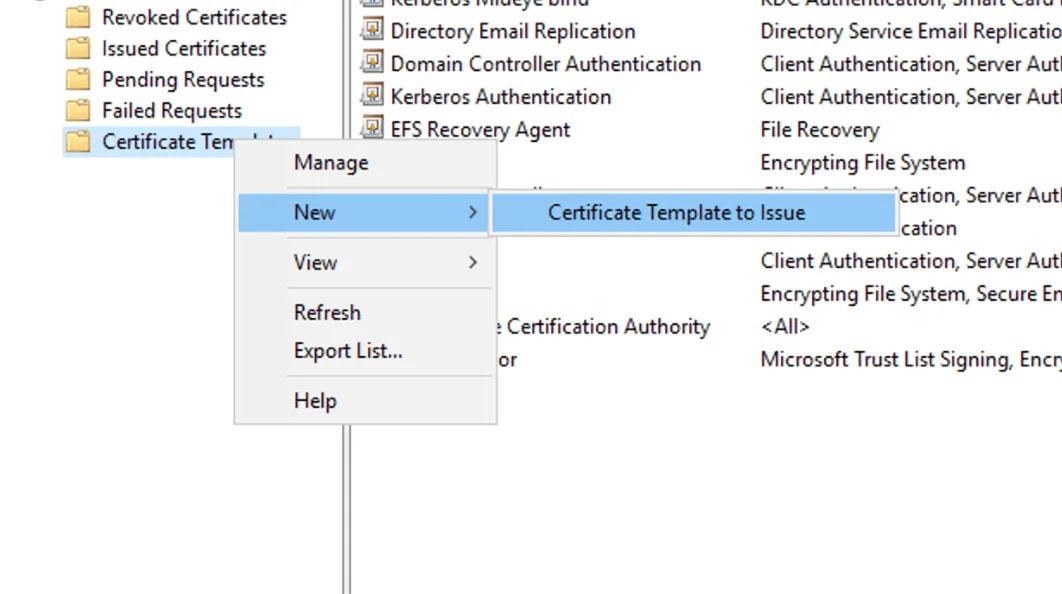
Again, from the “Certificate Authority” console right-click “Certificate Template” and select “New” followed by “Certificate template to Issue”
Issue a new template
Select the created template and click “OK”. Restart the Certificate Authority service.
From the Domain Controller, execute mmc.exe from the start menu. Click “Add/Remove snap-in” from the File menu and select a certificate followed by “Computer Account”. Select “Local Computer” and click “OK”. Expand Certificate –> Personal and right-click “Certificates” –> “All tasks” –> “Request New Certificate”. Select the certificate template created above and click “Enroll”.
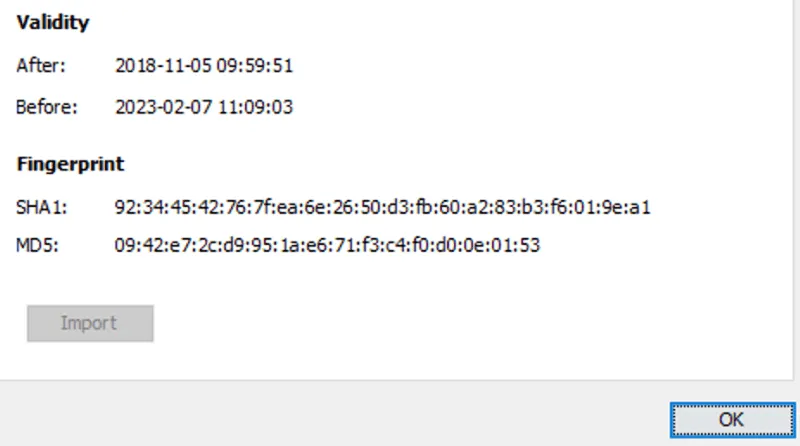
The last step is to update the certificate in the Mideye Server. Navigate to LDAP Servers and click modify on the LDAP server. Click “Get Certificate” and import the new certificate with a longer validity time.
Import the new Kerberos authentication certificate
Restart Mideye Server services by clicking “OK” followed by “Save” and “Close”.
User settings
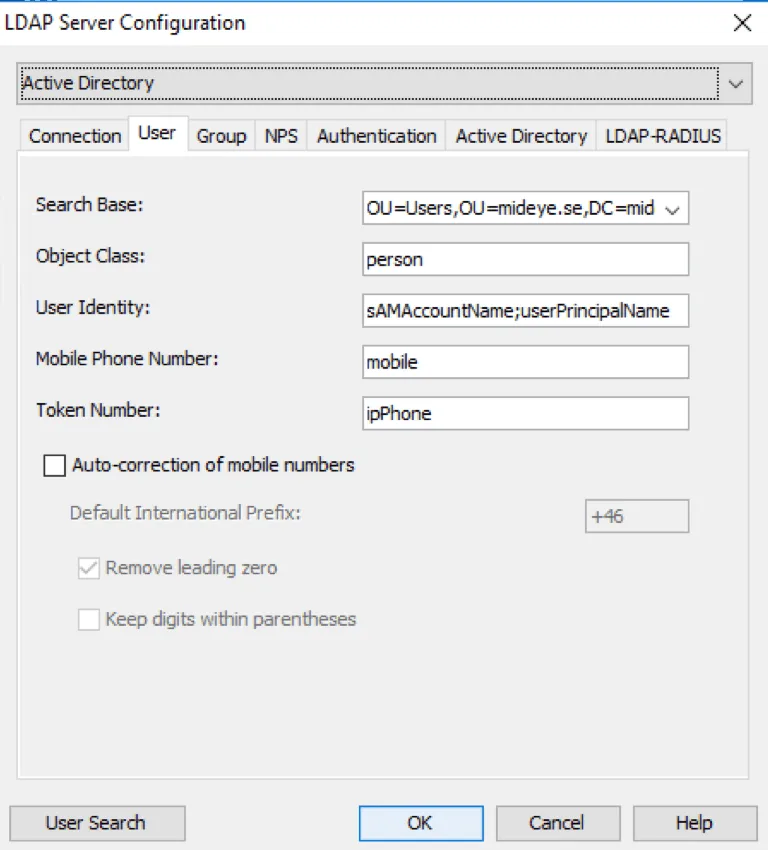
Section titled “User settings”Search Base: When completing the configuration of the “Connection” tab, “Search Base” on the “User” tab will be automatically populated with the root-base of the domain. This can be customised to narrow down what OU:s that should be used to look for users and groups. The “Search Base” must be specified using DN-format. Object Class: Default value for Active Directory is “person” and should not be changed. User Identity: The attribute populated by default is sAMAccountName. More attributes can be added, for example, userPrincipalName. Separate each attribute with a semicolon. Mobile Phone Number: Attribute used to find the user´s phone number. The default value is mobile, but this can be customised to any other attribute. Also, two or more attributes can be specified, meaning that Mideye Server will start searching for data in the first attribute, and continue with next if the field is empty. Separate each attribute with a comma. Example otherMobile,Mobile. Token Number: Attribute used to find the user´s token-number. The default value is ipPhone, but this can be customised to any other attribute. Auto-correction of mobile numbers: All phone numbers must be in international format e.g +4673508455 (Sweden) or +1123456789 (US). If not, auto-correction can be used to automatically add the prefix configured in the “Default International Prefix”.
Group Settings
Section titled “Group Settings”To further control permissions, a group check can be configured that will control what users who should be able to access the resource protected with Mideye. This can be done by adding a group in Active Directory and add the DN of that group in the “Group(s):” field. Starting from Mideye Server release 4.2.5 distinguished names can also be used with wildcard/Java Regular Expressions, e,g. CN=Mideye-administrators.*
To add more than one group, separate each with a semicolon.
If the group specified contains groups inside, make sure to enable “Search nested groups” in the Active Directory tab.
Add a group containing users allowed to authenticate with Mideye Server.

Web GUI LDAP login (optional)
Section titled “Web GUI LDAP login (optional)”As an alternative to local database accounts, existing LDAP (e.g. Active Directory) accounts can be used for Web Admin login.
Prerequisite
Section titled “Prerequisite”To enable LDAP login for Mideye Web Admin, an existing LDAP Server must be configured. See section LDAP Server Configuration for detailed how to set up an LDAP Server in Mideye Configuration Tool.
Configuration
Section titled “Configuration”-
Open Configuration Tool, navigate to the LDAP Server tab and choose to modify an existing LDAP profile.
-
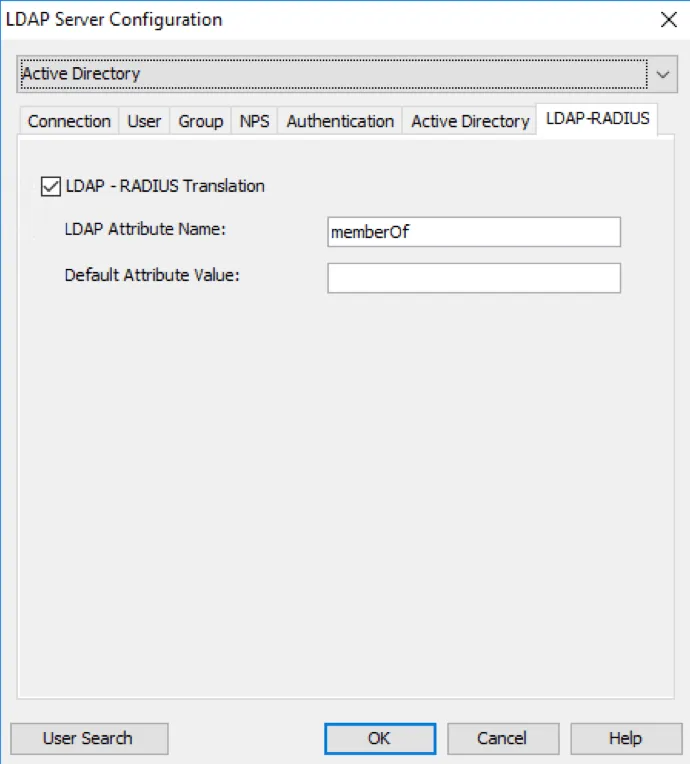
Navigate to “LDAP-RADIUS” tab, mark the “LDAP-RADIUS Translation” checkbox and specify the attribute name “memberOf”. This restricts access to Web Admin based on group membership.
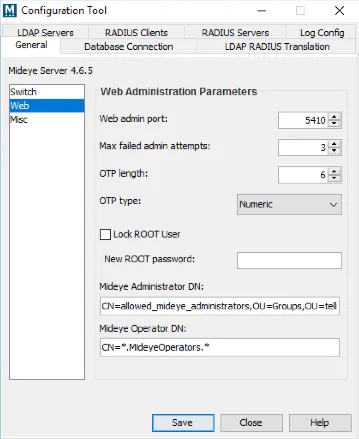
- Configuration Tool -> General, select ‘Web’ in the left menu. Specify the group memberships required for Administrator and Operator accounts. Group names can be specified using wildcards/Java regular expressions, e.g. CN=Mideye-administrators.*
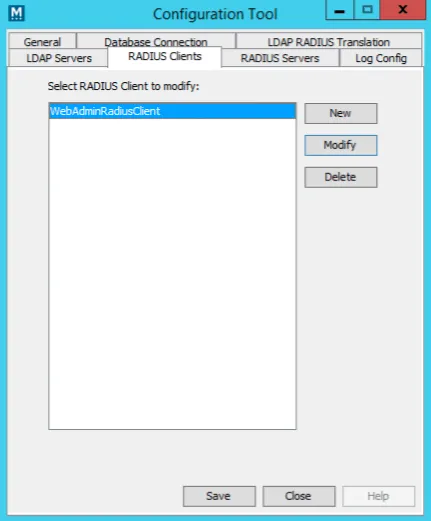
- Configuration Tool -> RADIUS Clients: select the pre-configured RADIUS client for Mideye Web Admin.
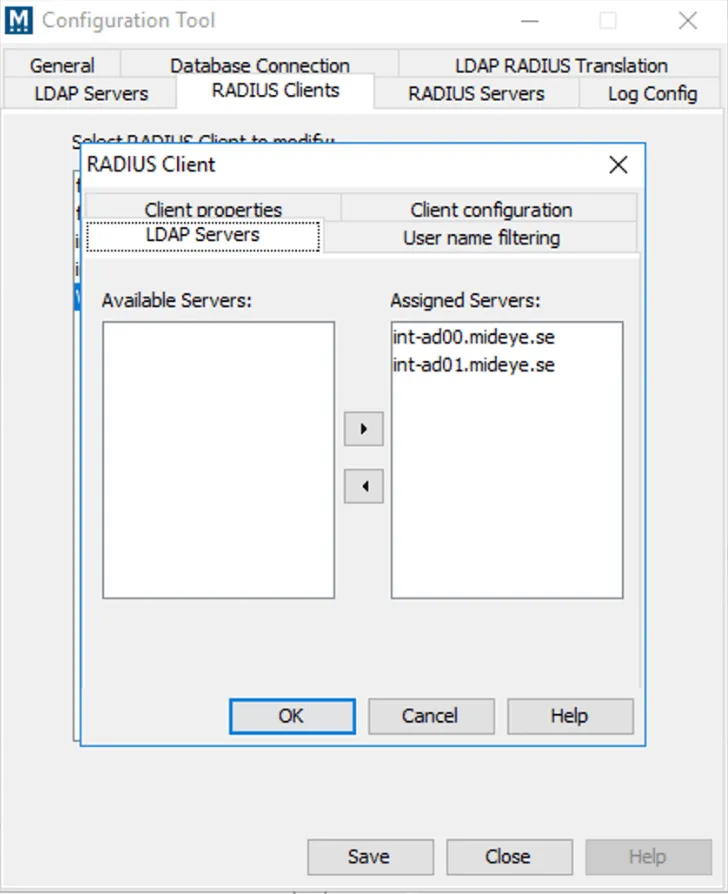
- Select ‘Modify’. In the LDAP Servers tab, assign the previously configured LDAP profile to this client.
Verify LDAP-server
Section titled “Verify LDAP-server”Navigate to LDAP Servers and click “Modify” on the selected LDAP Server. Click “User Search” and search for a user that should be within the configured Search Base.
Troubleshoot LDAP-server
Section titled “Troubleshoot LDAP-server”If a user can not be found, verify the following:
- Make sure that the user have the correct format on the attribute configured for the phone number. It must be in international format e.g +46735084555, or auto-correction of mobile numbers must be enabled.
- Make sure that the user is part of the search base configured in the “User” tab.
- (Optional) Make sure that the user is a member of the group specified in the “Group” tab.
- If a group check is enabled, and the user is part of a group inside the group specified, make sure that “Search nested groups” is enabled in the “Active Directory” tab.
- Make sure that the format of the search is specified in the “User” tab. By default, only sAMAccountName is specified. Add ;userPrincipalName if user@domain.xx should be enabled.